Wood Shed Plans 12x12,Apexstone Soft Close Lid Support Installation Dataset,Collins Miter Clamps Home Depot 75,Under Bed Truckle Drawer - Step 3

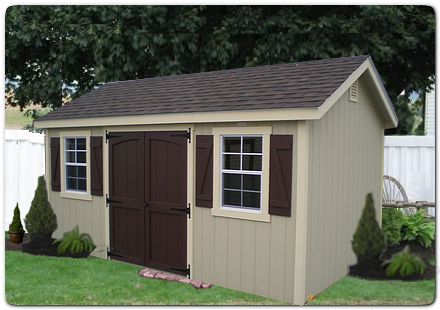
Fit the interior rim joists. Next, you need to attach the intermediary joists to the floor frame. Use joist hangers to lock the beams to the frame. Assemble the front panel of the shed from 2x4s. Cut the components at the right size, using the instructions in the diagram. Align the edges and make sure the corners are square. Assemble the side walls for the shed. Make sure the corners are square and leave no gaps between the components.
Fit the side walls to the floor of the shed. Fit the front and the back walls to the floor of the shed. In addition, you need to lock together the adjacent wall frames and the corresponding top plates. Attach the siding panels to the front of the shed, as well. As you can easily notice in the diagram, you need to cut out the opening for the door. Mark the cut lines and use a saw to get the job done.
Fill the holes with wood putty and let them dry out for a few hours. Smooth the surface with grit sandpaper and remove the residues with a damp cloth. Top Tip: Apply a few coats of paint or stain to the components, to enhance the look of the project. Take a look over the PART 2 of the project to learn how to build the roof for the shed.
If you want to see more outdoor plans, check out the rest of our step by step projects and follow the instructions to obtain a professional result. I really like these plans, however can someone provide me a coat on building this shed? I want to compare from the DIY kit sheds you can buy. How long is a day typically? The plans mention a day to build, but I have a guy on day three. Any suggestions?
Good morning. I need help! This is the 3rd time I have contacted you and sadly each time no one has responded to me. I would LOVE to stop contacting you guys and get on with my project. Please review the previous messages that I have sent and respond accordingly. I need to move on but cannot since I have not been able to update my materials list, plans, as well as clarification on the 12 x 12 Gable Shed. The way that you guys have it is all screwy.
No pun intended. Thanks and have a nice day? I am so sorry but I have been checking every few hours and the message that you sent that said that you had already responded is the first and only response that I have seen.
Had I seen another one I would have not written my last message to you. Also, I have tried to look for your response throughout the site and have not come across it. Use the notes below for additional information on the items you need. Please save the file to your phone or computer so you can read or print it any time in the future. Share this: Click to share on Facebook Opens in new window Click to print Opens in new window Click to share on Pinterest Opens in new window Shed Building Forum Please visit my shed building forum if you have any questions about my plans before or after your purchase them or if you have any questions about the shed building process.
Pressure treated lumber is designed for long term ground contact without rotting or being eaten by termites. Pre cuts are cheaper and often times better quality lumber.
Composite siding holds paint better than real wood siding and speeds construction over using a plywood or OSB base and covering with strips of siding. It comes in various grades and thicknesses depending on your budget. This offers the best of both worlds, strength and durability. Regular composite siding will still give you a long service life as long as you keep it painted properly.
Most of them are rated for 20 or 25 years. You can do it with a circular saw but your cuts will not be so nice. No groove siding is siding without the normal grooves in it. Or else you will have a lot of waste if you try to plan your cuts around the existing grooves in the normal siding. It just needs to match the texture so that it matches when painted.
Or you can buy ready made trim boards but they are very expensive. But I strongly recommend against this because real wood will take lots of extra prep time and effort and still will not give you as nice a finish product as composite hard board trim. F CDX is the cheapest and roughest grade of plywood with cracks and knots in the surface. You can use a better grade for a nicer floor finish. You can use either normal square edge plywood or the more expensive tongue and groove especially designed for floors.
But you can use either. I Felt paper, 15 or If you want to install metal instead see this post on my website: CheapSheds. A better option is a single heavy duty piano hinge that runs the entire length of the door.


|
Jerry Rig Carving Vise Image Modern Woodworking Projects For Beginners Job Do It Yourself Wood Bench Plans |

OnlyForYou
03.10.2020 at 18:38:57
DelPiero
03.10.2020 at 18:39:35
ANTIKVAR
03.10.2020 at 21:14:16
ToTo_iz_BaKy
03.10.2020 at 17:24:52
plotnik
03.10.2020 at 12:36:12