Salad Bowl Finish Butcher Block Countertops Diy,Best Selling Rap Debut Albums,Wilton Woodworking Vise Review 31 - Step 3
My daughter spent her first night away from home with her grandma and we worked all day and some of the night. I did all of the painting while Justus took care of trim work, light fixtures, and other time consuming details. I had never painted cabinets before in our previous house we purchased new cabinets when remodeling our kitchen and I was very nervous. But there was really no reason to replace these cabinets.
Sure, they were ugly, but these cabinets were as solid as could be, made with thick oak wood. I visited our local Benjamin Moore store and they helpfully pointed me in the right direction as far as what kind of primer to purchase and a cabinet paint roller.
I painted one coat of primer and three coats of paint. I used the same color for the cabinets and walls Simply White by Benjamin Moore. Since our kitchen is on the small side, I knew white would not only brighten the space, but also make it appear larger. The warmth of wood looks beautiful with an all white palette.
These countertops are my favorite thing in our kitchen. They were made by my husband and father-in-law from year-old reclaimed barn wood you can read more about them here. We were fortunate that the countertops were essentially free since my father-in-law had the wood and tools needed to build the countertops on hand. The countertops are an example of being resourceful though… sometimes unique and lovely things can come about when you have to think outside the box.
When we purchased our house, the original bead board was covered with foam tiles. Justus and I had no idea what the condition of the bead board would be in when he removed the tiles. He did the laundry room and kitchen at the same time and we were pleasantly surprised that although the bead board was covered in pealing old teal paint and had a few holes, it was in a salvageable condition.
This was a very dirty project and Justus did it all himself since I was pregnant and we knew we were potentially dealing with lead-based paint. He shut off this section of the house for a day and wore a face mask when sanding and making repairs. He then added a coat of primer and a coat of paint before opening this section back up.
I added three more coats of paint after that to ensure everything was sealed properly and would be for several more years. This was a very positive thing since the back portion of our house originally was a porch before there was such a thing as indoor plumbing and has a lower ceiling height than the rest of the house.
Justus added trim on top of the cabinets for a finished look. The farmhouse sink is also original to the house and fortunately is in excellent condition. We also replaced the dishwasher. The white bead board cabinet is something I found prior to purchasing our home and I use it for a pantry you can read more about it here. Later I purchased this wood piece at a local antiques store and I use it for extra storage since we have a limited number of cabinets.
I love both pieces in the kitchen since I feel like they must have been made around the same time period as our house and the bead board gives a cohesive look. This view is looking into the laundry room and then a bathroom. And actually I feel like a little variation from bead board is okay… our entire house is bead board!
We have some ideas in mind for additional improvements, but with an old house, a budget, and limited time, you learn to prioritize home repair projects and be content until the time is right. My butcher block countertops may be my favorite thing in my kitchen.
When we remodeled our kitchen last year, I told my husband that my ONE requirement was that I wanted butcher block countertops. The only problem? The affordable butcher block Ikea was 5 hours away and butcher block offered online was back-ordered up to 6 weeks. Lucky for me, my father-in-law had literally a pile of year-old oak wood from an old chicken house. He also had the power tools needed to build the countertops.
Although power tools are needed, the process is quite simple:. Find your wood. Good, straight boards without nails that have at least a quarter inch that can be planed down would be your ideal choice. When my husband brought the countertops home to be installed, I was blown away by how beautiful they were. There is also a backsplash. I had not originally thought we would have one, but I love the additional warm wood in the white kitchen. Do you see the nail holes at the top of the backsplash?
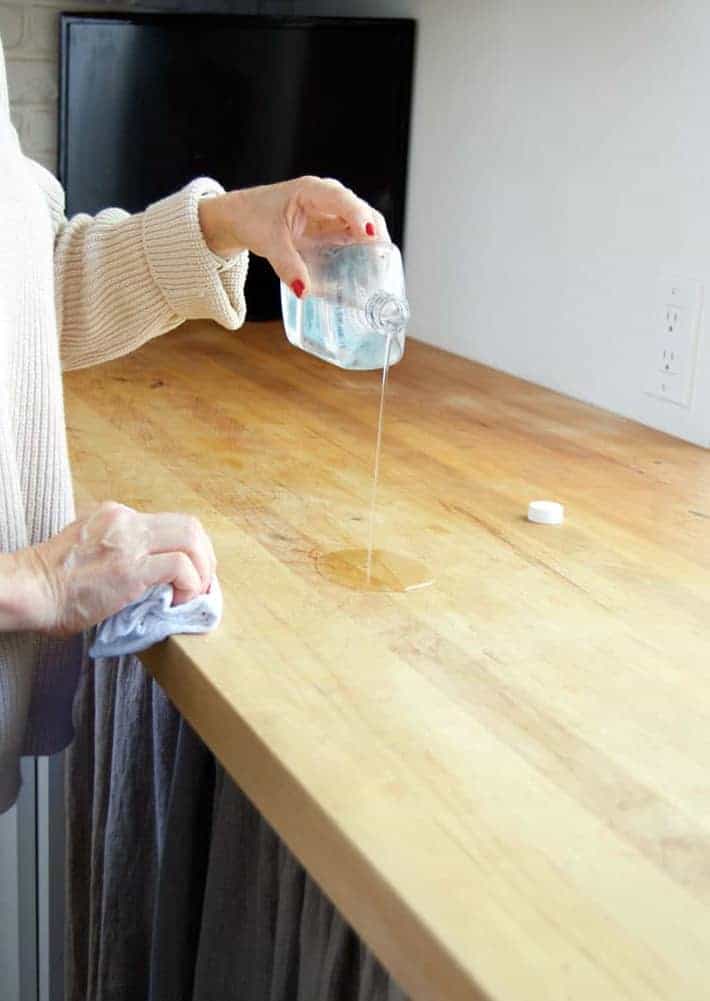
I was worried that butcher block would be hard to maintain. Salad bowl finish I have used this finish for at least 25 yrs. Have discovered that by using a piece of cloth to apply it, have had no problems with runs. Good stuff I having been using General Finishes Salad bowl finish for a couple years now. Most of my bowls are pine. I wet sand the first coat with grit to cover any lingering blemishes, then fine sand prior to another two or three coats.
At least 12 hours between coats, more when its cold in the shop. I get a beautiful smooth final finish with a lot of depth. I use a minimum of 3 coats, lightt sand in between on all my bowles, platters and hollow forms. American Specialty Hardwoods rolling pin This is a great product. I have been looking for a long time to replace polyurethane and finally found it. Great high gloss finish. I made some bowls out of… I made some bowls out of maple and walnut and was amazed at how this product brought out the beautiful grain of the wood once applied.
Question: How would this work on carved wooden spoons that are actually intended to be used regularly for serving food? I am concerned it will wear too quickly. Answer: I own 2 sawmills in Texas. Additional coats produces a slightly gloss finish. Stands up to daily rinses in hot soapy water. Hope that helps. I use it to restore restaurant cutting boards used daily and not well cared for by staff.
The finish is highly durable and an occasional re-coat maintains the luster. By Steven W. Rust on July 21, It wears well— FDA approved I believe— also I have used it on cutting boards but no as a cutting surface a serving surface and has outstanding gloss —spoons should wear well—several coats making sure dry times— saturating deep in the grain of the wood. By moemadebb on July 20, Never used on spoons but on cutting boards and after a year the finish is still good.
Safe to use and should be great on anything used around food. By Bjohns on July 20, ByPeteon October 13, Verified Purchase I really like the finish on my bowls after at least four coats of salad bowl finish they get a nice gloss to them you can just see the difference on them after each new layer put on. Very good finish and easy to put on. I used multiple thin coats applied with a cloth to a large salad bowel and the results were excellent.
It was best to let dry overnight before subsequent coats also used grit sanding between coats. It is a good product for applications that come Salad Bowl Finish Butcher Block Countertops With in contact with food … Bought and used this a few times. It is a good product for applications that come Salad Bowl Finish Butcher Block Countertops Canada in contact with food or food utensils. There was a bit of a learning curve for me however. I have learned to spend extra time with the first coat. Keep wiping it on when you see it has absorbed into the wood, primarily end grain.
I just keep wiping more on until it stays wet evenly, then do a final wipe to even it out. Leave extra time for the first coat to dry, I do both sides the first time. I sand with between coats and alternate sides, every 3 or 4 hours seems to work of me.
If I see a spot that still soaks in I just apply more until all is wet then do a final wipe to even out just like with the first coat. Last coat gets steel wool instead of sanding. The more you put on the glossier it gets. Last coat is just a thin wipe. I am experimenting with using this as a sealer coat before using oil or wax.


|
Walnut Turning Blanks For Sale Verification Wood Projects Using A Router Jacket Groove And Tongue Router Bits 40 |

LEDI_RAMIL_GENCLIK
30.05.2021 at 14:37:40
SeXy_GirL
30.05.2021 at 11:17:16
FILANKES
30.05.2021 at 18:16:36
Simpson
30.05.2021 at 17:48:45