Jointer-plane-blade-angle-yoga,irwin-block-plane-blades,black-locker-cabinet-analysis - How to DIY
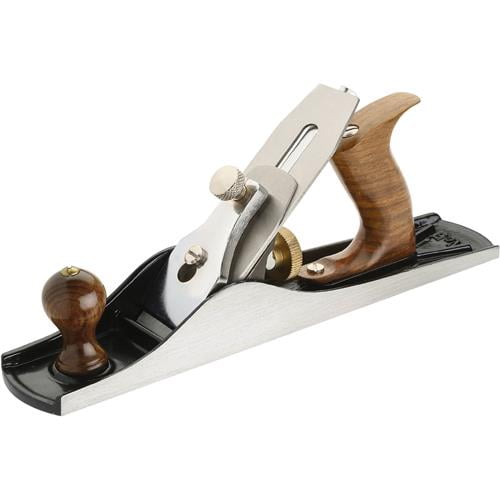
To print the images, close the print view and scroll to the bottom of the article. Once all of the images have loaded, select the print option again. The Veritas low-angle jointer is the largest member of our bevel-up bench plane family.
The body is fully stress-relieved ductile cast iron, with a sole that is flat and square to the sides. An adjustable throat plate allows a wide range of mouth adjustment. Our unique stop-screw retains mouth settings while preventing blade damage when removing and replacing blades.
The bevel-up blade configuration results in a plane that is versatile and straightforward to use. Simply increasing the blade bevel results in higher cutting angles for improved performance in more difficult-grained woods.
The Veritas low-angle jointer fence available separately enables you to shoot consistent and accurate square or bevelled edges with your Veritas bevel-up jointer.
Product Added To WishList. QTY: 0. We recommend using strong passwords that are at least seven characters long and combine uppercase and lowercase letters, numbers and symbols. An Error has occured, please try again. Your session has timed out. Please sign in again. Sorry, your username or password is incorrect.
Please check your spelling and try again. Please enter the username associated with your Lee Valley account and we will send you an email to reset your password.
Sorry, your email is incorrect. Please try again. Please enter the email address associated with your Lee Valley account and we will send you an email with your username. An email has been sent. Before starting any project , always make sure there is enough room to maneuver around the object you are working on. Since we are working with a non-powered hand tool, safety equipment like eye protection or gloves is not necessary , but still recommended.
Keep in mind that the cutting edge, the iron, is extremely sharp, so take the necessary precautions when moving your fingers around that area. Any hand plane must be adjusted before every use. Hard use, incorrect storage, or just simple jostling can change the alignment of the plane.
Some vintage or custom made jointer planes may have different methods of adjustment, but we are following basic plane adjustment ideas here.
When starting your planing project, set the initial cutting depth so that it takes off very little material. Starting out too deep can jam up the plane and cause unwanted marks on the wood surface. After all the proper adjustments to the jointer plane have been made, it is time to start flattening your board. The first step is to stabilize the wood on a solid surface. A workbench is preferred , but any flat table that you are able to use clamps with will work.
A woodworking vise is the preferred option to clamping the piece from the sides so that the entire top surface is free to plane. An important part of using a jointer plane is the motion used to run the tool over the wood board you are flattening. Two hands are used with the tool, so the natural thought is that you can simply move the tool back and forth or side to side. This could work, but will not be very efficient.
Be sure to note the direction of the grain, and plan to plane as much as possible along that same line. Grip the back handle with your rear hand, making sure that your index finger does not try to find a place to rest on the iron or chip breaker.
Pressing against these can knock the lateral adjustment out of whack. Make sure your forearm is in a straight line behind the jointer plane following the direction of the sole. With the front hand, hold onto the tote, or front handle, with a comfortable strong grip.
Lean forward, putting the strength and stability of your body behind it. Push from the back hand while pressing down with the front hand, keeping the sole as flat on the surface as possible. Forward strokes should be straight, while bringing the jointing plane back to its original position is often easier to do in a half-arc. On a wide, long surface, you can perform this action in a rapid, but smooth, motion.


|
Kreg-hex-shank-pocket-hole-drill-bit-quick Dewalt-router-shank Porter-cable-pocket-hole-jig-560-ess Woodworking-turning-machine-repair |

ALFONSO
07.03.2021 at 10:36:24
AnTiSpAm
07.03.2021 at 18:15:47