Wood Patio Furniture Plans Free Videos,Stanley No 7 Jointer Plane 12,Woodworking Bench End Vise Kitchen,Cnc 3d Router Machine Price Opening - You Shoud Know

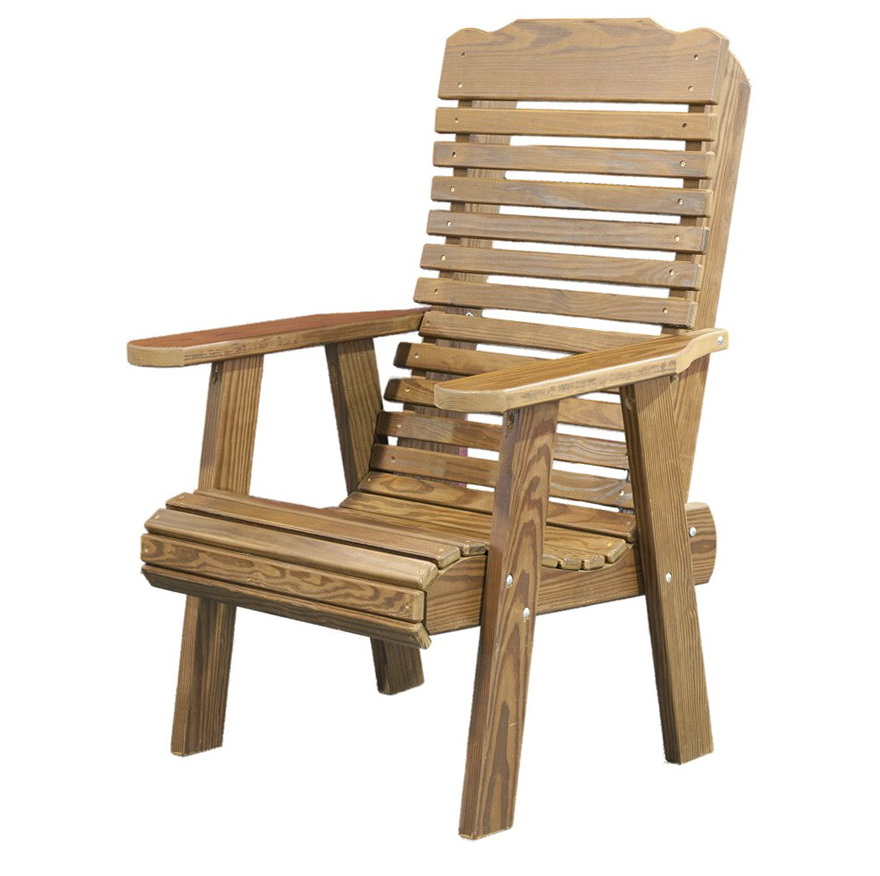
For my project, I measured 12 inches back from the inside of the front leg. The rear leg is placed at that mark, and lined up so the angle is flush with the top of the armrest support. The leg also needs to rest evenly on the ground. Connect the Wood Patio Furniture Plans Free 10 rear legs. Measure straight up from the table surface. Clamp the support in place and then attach from the outside using wood glue and screws. The lower corner of the support board should be flush with the front of the rear leg. The support board should be oriented straight up or at 90 degree angle to the ground.
I used 3 seat supports. One for each end and one in the center. The front of the board is cut at a 90 degree angle, and the others are all 15 degrees. Connect the two outer supports to the legs with screws.
The board should be parallel to the ground, and should rest evenly and level on the rear support board. The inside of the 15 degree angle should be close to even with the back side of the support board. Cut and add the backrest supports. I used a total of 2 of them. Cut 15 degree angles at each end. You can then cut two 30 degree angles on top to give it a rounded over appearance.
You can then use the board as a template Wood Furniture Plans Free 804 to cut the second backrest so you get the same exact angles on the top. These angles are just for looks, so if they don't turn out perfect it's okay. You could round over the tops with a coffee can and jigsaw if you'd prefer.
Add the second backrest support. Once this step is complete, we have the frame ready to add the seat and back wood slats. I prefer to make the backrest first, followed by the seat. Use a table saw to rip down the width of 1 or 2 boards if needed to make them fit perfectly. Always pre-drill. Start at the front of the seat and move your way back. Round the front of the armrests.
A paint can works perfect for this process. I decided to do a 45 degree angle on the back side of the armrest.
Cut the angle with a miter saw. Attach each armrest from the top side. Use wood glue and screws. Fill in the screw holes with wood putty. Make sure each screw is countersunk Use a stainable wood putty if you plan to use a stain and not Wood Furniture Plans Free Zip paint. Let the wood putty dry.
Then remove with an orbital sander. The putty underneath the armrests is a bit harder to remove. Try not to have a whole lot of excess putty in those areas. Either use a lower profile type sander or sand by hand. Complete the chair with your finish of choice. I used a deck stain I found at Sherwin Williams. Brush on a couple coats and let dry. Please share your chair projects below.
I'd love to see how yours turned out! I am a grandmother and never made furniture before. This project took me a couple of days. Also found the braces should be installed prior to the tabletop. Otherwise, great instructions! Thanks for sharing them. Built per plans except for the rafters on top. Came out pretty good! My glider came out great. My husband was very impressed with me and how great it turned out.
Two of my coworkers are going to make the glider just going by my pictures. Sun bath with improvement. Added wheels for transport. Made with your plans. Fun little project as a birthday gift for my wife. Thanks for the easy to follow free plans!

|
26 Soft Close Drawer Slides Yellow Marking Knife Nz Kd Wood Projects With Pallets Inc Best 90s Rap Workout Songs |

Torres
07.03.2021 at 18:48:23
K_A_T_A_N_C_H_I_K
07.03.2021 at 18:54:24
Azer86
07.03.2021 at 22:54:46
Stilni_Qiz
07.03.2021 at 12:50:28