Using A Jointer Plane Youtube,Top 10 Router Tools,Jet Air Filtration System Afs 1000b Iso - Plans On 2021

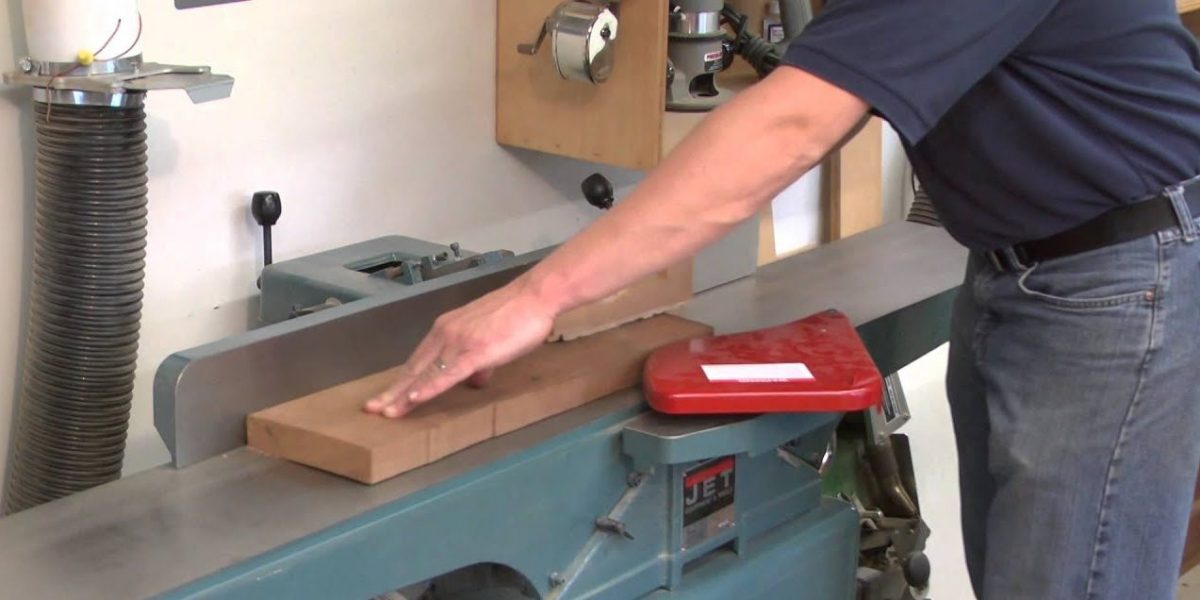
Then flip the non-marked boards and mark the other side. When you take the stock to the jointer remember to always place the marked face against the fence and you will produce complementary angles at glue-up time. Start by placing your board against the fence with the desired edge on the table.
This is a good time to double check that the board sits flat against the fence and does not appear to be twisted. With your left hand on the top edge near the front of the board, maintain pressure both downward and toward the fence. The goal is not to flex the board flat, but rather to simply control it as it passes the cutterhead.
Pushing down too aggressively will distort the board, Using A Jointer Plane Quotes resulting in a concave edge when you have completed the pass. As your left hand passes over the cutterhead, lock it into position a few inches past the cutterhead. You have now changed from using the infeed table to the outfeed table as your reference surface. This transition should be smooth, and this is where many jointing procedure problems occur.
After making this transition the left hand should remain in the same position for the duration of the cut, maintaining both downward pressure as well as holding the board firmly against the fence. At this time your right hand should continue with steady feed pressure as well as pressure toward the fence.
Maintain a steady feed rate. Feeding stock too quickly can also result in a rippled surface finish. If you are more comfortable feeding the stock using a push block, feel free to do so, especially for narrower stock.
Following these simple procedures will enable you to consistently produce perfect edges on your boards, eliminating frustration and quality problems in your projects. Click here to cancel reply. You may have helped to solve my problem…I continuously produce crowned boards when planing…. I will make a point to maintain downward pressure on the outfeed table once my left hand passes by the cutterhead.
This sounds like an excellent practice for the jointer. Lately I have using the jointer as a paperweight since my results were so poor. Thanks alotly. There is not a direct corresponding video this article; sorry. I do not use my jointer because I have too many problems with end cut gouging, I think you may have helped me see the problem. Has anyone ever run the cut end cross grain through the jointer?
I would assume this is not recommended. This was very helpful for me with the tips on reading the grain and compensating for out of square fence. I will be using my jointer more, thank you. I Taytools Jointer Plane Youtube believe my jointer is set up accurately but no matter how I feed, material is removed from the leading edge and little to none is removed from the trailing edge, resulting in a tapered board.
Sorry fpr the late response but i had the same issue and i solved ot by lowering the outfeed table slightly like 1-m at most. Same here. Always takes a lot of wood out in the beginning, then fades to nothing.
I cannot lower the outfeed table. WHY are you always endorsing a band saw? A table saw with a fence would work much better in most situations IMO. The reason for the band saw is most likely due to the board not having any straight edge yet and it is much easier to just take a pass on a bandsaw and cut off the worst part and then move to the jointer to straighten the edge than it is to put a wobbly board through the table saw, not to mention a bit safer with the bandsaw as having a bowed edge could result in a catch and massive kickback on the table saw which could be injury or even loss of life depending on the situation.
In any woodshop it should always be safety first. Hi Barry. Then you take the board to a thickness planer to […]. Same for edge jointing these boards. Hi Robert. It depends how flat the boards are to begin with. If they are relatively flat, you can probably still face joint them on the jointer. If not, you probably want to use a hand plane to establish one flat face, then plane the other side in your planer, and then flip and plane the side that you hand planed.
Same thing for edge jointing. If they are reasonably straight, try it on your jointer. Thanks, Paul. Some people have luck with this approach, but if the capacity of a board exceeds my jointer I just go with the router approach.
Still no infeed table extension? Hi Bob. It is challenging to establish and maintain the extension to be perfectly parallel with the infeed table, but if you are able to achieve this it would help with face jointing such a large board.
If that does not produce satisfactory results, you might consider using a hand plane for this. I am very new to all this, I only have a baby jointer and baby planer. I thought I could plane one face first, then joint edge it.
I am assuming that is wrong. Thanks in advance. Hi Alex. Here is the sequence you should follow: — face joint one face- edge joint one edge- plane the opposite face- rip the opposite edge If you use a planer to plane the first face rather than a jointer, there is a high potential that you will not produce a flat board because the planer will follow the contour of a warped board.
When you pull it out of the other end of the wood jointer, it will be less warped. This process has to be repeated a few times in order to straighten out the wood depending on how warped or […].
Hi Steve. Any time you remove the guard on a jointer, however, you should be on heightened alert and plan out each step very carefully. Then, as soon as you are done with your rabbets, put that guard back on the jointer. Thanks Paul-Woodworkers Guild of America. Any suggestions? Hi Randy. Thank you for contacting us. You can copy and paste the article onto a Microsoft Word Doc. I hope that helps! Cut as many wooden boards or blocks as you wish.
Just remember that when the task is finished, you need to turn the machine off. Make sure you watch it stop completely before leaving it. You can make use of the joint planer for many different types of woodworking projects. Bookshelves, cabinets, doors, windows, and lockers require the use of wood with smooth and even edges.
Take full advantage of the joint planer for every woodworking application. We welcome your comments and suggestions. All information is provided "AS IS. All rights reserved. You may freely link to this site, and use it for non-commercial use subject to our terms of use. View our Privacy Policy here. Toggle navigation subscribe. How to Use a Jointer Planer.
Written by Militsa Danova. To ensure our content is always up-to-date with current information, best practices, and professional advice, articles are routinely reviewed by industry experts with years of hands-on experience. Hannah Madans. What You'll Need. Jointer planer.
Push block. More From Doityourself Weatherizing 7 - Weatherstripping. Choosing Hardware for a Bookshelf Cabinet. Related Posts Workshop sub panel.
I would like to add a sub panel to an area where I am building a workshop i Read More. Making a Extension Cord. Hello, I am currently in need of a extension cord for my Jointer. Upgrade 20A to 30A breaker? Is there a 2. Related Posts Planer tearout formerly Planer snipe. How do you ever noticed that sometimes things work exactly the opposite to Planing with a Dewalt DW planer.


|
Orbital Sanding Discs For Wood 50 10 Inch Table Saw Blade Canadian Tire Wood For Workbench Frame 10 Lumber Products An Oregon Corporation Number |

V_U_S_A_L17
21.10.2020 at 15:58:18
LUKA_TONI
21.10.2020 at 15:32:16