Under Drawer Bed Frames Valve,Vicmarc Wood Lathe Prices Group,Makita 2708 Miter Gauge Ltd,Saw Dust Extraction 70 - Good Point
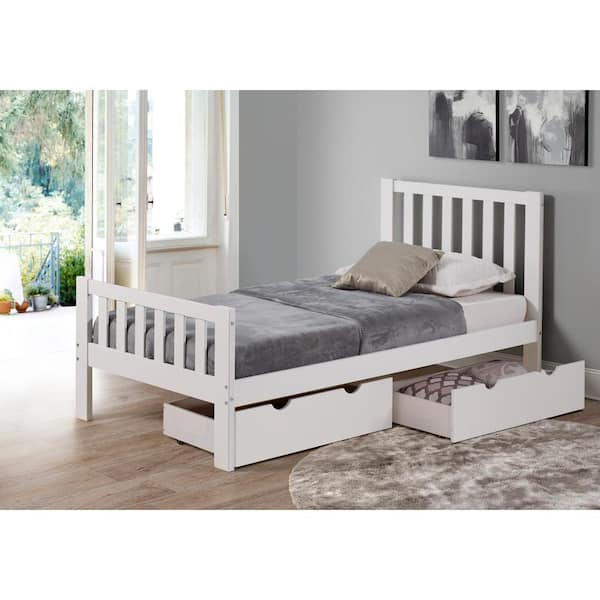
About 13" of space is remaining at the head of the bed to allow room for a night stand. I plan on building a head board next , that will be 6"-8" deep, which will result in about 20" of night stand space. This side of the bed is done for now. Repeat the process and build the opposite half of the bed frame. I built very basic drawers for this project using butt joints instead of dovetail joints.
The width of the drawer box should be 1" less than the width of the opening to allow for drawer slide clearance. Then I cut the pieces to length with the miter saw. I used a block of wood , screwed to my bench top, as a cutting stop to assure all of the pieces were exactly the same length.
It only takes a second to set up and it takes all of the measuring and guess work out of it. I made the front and rear drawer pieces fit inside the side pieces. Then I moved the table saw fence just a little, about half of a saw blade thickness, and ran the pieces again. The last step is to raise the blade of the saw and run ONLY the drawer back pieces, to rip off the previously grooved section. This is done to allow the drawer bottom panel to overlap the back piece and be fastened.
Before assembling the drawers I finish sanded all off the sides of the pieces that would be inside the drawer once assembled. Its much easier to do it before hand than to try and do it after the drawer is assembled. I start drawer assembly by fastening one of the drawer sides to the drawer front.
I sparingly applied glue to the slots in the drawer pieces and slid the bottom panel in place. I installed the other side piece the same way. The back drawer piece goes in next. I used a carpenters square to align the drawer frame, then fastened the luan in place, nailing it into the bottom edge of theback drawer panel. Each pair of drawer slides comes with two pieces, one to be mounted on the drawer and one to fasten to the drawer divider on the bed frame.
First I installed the drawer portion of the slides using the screws provided with the slides. Next I installed the piece of the drawer slide that attaches to the drawer divider panel. The bottom of the slides sits on the bottom of the divider panel at the front of slide. After installing the slides , I numbered each drawer and its mating location on the bed. I covered the exposed end grain of the plywood with a iron-on Birch veneer. Application of the veneer is fairly easy. It has a heat activated glue on the under side of it.
I use an old house hold iron to apply the veneer. I heat up about 10" of veneer at a time, which only requires about 3 seconds of ironing, then I use a small block of wood to press the veneer down tightly. If the veneer needs to be re-positioned, simply reheat the area and adjust as desired. This left over veneer can be trimmed carefully with a knife, but I find it easier to just sand the excess of with an orbital sander.
I also fastened all of the beds finished Under Bed Truckle Drawer panels to the bed frame from the inside, so there would be no visible fasteners and no nail holes to fill. I then cut the pieces to length. I clamped a straight edge to the plywood to use as a cutting guide. I used a carpenters square to align the straight edge and assure a perfectly square cut.
I used a circular saw to make the cuts. The first piece I cut was the side panel at the foot of the bed. This is to cover the side edge of the drawer front, on the drawer at the foot of the bed. Next I applied the veneer to the edges. I temporarily clamped the board into position on the bed frame. When I was satisfied with its position, I fastened the panel in place by screwing it to the bed frame from the inside.
The next piece I cut was for the 2 side drawers. I cut it in one, 40" piece, the length of both drawers combined. Then I ripped a 4" strip from the drawer piece, 40" long, to be installed along the top edge of the bed frame. I followed the same process of veneering, aligning, clamping and fastening in place. The piece of plywood remaining after the rip was cut in half to form the 2 side drawer front panels.
With the drawer boxes installed in place in the drawer slides, I positioned the drawer fronts in place. I will also mention that I pre-drilled the holes in the bed frame where the panel fastening screws were installed. This lessens the chance of the panels shifting while the screws are being driven. I continued applying the finish panels in this fashion on the other 2 sides of the bed. After installing all of the finish panels, some adjustment of the drawer slides was necessary.
A couple of the drawer fronts did not sit flush along the top edge. To rectify this situation, I had to adjust the drawer slides on the inside of the bed frame. Lowering the rear, or inner most end of the slides, allowed the drawer fronts to tip inwards slightly and sit flush. No matter how hard I tried, I still ended up having a few minor blemishes that needed filler.
I used Dap brand plastic wood filler, mixed with a little of the stain I will be using, to fill the imperfections. Once the filler dried, I sanded the entire exterior of the bed with grit sandpaper to prepare the surface for finishing.
I used a Ebony stain on the exterior of the bed. It produced a nice deep color. I applied one coat of stain with a foam brush , then wiped it back off immediately. After waiting 24 hours for the stain to dry , I applied 3 coats of water based polyurethane with a foam brush as well.
I waited at least 2 hours before sanding with grit sandpaper between coats. There are 2 steps that I omitted from this instructable because I forgot to take pictures. I painted the pieces black. I am satisfied with the outcome of this bed project.
I had a lot of the materials already, left over from previous projects. My daughter loves the look of her new bed and also the newly gained, and needed, storage space.
Now we'll see how much junk she can cram into those drawers when it comes time to clean her room. My next project will be to construct a matching head board unit with more storage space designed into it. Thank you for checking out my Instructable and I look forward to reading your questions and comments.
As I stated in the beginning, this project was designed as I went. Like most projects, even the most well thought out ones, problems arose. What kind of instructable author would I be if I did not include my screw ups so that we can all learn from my mistakes. The first problem that arose was when I tried to install the drawer boxes after the slides were installed. Then boxes were too tall to allow them to be tipped into position while inserting them into the drawer slides.
My next issue occurred when I realized that I may have Under Bed Storage Drawer On Wheels Nz built the bed frame too narrow. I had made it exactly 60" wide. I measured a bed that I made a few years back and discovered that It was 61" wide , to accommodate the thickness of bedding. I figured this out before I had cut any of the finished panels. To solve this problem, I added 2x4 blocks between the 2 halves of the bed to gain the extra width.
Then it came time to put the new mattress on the bed. I removed the mattress from its packaging and was disappointed to learn that the mattress was actually made undersized, that's right, it is only 58" wide. After muttering a few choice words, I came up with a solution, which I have not put into action yet. I am going to remove the 2x4 spacers from between the frame rails, simply enough right? I also have to trim the width of both drawer fronts and upper trim pieces.
This should not be too much of a problem if done carefully. Since all of the drawer fronts and finish panels are screwed on from the inside of the bed frame, they can easily be removed to be trimmed to length. I will, however, have to carefully apply a new piece of edge veneer to the freshly cut ends of the drawer fronts. Next came the finishing process. I have had bad luck in the past with fillers that claimed to be stainable, but just didn't work out.
So my next problem came while applying stain. Certain areas of the bed , where I had to do more extensive sanding, did not absorb the stain as well as the other, less sanded areas. This left me with inconsistent color. I thought I could live with it and decided to continue with the finishing process. After the first coat of polyurethane, I changed my mind and decided to try and fix the problem. I was able to sand off almost all of the stain and re-apply the stain for a much more even color.
I am very glad I took the extra effort to rectify this situation. I am now left with a quality piece of furniture that will last for years to come.. Question 1 year ago. I am hoping to build this bed frame.
Thanks so much for the instructions! Is there anyway someone can draw over some images with the exact measurements for the pieces of wood? I can't tell how much space Under Bed Drawers Grey is in between the drawers. Just a little confused. Thanks so much! Question 1 year ago on Introduction.
Just want to make sure I am understanding you correctly. I really want a platform bed with drawers that is truly solid. Everything I have seen so far is all particle board. Answer 1 year ago. Can you build one for me? I pay for labor and materials. How much would total cost if you say yes? The comerial buids are mostly use particle wood whick i hate them. I really want to attempt to make this bed but cannot find the list of materials.
School Specialty. VM Express. Bookcase Beds. Bunk Beds. Loft Beds. Murphy Beds. Platform Beds. Slat Beds. Sleigh Beds. Storage bags. Storage Beds. Traditional Beds. Trundle Beds.
Trundle Storage Drawers. Wood Composite. Twin XL. California King. Easy-Close Fastener. Search Brand. Acme Furniture.
Aiden Lane. Alaterre Furniture. American Furniture Classics. As Seen on TV. Atlantic Furniture. Badger Basket. Baxton Studio. Bella Storage Solution. Blaze Outdoor Products. Breighton Home. Brookside Home. Christopher Knight Home. CosmoLiving by Cosmopolitan. Danya B. Decor Therapy. Eco Dream. Elegant Home Fashions. Elf Stor. Ezy Storage. Gracious Living. Hillsdale Furniture. Household Essentials. Life Story. Lion Premium Grills.


|
Pinnacle Wood Turning Tools Usa Jointer Planer Difference List Fun Scrap Wood Projects Nz Best 2 On 2 Battle Rap |

VAZ_21_07
01.08.2020 at 23:18:57
SOSO
01.08.2020 at 16:30:34
Sevgi_Qelbli
01.08.2020 at 11:44:14
99999
01.08.2020 at 20:53:43