Sanding-discs-for-wood-lathe-chart,grizzly-g0645-benchtop-mortising-machine-set,dewalt-925-radial-arm-saw-type - Step 2
This will keep the base stable. With another piece from the same board, do the same for the bottom to make a matching mounting plate. To attach the two plates together, cut a small notch in the side of each to accept a bar clamp. This comes down to what you have on hand. Once assembled, it should put pressure right down the center of the board. Next we need a way to raise the table surface to the center of the disc.
Photographs: Cutting dados for the bed Notches marked to fit a bar clamp Sides and rabbets for the top supports. Generally, you want to have a clear picture in mind of your project before you get started. Okay, maybe not generally; this is pretty critical. I was still mulling over how to stabilize the assembly after I glued up the two sides. I decided to add a notch to each side and drop a length of 1x2. Problem: I now have no clearance for a router or mallet.
Instead of going another route, I marked the edges of the stopped dados and cut as much as I could with a hand saw. I dropped the brace in place and screwed it in from the outside. Everything was still square. Size it to fit your favorite miter gauge that you already have on hand. I got close with the table saw and then finished off the depth with a rabbet plane. Test-fit all the parts on the lathe and attach the top so the track is parallel to the disc surface and even with the inside edge of the supports.
At this point, all you need to do is add your sanding disc and you should have a functional sander. A disc sander with a sub grit disc can pump out a mess real quick. We should probably do something about that. Keep it shallow to avoid hitting your screws and use a chisel to clean out the corners. Cut the board to match and glue it in place.
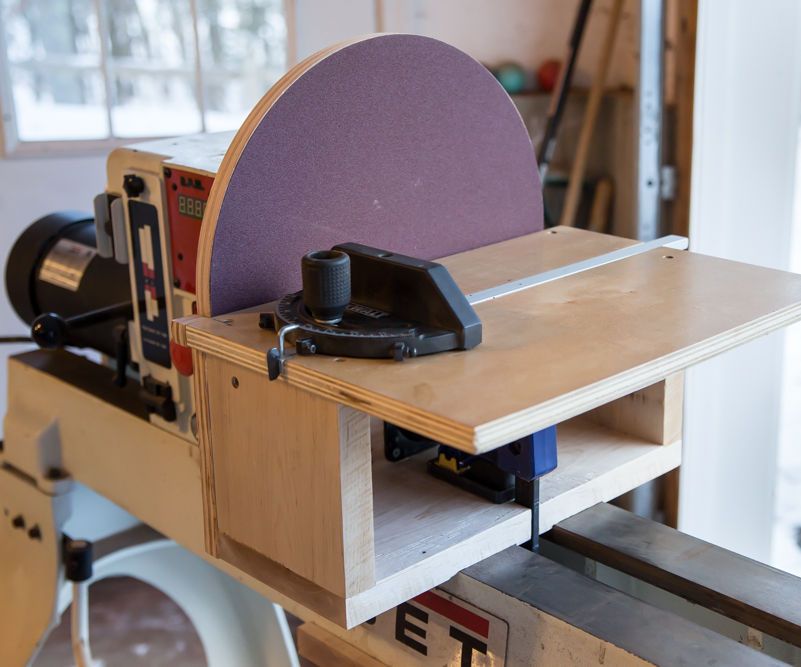
Go back to your scrap plywood that should have an arc to match the disc. Place your new sander's base on your lathe and set the plywood along the edge of the disc with minimal clearance. Trace the edge with a pencil and cut it to fit. I left the ear on the corner even with the tabletop so I could ride over it if needed later.
Make these shrouds for the front and back. Glue and tack them in place. Add a few coats of polyurethane to seal everything up and add some wax to make the top slick. Screw it in place and grind off any points that poke through the plywood. Upon testing I found this was enough to collect nearly all of the dust it was able to create using a Shop-Vac with a Dust Deputy cyclone. Last but not least, check to make sure everything is square.
I checked the table front-to-back as well as the miter gauge and everything looks to be fairly straight. If you have issues, you can either add shims under the table or work the dadoes with a rabbet plane for a closer fit. Once you're satisfied, attach a disc and have at it! Photographs: Building the plywood filler Cleaning the leftover plywood Yes that's a homemade stand for a Porter Cable Maybe that'll be the next 'ible.
Shrouds installed Dust port installed Finished! Since you're already doing this to your lathe you might as well look at what Shopsmith MK series machines do. Very similar to what you're accomplishing. I didn't see where you dealt with attaching the sanding disk to the ply disk. What did you use and can a new disk be added easily? Reply 6 years ago on Introduction. The discs I used were PSA adhesive-backed. Generally, that's what you'll find on disc sanders since they don't deflect with pressure.
If you want to switch between grits easily, it'd probably be best to make an extra disc. Hawkeye, below, had a good idea on recessing bolts into the discs to do that. Awesome "tool hack". I love multi-purposing tools. I expect nothing less from a fellow Festool man though.
It's a sickness, but the Domino XL is a dream machine. Parents, talk to your kids about Festool before someone else does. A consideration regarding RPM, the larger diameter the slower it should spin. If you sand too fast you might get burning. Use the variable speed of the lathe to find a suitable surface speed. Technological components for the Group's machines and systems, for those of third-parties and for the mechanical industry. Marco Mancini is appointed CEO and representatives of the next generation are introduced, together Back News Back Getting ready for Ligna.
The most advanced skills and know-how in the fields of machinery and industrial components. Industrial machinery Stand-alone machines, integrated systems and services dedicated to processing a wide range of materials. Industrial components Technological components for the Group's machines and systems, for those of third-parties and for the mechanical industry.


|
Rockler-products-australia-email Wood-projects-cricut-maker-90 Wood-work-kitchen-zoo |

Naina
08.03.2021 at 14:43:53
AnTiS
08.03.2021 at 17:22:19