How To Build A Wooden Bench Table Year,Best Software For Woodworking Plans 04,Shop Dust Collection System Diy Uv - And More
Last Updated: October 8, References. To create this article, 18 people, some anonymous, worked to edit and improve it over time. This article has been viewedtimes. Learn more A do-it-yourself bench for your home or garden can be a rewarding project for a beginner or expert woodworker, and anyone in between. There are many types to choose from, ranging from basic planks using logs, to stone and rock benches, to wooden slat benches.
You can build a bench from blueprints and plans you buy or find for free, or browse plans that have worked for others and use them as starting points for your own creations.
Here are some ideas for building a bench for your own indoor or outdoor use. To build a bench, start by cutting 2 side pieces to the desired height of your bench out of 2 by 10 wood. Then, attach a brace bar cut out from a 2 by 2 piece of wood near the top of each side piece with screws.
Next, attach the 2 ends together with two 1 by 4s, ensuring that the 1 by 4s are flush with the top of each end. Finally, attach 2 pieces of 2 by 4s to the how to build a wooden bench table year at a lower level for the seat.
For tips on how to build a bench using a bed, read on! Did this summary help you? Yes No. We've been helping billions of people around the world How To Build A Wooden Bench Table Online continue to learn, adapt, grow, and thrive for over a decade. Every dollar contributed enables us to keep providing high-quality how-to help to people like you.
Please consider supporting our work with a contribution to wikiHow. Log in Social login does not work in incognito and private browsers. Please log in with your username or email to continue. No account yet? Create an account. Edit this Article. We use cookies to make wikiHow how to build a wooden bench table year. By using our site, you agree to our cookie policy.
Cookie Settings. Learn why people trust wikiHow. Download Article Explore this Article methods. Tips and Warnings. Related Articles. Article Summary. Method 1 of Buy a sturdy, narrow bookshelf. Since bookshelves aren't normally meant to sit on, this one is probably better for kids than adults, but hacking an Ikea shelf actually makes a great place to get little ones ready for school. Try the narrow Expedit shelf one 5-shelf columnwhich is handy because the square shelves allow the accompanying storage baskets and bins to work in this orientation as well.
This will give you a great place to sit your preschooler down to change shoes, hats, mittens, as well as store backpacks and other items.
Turn it on its side. Build the shelf as described in the product's instructions and then turn it on its side. The side on the floor will eventually become the top or seat of the bench. Add wheels or legs. You can get wheels like the kind you see on shopping carts or wooden or metal furniture feet. Whatever you feel matches with your decoration and your needs. Attach the feet at the corners of the bench as described in the instructions for the product you buy.
At least four feet are necessary. Six are recommended. Make sure the screw does not interfere with the other pieces holding the shelf together.
Be strategic! Turn it right side up. Turn the shelf so that it sits on its new feet. You now have a bench! Add cushions. Either make a custom cushion or buy relatively flat, square cushions to go on top of the bench. Glue strips of velcro to the top of the bench and then attach the other side of the velcro to the underside of your pillows. Add finishing touches. You can add finishing touches by painting the bench a different color, if you want to.
You can also buy baskets or other storage items to go in the shelves. Method 2 of Buy and prepare an old bed frame. You will need a wooden headboard and footboard. If they are attached, detach them.
This project works best if there is either a flat skirt on the footboard or two-part skirt with an even edge at the top. Measure and mark the center line on the footboard. Measure a vertical center line on the footboard and mark it with a pencil or other marking tool.
Cut the footboard. Use a jigsaw or circular saw to cut the footboard along the center line. The two pieces will become the sides of the bench, while the headboard will be the back of the bench. Create the how to build a wooden bench table year points on the footboard. Along the edges you just cut, drill evenly space holes for dowels.
Find dowels that are an appropriate size and then use the drill bit for that size to drill the holes. Measure the height from the floor to the holes that you cut, as well as the distance between the holes, and then make identical holes in the same location on the front of the headboard posts.
If your bed is of a non-standard shape, you may have to alter how you attach the footboards to the headboard. It may be necessary to attach them at the sides, rather than at the front of the posts.
Attach the footboards to the headboard. Insert the dowels, applying wood glue in both holes, and attach the footboards to the headboard. It should now be starting to look like a bench! Attach the seat. Lay the bench on its back and how to build a wooden bench table year 1x6s cut to the appropriate length to the footboards using L brackets and wood screws.
Attach these at whatever height works for you and that the footboards allow. Use however many boards are needed to create a wide enough seat. Add a 1x3 board to the bottom of the front seat-board to make a skirt, if you want to. Caulk all joints. Caulk all the joints and gaps so that the connections are more sturdy. Upright the bench when necessary during this process. Paint the bench with outdoor paint if you intend to put it outsideif you want to.
You may also wish to add seat cushions or upholster the bench. Method 3 of Cut the side pieces for your bench. Take a single 2x10 how to build a wooden bench table year cut two equally sized pieces to the desired height of your bench using a circular saw or a jigsaw. Attach a brace bar.
Attach a 2x2 cut to 8' length how to build a wooden bench table year each side piece. Attach the sides to each other. Using two 8' 1x4s, attach the sides of the bench to each other. The top edge of the 1x4 will be flush with the top of the side pieces. Drill dowel holes into both ends of the 2x2s and the matching location on the 1x4s.
Use dowels to attach these and then use wood screws, passing from the outside of the bench sides and into how to build a wooden bench table year 1x4s, two screws for each end of the 1x4 boards. Add the seat. Drop in two 8' 2x4s. There should be space to have a gap between them.
Use long wood screws, going through the side boards and into the seat boards, 6 screws across each side.
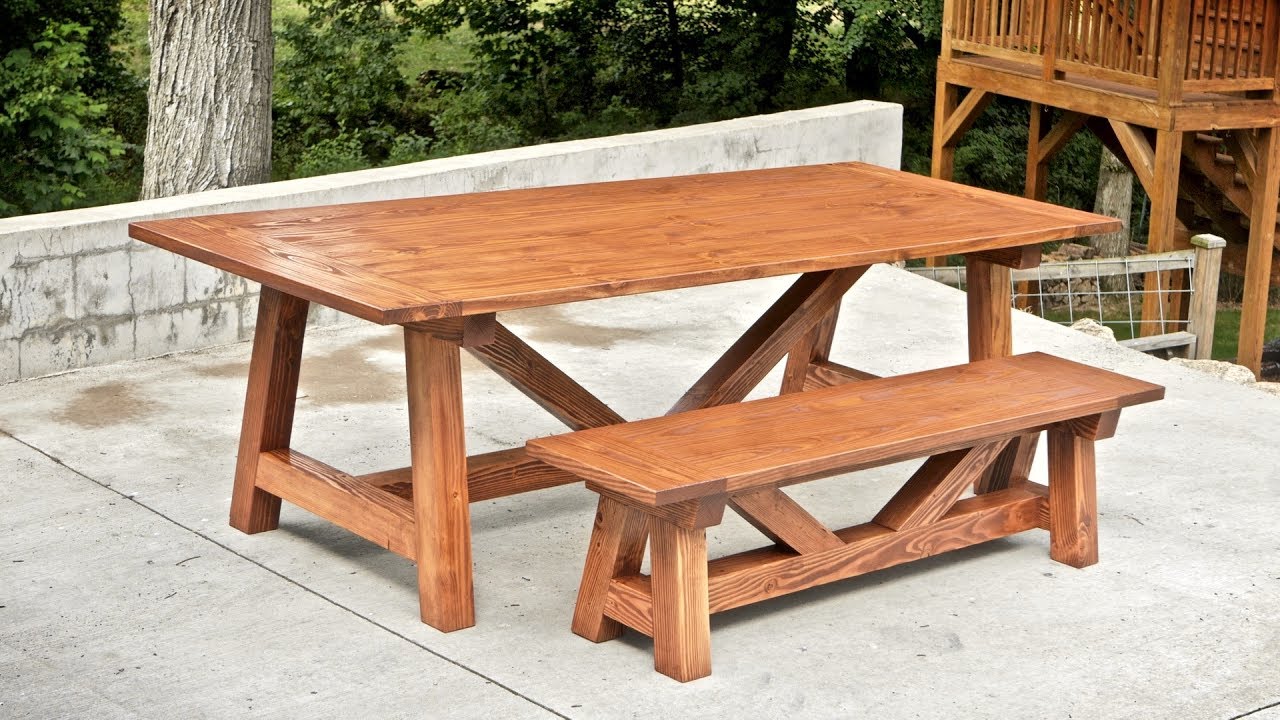
:max_bytes(150000):strip_icc()/diy-diva-free-picnic-table-plans-57f3cea43df78c690f522c28-5bfd90ea46e0fb00264270b5.jpg)


|
Woodturning North Brisbane Jet Planes Art Valve |

KAYFUSHA
02.01.2021 at 22:31:33
APT
02.01.2021 at 10:26:33
shakira
02.01.2021 at 17:20:19