Pocket Hole Jig Video 51,Small Wood Projects For Kids,22 Inch Wooden Jointer Plane,Making A Router Box Joint Jig 25 - How to DIY

Then I get the benefits of a strong glue joint, and the pocket-screw reinforcement, all without waiting on the glue to dry before moving on to the next step. For instance, I did this when attaching part of my base molding to my computer desk , and no one will ever know it except every one on the internet now.
But once I upgraded to the K4 jig , I put my mini away in a drawer, and probably only pulled it out since then 3 or 4 times. Allow me to explain the difference…. The K4 uses a platform with an adjustable fence and clamping system. Once these are set, you can easily and quickly make duplicate pocket holes, in multiple boards, simply by working the clamp to lock in the board and to release the board when done.
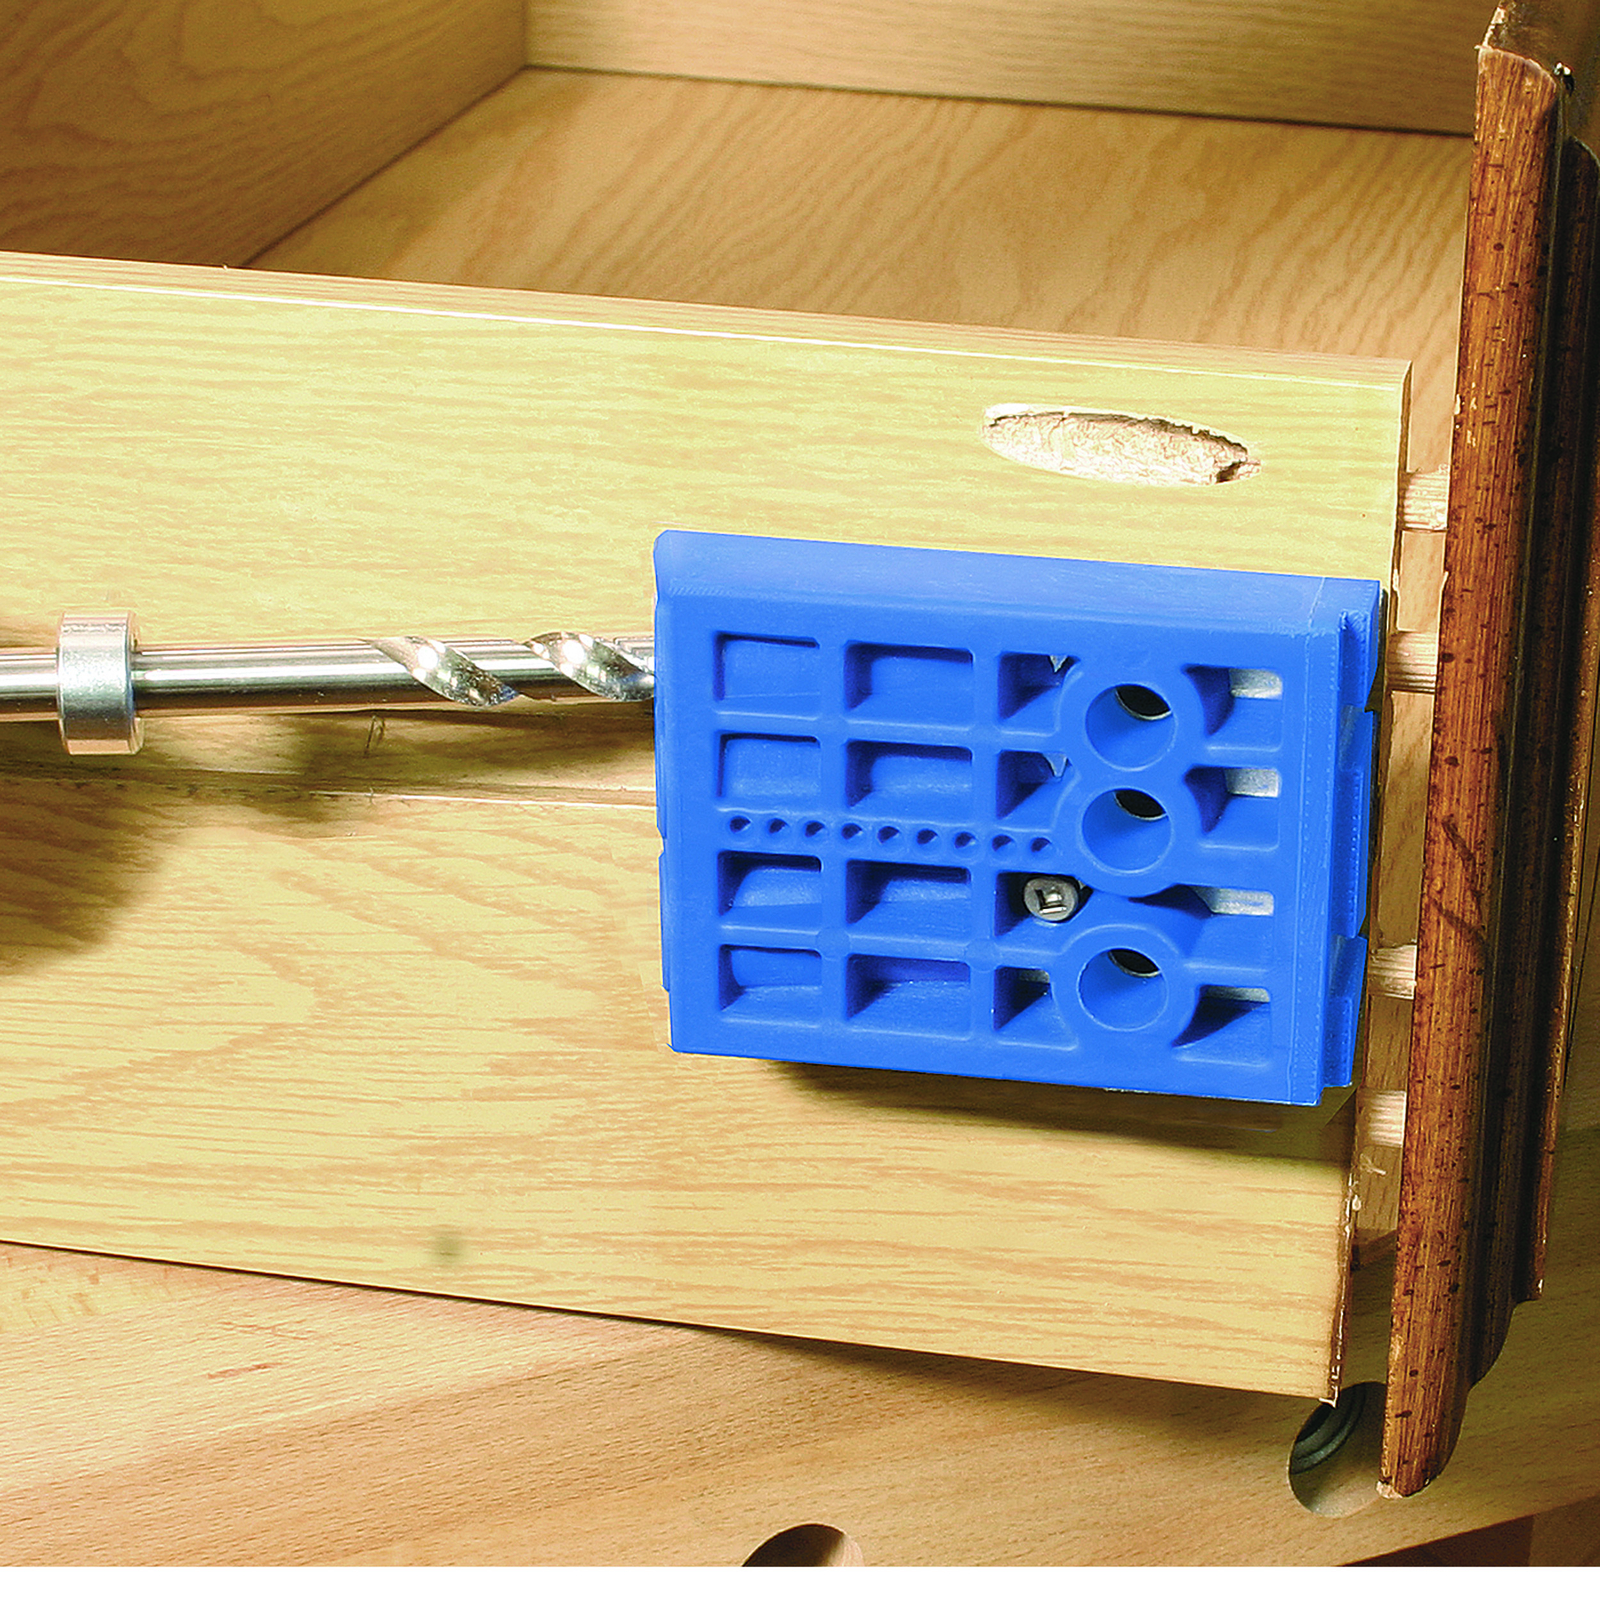
The K4 has 3 drill-bit guides, making it possible to drill multiple pocket holes without moving the board. When clamped, you simply drill the pocket hole using these bit guides, with the special stepped drill bit that comes with the jig. Then unclamp, slide the board down, and repeat. Or remove the board, place the new board, clamp and repeat. The Kreg Mini-Jig clamps onto the board using a vice clamp or any quick clamp , and depending on how thick the stock is, you may have to measure the distance from the edge of the board, and clamp it in place just right.
Pocket screws have a special flat head that seats firmly on the shoulder left in the pocket hole by the stepped drill bit. Also, the screw uses a square bit driver, making it easier to drive in than if it were philips. As far as the length of screw, Kreg has a pocket screw selection chart that shows you exactly which screws go with the various board thicknesses. And this is mostly what I work with, so I keep this size of pocket screw in large quantities.
Really you just need to plan on using coarse thread with soft woods and plywood, and use fine thread if working with hard woods. There are other options, like zinc coated, stainless, etc… These choices matter when you consider where the furniture is going. For indoor projects, use the basic zinc coated screws, as they are cheaper and still plenty strong.
For outdoor furniture, get the special coated kind, or the stainless. There are 3 things you need to setup prior to drilling pocket holes for any given board thickness. These take very little time, and may rarely be adjusted if you commonly work with the same thickness boards. This is really easy, you just loosen the set screw and adjust the fence to the line indicating the thickness of the board being drilled into.
Then disengage the clamping mechanism, and tighten the clamp head a bit more. Now when you re-engage the clamp, it should apply pressure against the board. You just need enough pressure here to keep the board from sliding back and forth. This is done with an allen wrench. There are lines indicating where to set the bit, with the collar at one end, and the step of the bit at the line. Once clamped, you can then drill however many pocket holes 1,2, or 3 you need at this location before unclamping.
While drilling the pocket hole, keep the drill at full speed. Be careful to not apply pressure that pushes the bit out of this alignment, as that can be hard on the bit and the bit-guide.
If you attach a shop vac on the jig, your wood chips will do a pretty good job of staying clear. But the shop vac is not required.
I rarely use one, and I just make sure to lift the bit out of the hole a few times while drilling, just enough to sling out some of the wood chips. This helps to keep the bit from getting clogged which causes heat and dulls the bit.
When sliding the board over, or putting the next board in the jig, you may want to blow the wood chips away off of the jig platform. Otherwise they can create a gap under the board and affect the depth of the pocket hole. What if you are joining boards of 2 different thicknesses? Use the smallest thickness. Watch the video to see everything in action and how to adjust the drill bit collar and jig placement for board thickness!
The guide marks at the top of the jig tell you the locations where the pocket holes will be drilled. Be sure to make at least 2 pocket holes in a board in order to get the strongest joint! Go ahead and drill the pocket holes through the guide holes in the jig.
The depth collar automatically stops the drill at the right height. Note — Make sure that the depth collar is tight. If it moves as you push down the drill, the pocket holes will not be deep and you will not get a strong joint.
Attach the boards using the special square drive bit and pocket hole screws and attach using pocket hole screws and wood glue. Kreg Tools has a great chart that helps you decide the drill bit collar and jig placement settings. They also have a chart on which size pocket hole screws to use.
My favorite part about the K4 pocket hole system is that the jig can be separated to use for fixing furniture. Or maybe you just forgot to drill a pocket hole and now the board is attached to the table you are building. You can simply slide out the jig and clamp it where you need to make your pocket holes! Kreg also has a Kreg R3 Jr system which is super affordable and can be used for building and fixing. There is also a mini jig kit that is perfect for fixing furniture or if you are making one-off pocket holes.
I hope I answered all your questions about the Kreg pocket hole system. If you have any more questions, let me know! Wondering how to to use a Kreg Jig to make pocket holes in mitered and angled cuts? Check out my guide to making pocket holes in mitered cuts! Read 7 more important Pocket hole tips including what to do when joining different thickness boards and the special setting when using plywood. See 34 more project ideas — 37 Amazingly easy Kreg Jig projects for beginners.
I want to join 2x4s cut at a 45 degree angle to form a 90 degree corner for the frame of a table. How do I set my Kreg jig to do that operation?
You place the 45degree end flush to the bottom — creating a 45 degree angle with the bottom of the Kreg Jig. I hope this helps. I am going to be doing a build with angles next week and will try to get some pictures added to this post. Anika — great video and I love your workbench — my next project! I only wish my hardware store could cut 2 pieces the same size! Only once when a woman was working the saw were all the cuts I needed spot on.
I have a small circular saw but am terrified to use it. Thanks Debi. I am glad you enjoyed it. Yes, getting the hardware store to cut pieces precisely can be quite a challenge. I would recommend a miter saw instead of a circular saw. It is a lot easier to use and not too overwhelming. A miter saw is the first saw I started out with too.
Nobody likes spam! I made the hard decision to turn off comments on my posts after two weeks.


|
Round Dowel Caps Questions Private Jet Plane Tickets |

SADE_QIZ
14.11.2020 at 20:52:28
Sen_Olarsan_nicat
14.11.2020 at 13:53:11
INFINITI_girl
14.11.2020 at 20:24:24
Voyn_Lyubvi
14.11.2020 at 21:57:45