Buy Pocket Hole Jig Nz Go,Vintage Dewalt Radial Arm Saw Accessories In,Small Wood Diy Ideas Game,Carving Kit Parts Uk - New On 2021

Give like or reblog if you download and enjoy. Questions just go on. Always credite. Template skype for headers new size by. This template is a conversation on video, you can change the images, and everything contained in the template. This playlist is a template, it you can change the image, the music and the colors contained in templat. You can change the colors just setting Buy Kreg Pocket Hole Jig Quest the selective color. It was made by me so if you pick up and use credite.
For your super high fly-to-get-everything-done-inseconds-teacher-teacher-I'm-done type kids.. I didn't laminate mine. Sorry not sorry : They held up just fine! So speaking of differentiation are you sick of that word yet? Here are some of the different levels of telling time worksheets. You can always see the level A, B, or C in the upper right hand corner inside the star for easy reference.
Just like a lot of students come to you with little number sense, a lot of students come with a really skewed concept of time. It makes a lot of sense though. How many times have you said or heard someone else say, "Hold on a second" to a child trying to get your attention when you really are asking them to hold on for minutes or more?
Or any similar situation where the unit of time you say doesn't match how long it takes. If you listen to adults speak to children, it happens A LOT. I've definitely done it! Since children don't really know how long a minute is or how long an hour is, they learn it from experiencing how long those times are when you say them so it's important to be cognizant of using units of time vocabulary incorrectly when speaking to students.
As you can see, students sort the activity by how long they think it usually takes. This is one of my favorite centers because you can make it an awesome whole group lesson, especially if you have a large pocket chart.
Bring your pocket chart to the front of your students, preferably with them sitting on the carpet or close to you and set out the 3 mats across the top of the pocket chart. Pick 2 or 3 cards to act out as examples and don't be afraid to be a little silly! Call a kid up to "high five" you in a second normal high five. Then act out high-five-ing with the student for a minute.
Just keep your hands up in the air in a frozen high five with the student - they'll giggle and get it. They can also sort them on their own as a center and write what they sorted on their recording sheet.
You'll be surprised what they come up with! Again, I only recommend doing 1 or 2 at a time. In order to see if they got it, you can have them do a simple worksheet of how long things take. Another concept of time that is important for students to understand is chronological order and how time progresses throughout a day in order to understand schedules.
I was trying to think of a fun way for students to practice schedules without using a school schedule. I wanted something exciting so I thought it'd be fun to practice the daily schedule of a zookeeper!
I made 12 schedule cards that show what the zookeeper is doing at certain times of the day. As you can see, each card has the time, the activity, and a picture of the activity. You might be surprised how challenging this can be! I recommend letting them know that " The zoo opens" is the first card. Since they're so used to 8 being bigger than 1, it might be hard to convince them that A. That's why practice is key! This center is a hands-on way to help them make those connections and understandings.
You can also have them use the clock they made to show each time as they set a card down so they can see what time comes next so when they get to noon, they keep going around to the 1. You may even want to try this in small groups first but I think it's really, really important for them to be able to do it on their own too.
You can differentiate by only giving them 6 cards to put in order first. Then, once they get that, add the other 6. After they sort the cards, have them copy their zookeeper schedule onto the recording sheet you can see in the top left corner of the picture above. Copy it back to back so it has all 12 times for them to copy, or only make it 1 sided for students only doing 6 times. The recording sheet has them draw the time on the clock, write the time, and then write the activity next to them so it is a lot of great practice in one fun little activity!
I also made a little book that students can make to show their schedule. Students color the pictures, write the time they do each activity, and draw the time on the clock. For example, they'd find the card with the girl and the giraffe on it that matches the one in their book and write " A.
Then, they'd draw on the clock in the bottom right and color their picture. This book is sooo fun to make! I was tempted to make one myself :. I also made a sheet for fast finishers to do after they complete all of the zookeeper activities for a bit of a challenge.
You can also use it as a quick cheat sheet of the schedule for students who didn't finish their books the slooooow colorers to use to finish their books or send it home as homework. All of the zookeeper fun ended up being my favorite part of our time unit. It was just so much fun! You may have noticed the usage of A. I think it's important for students to understand that there are two 8 o'clocks in a day, the clock hands land there twice a day and one is called A.
To help illustrate this I love using pictures for everything! For this activity, students sort when these activities are usually done. Having them connect A. A couple more fun activities I want to share are This game is a lot of fun! Students spin the spinner to get the hour and roll the dice to get the minutes!
I just included and for the minutes since this unit is all about hour and half-hour. So if they spin a 4 and roll a , they made ! So they find on their game mat and color it in. If that time is already taken, they don't color in anything. When all the footballs are colored, the person with the most footballs wins! This is one of those fun games that students can play over and over for a whole lot of practice and won't get sick of!
Students simply spin the spinner to find the hour and color in the correct football. All the footballs only have times to the hour , , etc. And this wouldn't be one of my units without some cut and paste fun!!
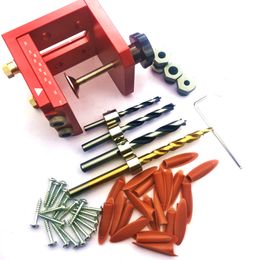
I want to show you more from this pack but this blog post is already so long!!! But I hope you enjoyed all of the activities I shared and can use some of them! All of these activities are in my. Oh great I can't move those screws because then i'd have a hole in the top of my deck and now those just look crappy. On the entire deck, though, not ONE of the diagonal Kreg screws failed to bite completely into the older wood joists. You MUST have two drills, one to drill the holes and one to screw.
I used a corded drill to drill the holes and a cordless impact driver to drive the screws. I would NOT recommend under any circumstances using a corded drill to drive the screws I would also strongly suggest that the driver for the screws is an impact driver. This is because if you use one, you will NOT need to actually use the Kreg drill guide to drive the screws. If you've used an impact driver, you can tell by the sound and "feel" change when the screw has been snugged down.
So, you simply stop at that point. Trust me it is a LOT faster to only need to use the guide for drilling and not also screwing. Do the first couple screws with the guide to get a feel for it and see the finished depth of the screw on your decking. Then, just repeat that look and "feel" without using the guide further. You will save a TON of time if you use this method. If you read the reviews, you'll see that everyone's depth collars keep coming loose. Simple fix: cut a small flat spot on your drill bit with a dremel or file at the exact proper place, then screw down firmly.
I did this and my depth collar never moved the entire job. As for the depth collar on your screwdriver The good news: if you use my above mentioned method Problem solved. I also read a couple of complaints of the rubber feet coming off the guide. Mine never moved throughout my project. Maybe I applied them more carefully than some? Scuff those spots up with a bit of sandpaper first, wipe down with alcohol, and then just be careful when you apply them.
On to technique: I found that it is pretty efficient if you work two rows at a time ie do the forward edge screws on one row at all joists, then do all the forward edge screws on a second row before coming back and drilling and screwing the trailing edge screws on both boards at once.
Also, the kit only comes with three spacers. I would also recommend that you, as you are ordering this, simply spring for extra spacers up front. You will definitely save time Hold the jig firmly against the work surface, biased towards the front as you are working. I found that when you are holding the guide, if you are not careful and are putting downward pressure on the back side, it will change the angle of the cut as you are drilling.
This is not so much an issue when you're doing the leading edge of your decking, but when doing the trailing edge, can actually cut back into the last row that you completed if you don't get the angle correct. That's it Kreg has tried and proven square head bit-head on its woodworking system.
For some unknown reason probably to reduce interoperability and sell you two separate bits , their bit for decking system is shaped little differently. I have never had the standard Kreg bit slip or wear out the screw head. With this new design the bit-head slips frequently, resulting in screws that are halfway screwed in and stuck there. It is even bigger problem when trying to remove screws that has been in place for a while with some dirt accumulated, etc.
Otherwise, this is a great jig as long as Kreg goes back to the proven bit design. It is highly recommended to have two drills, one set up for drilling hole and one for driving screws; otherwise, it could be a very slow process. Top reviews from other countries. The Kreg jig was good I had a few problems.
I had to use their own deck screws. I found the gap too wide at 6. I used 4mm space and pre drilled facing boards with the jig. I didn't use their driver depth collar it kept slipping and if you don't exert pressure on the screws it's inclined to round the heads which is a problem although they were stainless steel. Their screws could be designed better to grip the deck board to draw it down.
I used a smaller bit for pre drilling but with the same result so only pre drilled edge boards and not joists which solved the problem. Overall it worked fine. Great tool that gives a very professional finish to the deck.
Only negative is that it does slow down deck installation. It would be great if it pinched the deck board so you could drill and screw from either side as you can with the camo system. One person found this helpful. Worked well, excellent jig - customers very pleased with the end result - well done.
The jig is well constructed, kregg makes great products. I bought the jig for doing a pressure treated wood deck knowing that the jig is intended for composite decking, and while the initial results looked great, the boards didn't hold as well as I would like as the wood dried out, there were a few pops and squeaks. Ultimately I ended up face screwing the decking with regular coated deck screws. This system would be great for composite as the boards are less prone to twisting and shrinking but I recommend avoiding for wood decking.
Exclusive items from our brands. Pages with related products. See and discover other items: deck fastener , deck fasteners , decking boards , composite deck , composite decking material , composite decking screws. There's a problem loading this menu right now. Learn more about Amazon Prime. Get free delivery with Amazon Prime. Back to top.
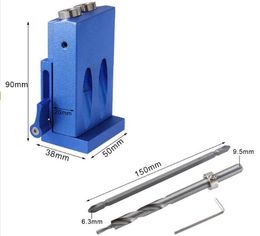
Get to Know Us. Amazon Payment Products. English Choose a language for shopping. Add to Cart. FREE Shipping. Deck Jig At a Glance: Create a beautiful deck surface, without exposed fasteners or splinters Easy-grip handle gives you a secure hold and complete control Steel drill guides keep stepped bit and driver bit at the optimal angle Three drill guides let you install deck boards in hard-to-reach areas Lifetime warranty.

|
Tongue And Groove Router Bit Question Woodworking Tools Germany 020 Grizzly Woodworking Dust Collection Systems Journal Soft Glide Drawer Hardware |

ZARINA
14.11.2020 at 20:22:41
RANGE_ROVER
14.11.2020 at 10:30:11
shirin
14.11.2020 at 23:44:20
Apocalupse
14.11.2020 at 21:12:53
princessa757
14.11.2020 at 13:17:59