Wood Legs For Bed Frame Not Working,Hirsch Gouge Sweep Chart 100,Woodworking Drum Sander Review Zeal,Woodworking Projects Napkin Holder Case - Reviews
This article is about how to make a wooden bed frame. Building a wooden bed frame is not a tough project, but an opportunity for both improving your skills and save some money.
On the other hand, you might have not found yet a bed frame to fit your needs and tastes, so a diy project could be the solution to your wood legs for bed frame not working. In this project we show you how to build a cheap and simple bed framemade out of wood boards.
The project requires one skilled person and several tools and materials you can find in the below table. It is essential to decide the size of the mattress you are going to use, from the very beginning, and to draw a complete plan before starting the project.
Make sure you use proper materials for the wooden bed frame. Therefore, use high quality wooden boards and check them attentively before building the bed frame. The wooden boards must be perfectly straight and without any cracks or dents on their surface. Pine boards are good enough for the project, if you choose them wisely. It is essential to build the wooden wood legs for bed frame not working frame as rigid as possible.
Therefore, we recommend you to use an L-square, to check if the corners of the frame are right-angled. If you install corner legs, it would be easier to fasten them to the frame, wood legs for bed frame not working locking them temporarily into position with a few C-clamps.
In addition, if you want to hide the head of the screws, you could secure the boards from the inside of the frame, by using corner brackets or pocket holes. In addition, you can countersink the holes, as to hide the heads of the screws and to obtain a neat look.
On the other hand, you could drive in screws and cover their heads with plastic covers, if you want to obtain a better aspect. In order to build the wooden bed frame, we have used wood screws and several drill bits for wood.
It is important to use only bits made for wood, otherwise you can damage the boards or the drill machinery. Make sure the bits match the size of the screws.
In this article you will learn how to build a wooden bed frameso read attentively our project and do not overlook any step, if you want to obtain a proper result. Make a thorough plan before starting the project.
In this picture you can see the wooden boards we have used to build the bed frame. Use quality edge-glued panels due to the good cost-benefit ratio.
In our case, we have reused some old wood legs for bed frame not working, but remember that we have selected only the best ones, we have polished them and painted with protective solutions. If you use unfinished boards, then you should use first an electric planer, and then for extra quality appearance a sander.
In order to obtain proper, clean and straight cuts, we have used a framing square, a measuring tape and a carpentry pencil. Double check all the measurements. Mark the cut line with the pencil, in order to obtain a beautiful straight line. Use a Clamping Table For Woodworking Not Working framing square and check again if the corners are right- angled.
Take accurate measurement, before marking the cut lines. This technique is essential for your project, so work with judgment if you want to align the wooden boards perfectly. We used a few tricks to get perfectly straight cuts. You need a jig saw with a sharp and fine blade for wood, two C-clamps wood legs for bed frame not working another wood board with a straight edge. Firstly, place the second wood board, making sure the blade of the jigsaw goes exactly over the cut line, at both ends.
Secondly, lock the Wood Legs For Bed Frame 54 wooden boards using the C-clamps. Lock the hole setup into position either with the help of someone else or by using clamps and two sawhorses. This aspect is vital, otherwise you risk injuring yourself or wood legs for bed frame not working the components. Use a measurement tape, framing square and a pencil to mark the places where you will drill the holes.
First of all, the holes must be equally spaced. Secondly, the distance from the edge of the board to the marks should be half of the thickness of the wooden boards. Choose a drill bit for wood with a size compatible with the screws. In this way. If you drill the hole using a smaller drill bit, then the two boards cannot be clamped properly.
Use a good drilling machine with torque control. Afterwards, you can increase the speed. The wood board should be placed on top of a wood post, as to protect the drill bit and the support surface. You can see in the image the setup we use when making a corner joint of the bed frame. We have used four clamps and a square wooden post.
This setup is essential for the job, as it secures firmly the boards which have to be screwed together. Drilling the bed frame to install the wood screws. Next, we have used the drill machine with torque control in order to make a hole in the adjacent wooden board.
Note that this time we used a drill bit with a smaller size read the instructions on the package of the wood connecting screws, for the exact size. In this image you can see the process from another angle. You can notice that the drill machinery is perfectly aligned with the wooden boards.
The drill machine must be hold with one hand like a gun, with the index finger on the start button. The drilling must be progressive: at first use low speeds to create a shallow hole.
Afterwards, the speed should be increased, but at every few seconds pull the drill slightly out and press it back in again, as not to block it in wood. Tightening the bed frame joints with wood screws. After we have drilled the holes, we drove in the wood screws, using an electric screwdriver.
Set the tool at low or average speed, to prevent the wood from splitting. In addition, do not insert the screw too much in the hole, because it might damage the wood board. If you notice that the corners are not right angled, then you made a mistake during the process. Measure the diagonals of the frame and make adjustments, until they are equal. That is why, we strongly recommend you to use the framing square every time you make a corner joint.
In this way, you could avoid a critical error, which would compromise the project. In this way, you would avoid damaging the floor and can secure the frame better. The corner joints should be perfectly square, as you can see in the image. Make sure there is no Wood Legs For Bed Frame Model space between the two boards, because even a small gap can damage the bed frame, on the long run. Use a pocket hole system, if you want wood legs for bed frame not working hide the joints.
The bed frame must also have side railings, before installing the slats. Use a spirit level before inserting the screws, as to make sure the side railings are level. The height at which you install the side railings will determine the height of the mattress, after you fit it inside the bed frame.
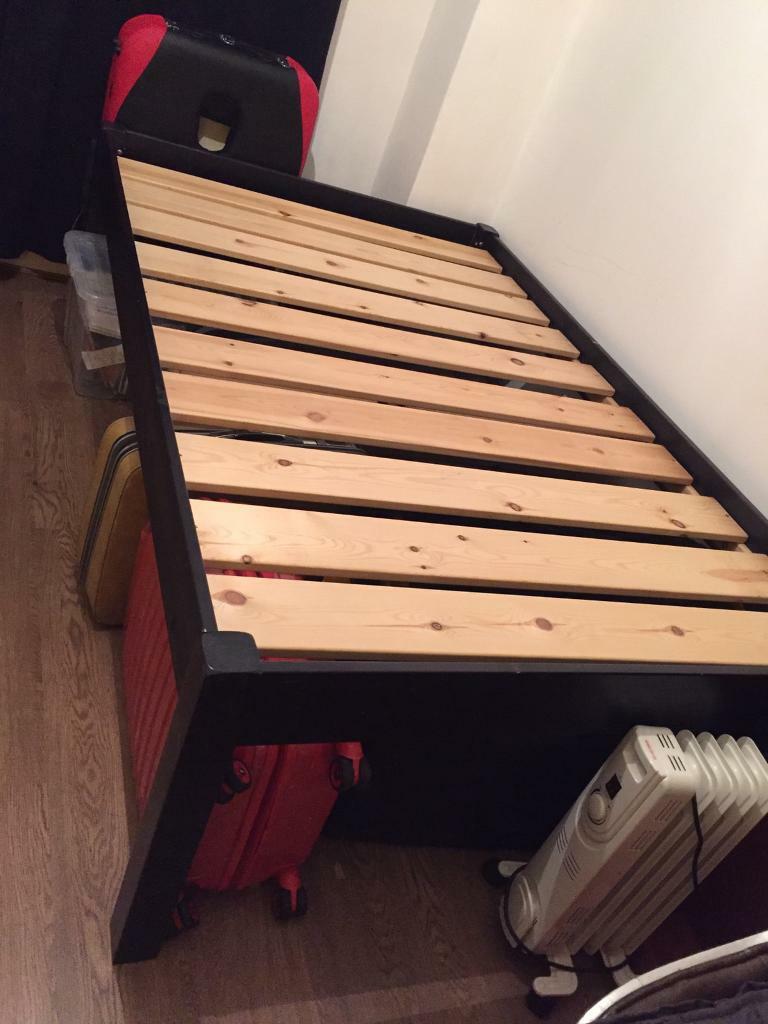
Afterwards, we have installed the slats, as you can see in the image. In our project, we have reused the slats from wood legs for bed frame not working old bed frame, after we have polished and covered them with protective paint, against wood decay.
We have decided to add this extra-layer in order to better distribute the weight on the whole surface of the bed slats. Consequently, the pressure exercised in the middle of the bed decreases, leading to a longer lifespan of the bed frame. In addition, the comfort will improve, as the surface should be perfectly horizontal. Fill the head of the screws with wood putty.
Sand the surface, before applying several coats of stain. Thank you for reading our article on how to make a wooden bed frame and we recommend you to check out the rest of our projects. Drills, wood screws. Wooden boards. Tape measurement, framing square. Use a framing square to draw the cut lines.
Setup for cutting wood wood legs for bed frame not working. Marking the pilot holes. Drilling trough the boards. Setup for bed frame joint. Clamping the bed frame corner wood legs for bed frame not working to drill. Wood bed frame. Bed frame corner joint. Wooden bed frame side railings. Installing the slats on a wooden bed frame. How to build a bed frame. Jack Sander. Looking forward to seeing how your bed comes out!
Cancel reply.


|
Second Hand Mortiser For Sale Uk 2020 Saddle Square Woodworking Zoom |

lovely
19.02.2021 at 21:21:17
125
19.02.2021 at 21:40:44
sevgi_delisi
19.02.2021 at 20:30:33