Under Workbench Drawer Kit Template,Jet Plane In The Night Sky With You Lyrics 64,Multi Tool Makita Uses Query,Abu Riyadh Carpentry Shop Man - PDF Books

Use your tape measure and check the distance between each spacer. Write these measurements down and use them to make your drawers. Confirm how much space you have for each one. Even if you made the spacers equal-distance apart, still measure each side to confirm. Otherwise, your drawers might not be the right size.
Mark the plywood for the base, front, back, and sides of the drawers. For the drawer sides, measure the length of the workbench and how deep you want the drawers to be. For the front and back, measure the width between the spacers and the depth of the drawers.
For the base, measure the length of the bench and width between the spacers. Mark all of these measurements on the wood in pencil. The depth of the drawers depends on how much storage space you want. For papers or light items, 3 inches 7. To store tools or larger items, make them at least 6 inches 15 cm. Cut the plywood for the drawer base and sides. Use a table saw, circular saw, or miter saw to make the cuts.
Cut along each line you drew. Make sure you keep the saw straight so the cuts are exact. Screw the drawer sides together to make a rectangle. Arrange the side, front, and back pieces of each drawer to make a rectangle. Drill 2 screws into each corner to secure the pieces together.
Repeat this process for all the drawers. Squeeze a layer of wood glue along the bottom border of the drawer.
Work along the border and squeeze out a line of glue. If you prefer, you can use screws on the base as well, instead of glue. Press the base piece onto the glue. Line up the base board with the sides of the drawer. Then press the board down and apply pressure to make the glue stick.
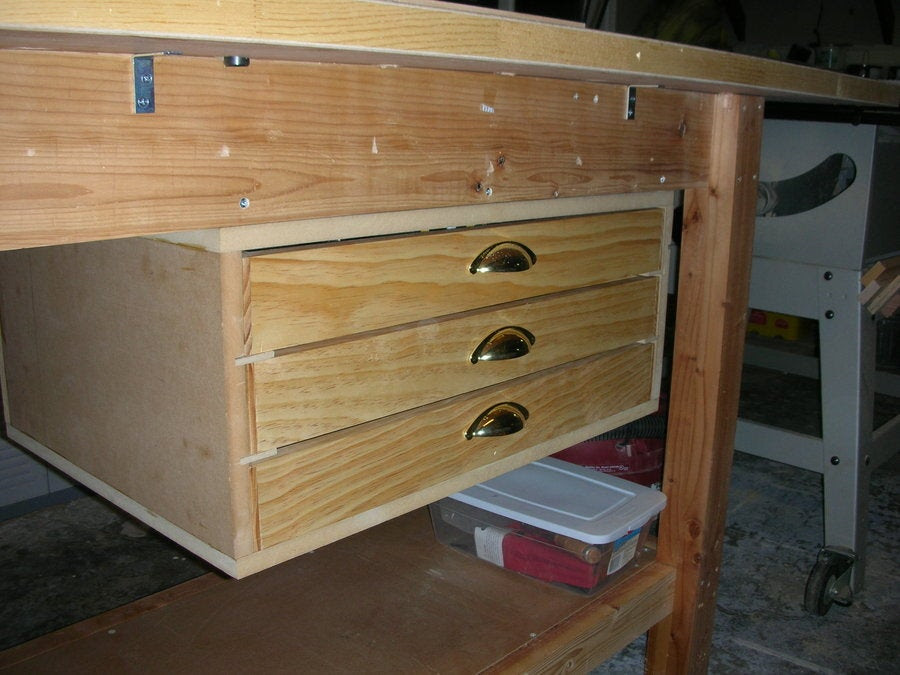
Run your hand around the border to ensure the board is attached at all points. If the panel is thin enough, you can also use staples. Install handles on the front of each drawer. Drill a hole into each point. Then, hold the handle over the holes and install the screws from the back. Repeat this for each drawer. Part 3 of Attach the sliders to the bottom of each drawer.
This hardware allows the drawers to slide in and out of the bench. Place a slider on each side of the drawers. Then screw each one into place. Follow the directions on the product you use. Slider kits are available at hardware stores. Measure the distance from the top of the drawer to the sliders. Use your tape measure and check the distance from the top of each drawer to the slider.
If you made each drawer the same size, then this should be the same measurement on each one, but double check just to make sure. Write this measurement down so you remember it for the next step. Mark the distance for the slider mounts on each spacer. Take the distance you measured from the top of each drawer to the slider. Then, measure that distance down from the top of the workbench.
Use a straightedge and make a line at this point to indicate where the slider mount should go. Repeat the process on all the spacers. Attach the sliders to Under Counter Drawer Kit Key the sides of each spacer. Take the mounting sliders that correspond with the sliders on the drawers. Then screw the slider into place. Do the same for the corresponding slider on the other side.
Follow the directions provided. Slide the drawers into place. Take each drawer and line up its sliders with the slider mounts in the bench. Tilt the front of the drawer down to insert it into the mount, the angle it up and slide it into position. Include your email address to get a message when this question is answered. Submit a Tip All tip submissions are carefully reviewed before being published. Related wikiHows How to. How to.
More References 9. About This Article. Co-authored by:. Co-authors: 2. Updated: April 5, Categories: Building Workbenches. Thanks to all authors for creating a page that has been read 5, times. Did this article help you? Yes No. Cookies make wikiHow better. By continuing to use our site, you agree to our cookie policy. Related Articles How to. By signing up you are agreeing to receive emails according to our privacy policy.
Follow Us. X Help us do more We've been helping billions of people around the world continue to learn, adapt, grow, and thrive for over a decade. Let's do this! With a business account you can get significant discounts off of list price.
In my case, in order to add shop cabinets, I needed to remove the front middle cross brace. I just cut it off in place using a SawAll. Also, since the workbench was already set in place and loaded on the top, I decided not to cut the rear middle brace. This meant, though, that the back of the cabinets would butt up against the rear brace and would not be able to rest on the rear bottom 2 x 4 brace for support.
I added short 2 x 4 braces underneath the front and rear lower cross braces in order to provide support for the cabinets when the 2 x 4 begin to sag. I also added recessed 2 x 4 bracing front to back across the entire length of the bottom in order to hold the weight of the shop cabinets.
Note: I don't think this step would be needed if you are able to cut out the rear middle brace in addition to the front middle brace. I then measured the full opening size that I had available for cabinets height x depth x width. Recommendation: Start simple. Build a simple cabinet first. I figured that I could build a second set of cabinets later to fill out the remaining space, but since I had never built shop cabinets before, I wanted to start simple.
It doesn't need to be a fancy sketch you can see my first one wasn't very fancy, or very accurate, at all , but you want to make sure that you take into account the thickness of the plywood and various mating surfaces. It will serve as a roadmap for you as you begin to make your cuts and build your cabinet s. Note: It is not critical to specify detailed drawer dimensions at this point. Just determine how many drawers you want, and approximately how tall you want each drawer to be based upon the opening size between the top and bottom front faceplates.
The detailed dimensions for the drawers can be worked out later. Note: The top and bottom faceplates hold the sides together and after those are fastened, the left and right faceplates are cut to size. Suggestion: You will want to locate a good low cost source for drawer slides early on in the project. Check with any cabinet suppliers that may be close by. I used Wurth Baer, a cabinet parts supplier in our area. Using a business account with Wurth Baer, you can get drawer slides at a significant discount over retail.
I cut the large pieces sides, bottom, top from a 4' x 8' sheet of plywood using a circular saw and a guide on the initial project. I have since graduated to using a kit panel saw called a Swap Saw to cut the large pieces.
The simplicity of Tom's design is that you lay out the locations of the drawer slides while the left and right cabinet sides are still on the bench. Position the left and right sides on a flat surface and layout where you want the drawer slides to be. Using a ruler, lay out where you want the slides to be on both pieces.
See Tom's book for more details. Unfortunately, all I've got is a pic from the 2nd set of cabinets after they were assembled showing how the slides are mounted. Assemble the frame of the cabinet using the sides, back pieces, and front top and bottom faceplates. I used Kreg pocket screws for most of my fastening, but you could just as easily use nails, wood screws, or wallboard screws. I don't have any pics handy of when I built the first cabinet frame, but I've attached a couple of pics from the second cabinet frame under construction.
Note: In these pictures, I added stiffeners across the top of the cabinet and decided to putting an top across the entire cabinet the saved using a lot of wood.
Why add a top when nobody will ever see it it's always going to be under the workbench, hidden from view? In the beginning, take your time on this one. It is critical that you do not make the drawers to wide they will bind or too narrow too much play.
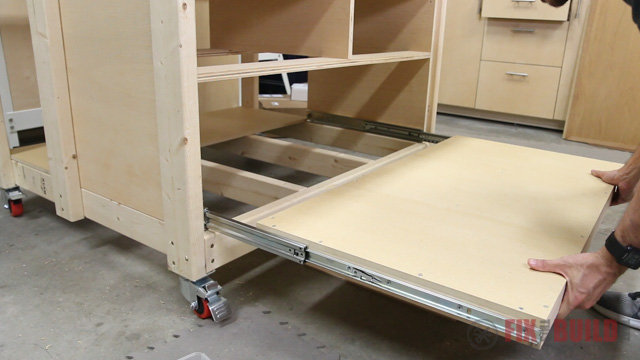
After you've done a few, you'll know what to look for. You make the front of the drawers the full width, or you can sandwich the front in between two side pieces. It is your call. I tried both. Remember that you will be adding faceplates later on and any joints will be covered up. Put it in the drawer slides.
Hold it in place and slide the drawer in and out and see if it slides the way you want it should slide easily. If it does not slide easily, re-measure and recut the drawer pieces as needed so that it does slide easily.
I then proceeded to design the build the second set of cabinets using Tom Clark's design techniques. After I finished the cabinets, I immediately filled them with some of the tools that I have in my shop. I really learned a lot from building these cabinets and am really enjoying using them. If you have any questions, please post a comment. When I can afford some better plywood, I'm going to make nice drawer faceplates and add drawer handles.
To give you an idea of what the drawers would look like with faceplates and handles attached, I've attached a couple of pics of a large art storage box with two drawers that I made for one of my daughters for Christmas using the same techniques.
The handles and the staining really make it look nice! Hi just ran across this and want to build it myself. I can not find Tom's book anywhere. Reply 8 months ago. Yes, unfortunately, the Tom's booklet is no longer available. If you have a specific question about the drawer design, please let me know and I will try to answer it.
Are pocket holes stronger than nails and glue? I don't know if they are stronger than nails and glue, but I haven't Under Shelf Mounted Drawer Upper had one come apart on me yet and I've made over drawers Under Workbench Drawer Kit 05 some of them very wide and deep drawers.
I was more interested in the process of layout of the drawer sliders in the space, I am going to build the drawer just like you have but cant figure out the spacing of the sliders. Please carefully review all of my Instructables that involve drawers. As I've made more cabinets and drawers, I've included more information in the Instructables. The basic process is to lay the cabinet sides side by side on a table and then drawer a line across both pieces at the same time to locate the position of the bottom of the drawer slides.
Then attach the outer Under Workbench Drawer Kit Games drawer slides before assembling the cabinet. Thanks, Paul. I found shimming the drawer slides with washers makes it easier to get a less then perfect sized drawer to fit.
Reply 4 years ago. Tyler - Yes, it really important to not make the drawers too wide as they will bind. So, the simplest way to add washers would be to add them to the slides that screw to the drawer bottoms.
|
Diy Wood Disc Projects Online Aqua Wood Grain Filler 10 26 Inch Drawer Slides 3d Elmers Carpenters Wood Filler Stainable Pdf |

pff
01.08.2020 at 22:27:42
Jin
01.08.2020 at 12:16:40
centlmen
01.08.2020 at 16:53:35
H_Y_U_N_D_A_I
01.08.2020 at 20:49:18