Kreg K5 Master System Uk 01,Pumpkin Carving Kit Hobby Lobby For Sale,Makita 125 Hp Router Code - Easy Way
Note that next day delivery for orders placed after 4pm on Thursday, up to 4pm Friday, is usually Monday excluding bank holidays. Estimated delivery for all orders placed over a weekend is Tuesday.
Note that due to the size and weight of some products, next working day delivery is not available and additional carriage charges will apply. If you would like to return your goods, we will offer a full refund or exchange within 30 days of purchase.
For full details, visit our delivery and returns page. All of our products come with a standard 1 year manufacturers warranty, however if you would like to discuss extending this warranty, please contact our customer service Kreg K5 Master System Best Price team on , or email customerservices toolstoreuk.
For further warranty information from this specific manufacturer, visit our warranty page. Customer Reviews. By HerbertGoffelman on 19th November It creates a strong joint on its own but I added the dominoes for added stability and to stop the piece from moving when screwing, only thing is it didn't come with a lot of screws so purchase screws I have used the 32mm screws the most on 18mm thick and 15mm materials. By Tom on 17th August By NicholasSanders on 18th March I cannot talk about the longevity of the joints as they have only just been completed".
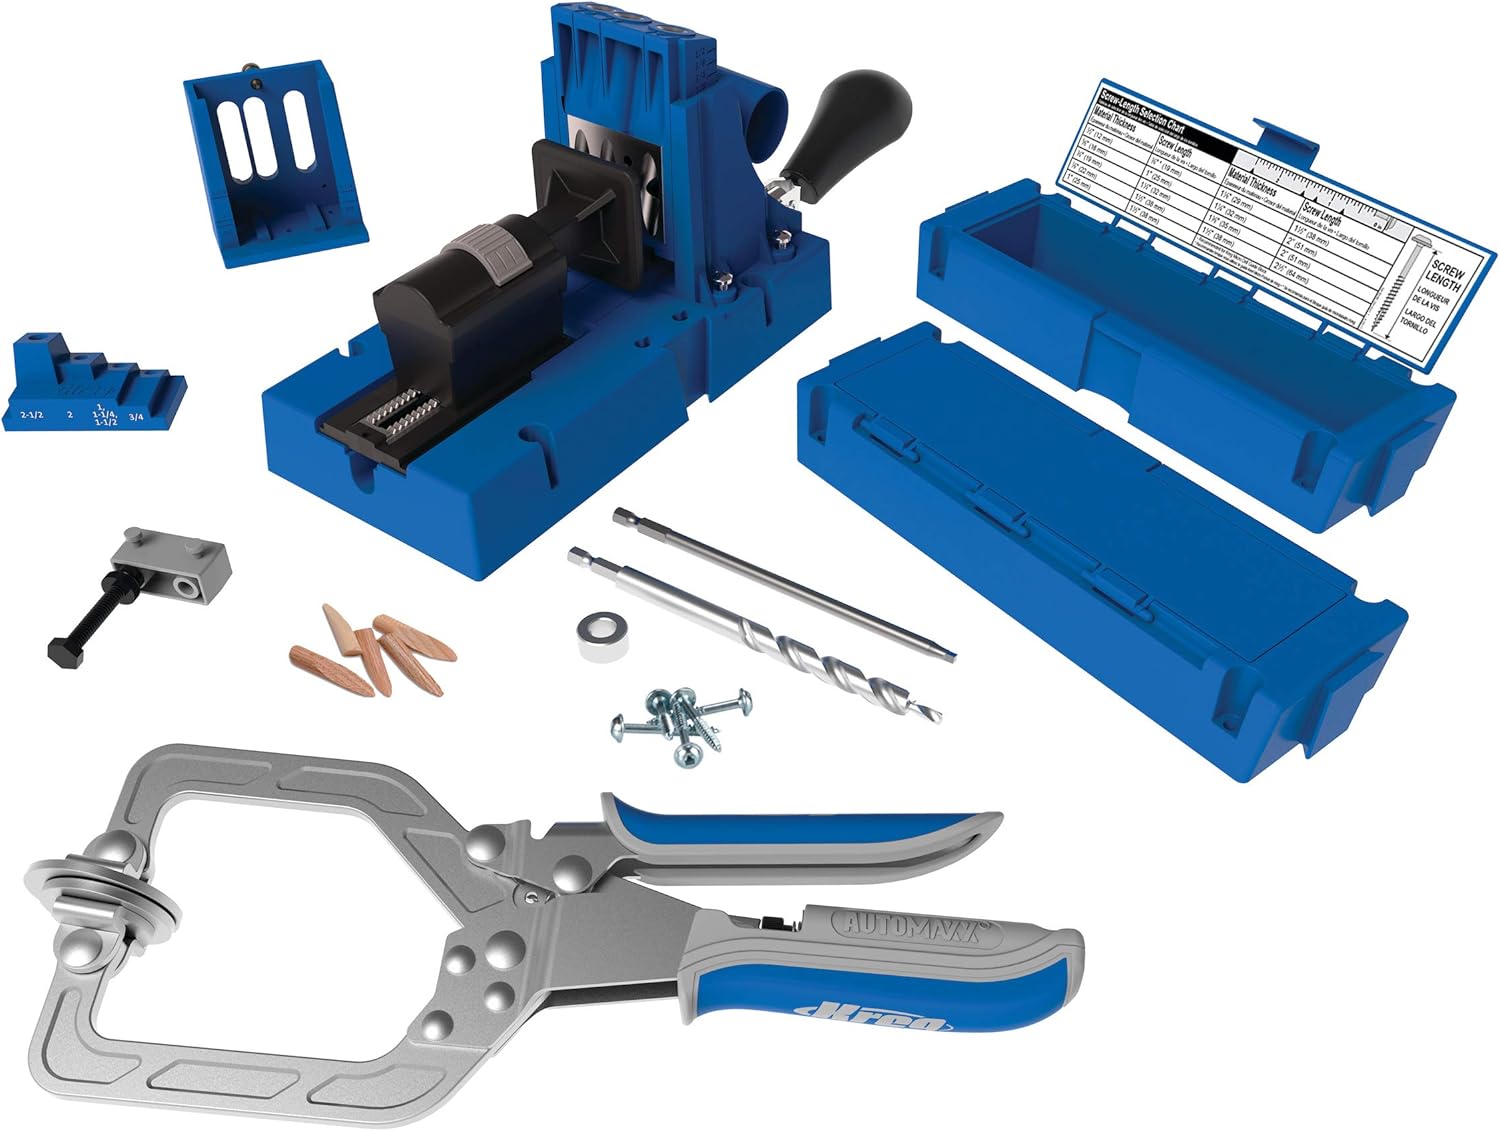
By ArthurFerguson on 22nd November Easy to set up and gives excellent results Kreg Pocket Hole K4 Master System Analysis Instruction manual very informative. I had never used one of these tools before but I had no trouble in using it and achieving good results. Keeping the mess down is another nice advantage over my HD system. If you are going to be using large boards than the accessories found in the K5 Master System may be important to you. The Master System comes with a portable base that can be used instead of the clamping system.
It also has an Automaxx Face Clamp that locks into place on the portable base so you can clamp the base to your wood. I'll explain these accessories shortly. The Standard Kit comes with three downloadable project plans for you to build and the Master System adds another three for a total of six projects you can download and build. One thing I have noticed in all of Kreg's products is the high quality of their instructions.
The K5 has a very nice instruction manual to guide initial setup and use of K5 Master System Kreg Games the system. Here are a couple of pages from the manual. The length of the screw you use in a pocket hole is dependent on the thickness of the wood you are using. The K5 has etched markings on the drill guide to help set the guide at the right height.
There is also a setup fixture to help set the collar on the drill bit. The collar stops the drill from going all the way through your board. Once the drill guide is set to the height of your wood, you put the screw length fixture in place and insert the drill bit. Once they are in place you can slide the collar onto the drill bit and tighten the setscrew. The last accessory for the clamping system is a 'stop-block' that fits into keyholes Kreg Jig Master System Video File in the base of the system.
The stop-block is nice if you want to make repeated cuts on multiple boards and have all the pocket holes in the same place. The stop-block has an adjustable screw and clamp so you can fine-tune the location of your cut and lock it in place.
Below is a view of the Master System all put together and a board clamped in place. I found that they kept the clamping system really stable as I moved the board between cuts and while drilling. Once the board is clamped in place you simply insert the special drill bit and drill down until the collar bottoms out on the drilling guide.
One nice feature that I really liked was the ratcheting locking system for the clamp. You do not need any tools to change the location of the clamp for different thicknesses of wood. The ratcheting system handles the thickness changes automatically. Cabinet Project. As with any project for someone else, I had a few 'design enhancements' over the past month. The shop owner decided that it would not be a good idea to cover up a quad-outlet so I needed to remove a corner of my cabinet.
But, it really doesn't matter because we are interested in using the K5 to put the pieces together. Here is a Sketchup drawing showing what the current and final! Below are the pieces I'm going to use with the K5 to put the cabinet together. You will notice in this picture that I've mounted the K5 system onto a piece of plywood. This makes the system very stable and I can clamp the K5 to my bench.
The first thing you need to do when building a project with pocket hole screws is to determine where to put the screws. The instruction manual discusses this and there are both strength and aesthetic considerations.
I like to clamp the project together and mark the edges that will get the screws. I like to pick locations that will hide the screws if it doesn't impact strength. Once it is clamped together I mark the edges and surfaces that will receive the pocket holes. After that, it is just a matter of clamping the boards in the K5 and drilling the holes.
You can use any of the holes on the drilling guide for this type of application. Sometimes you'll use one set of holes versus another for special applications, which I discuss later. Once the holes are drilled you need to clamp the two pieces together in order to put the screws in without the boards moving. This clamp is designed so the one leg fits into a pocket hole and then clamps around the mating board.
I like using this type of clamp because it gives you a nice tight fit right at the joint. This clamp will help hold the boards together while I'm putting a screw in place.


|
Decorative Wood Gate Plans Pocket Hole Jig 18mm 9mm |

Natcist
17.09.2020 at 18:10:51
SmashGirl
17.09.2020 at 16:40:27
Samurai_0505
17.09.2020 at 23:53:29
sakira
17.09.2020 at 12:48:32