Gouge-chisel-sharpening-jig-nova,fully-automated-wood-designing-machine-size,rockler-tools-denver-2020 - Reviews

It is the best tool that is accurate, compact, and user-friendly. Shortly, it comes with a quick and easy setup.
You can easily set up the chisel in the jig. Moreover, the instructions it comes with our easy to follow for quick assembly. The jig comes with fine and fit finish on it. You would simply love this tool.
This is a sharpening system that comes with everything you need to sharpen your turning tools. You can use this sharpen the following items; chisels, gouges, bowl gouges, spindle gouges, carving tools, woodturning scrapers, parting tools, block plane irons, and more. The system provides you with three primary of sharpening. You will get each tool according to the exact specifications. Additionally, you will get a precise edge to your bevels.
The tools would last longer with much durability. This is an ideal way of sharpening flat-edged tools like woodturning skews, chisels, and hand plane irons. To get the correct angle, the system has designed the tool holder for your tools.
Thus, you can easily achieve consistent repeatable angles with amazing results. So, get your sharpening tool now from the list of mentioned tools to get the perfect and long-lasting edge.
These tools provide sharpening with much ease and accuracy. Try to skim through all the specifications of the item before purchasing it. However, these are some of the best ones that come with economical prices. All of them are specifically designed to handle your basic chisels and plane irons.
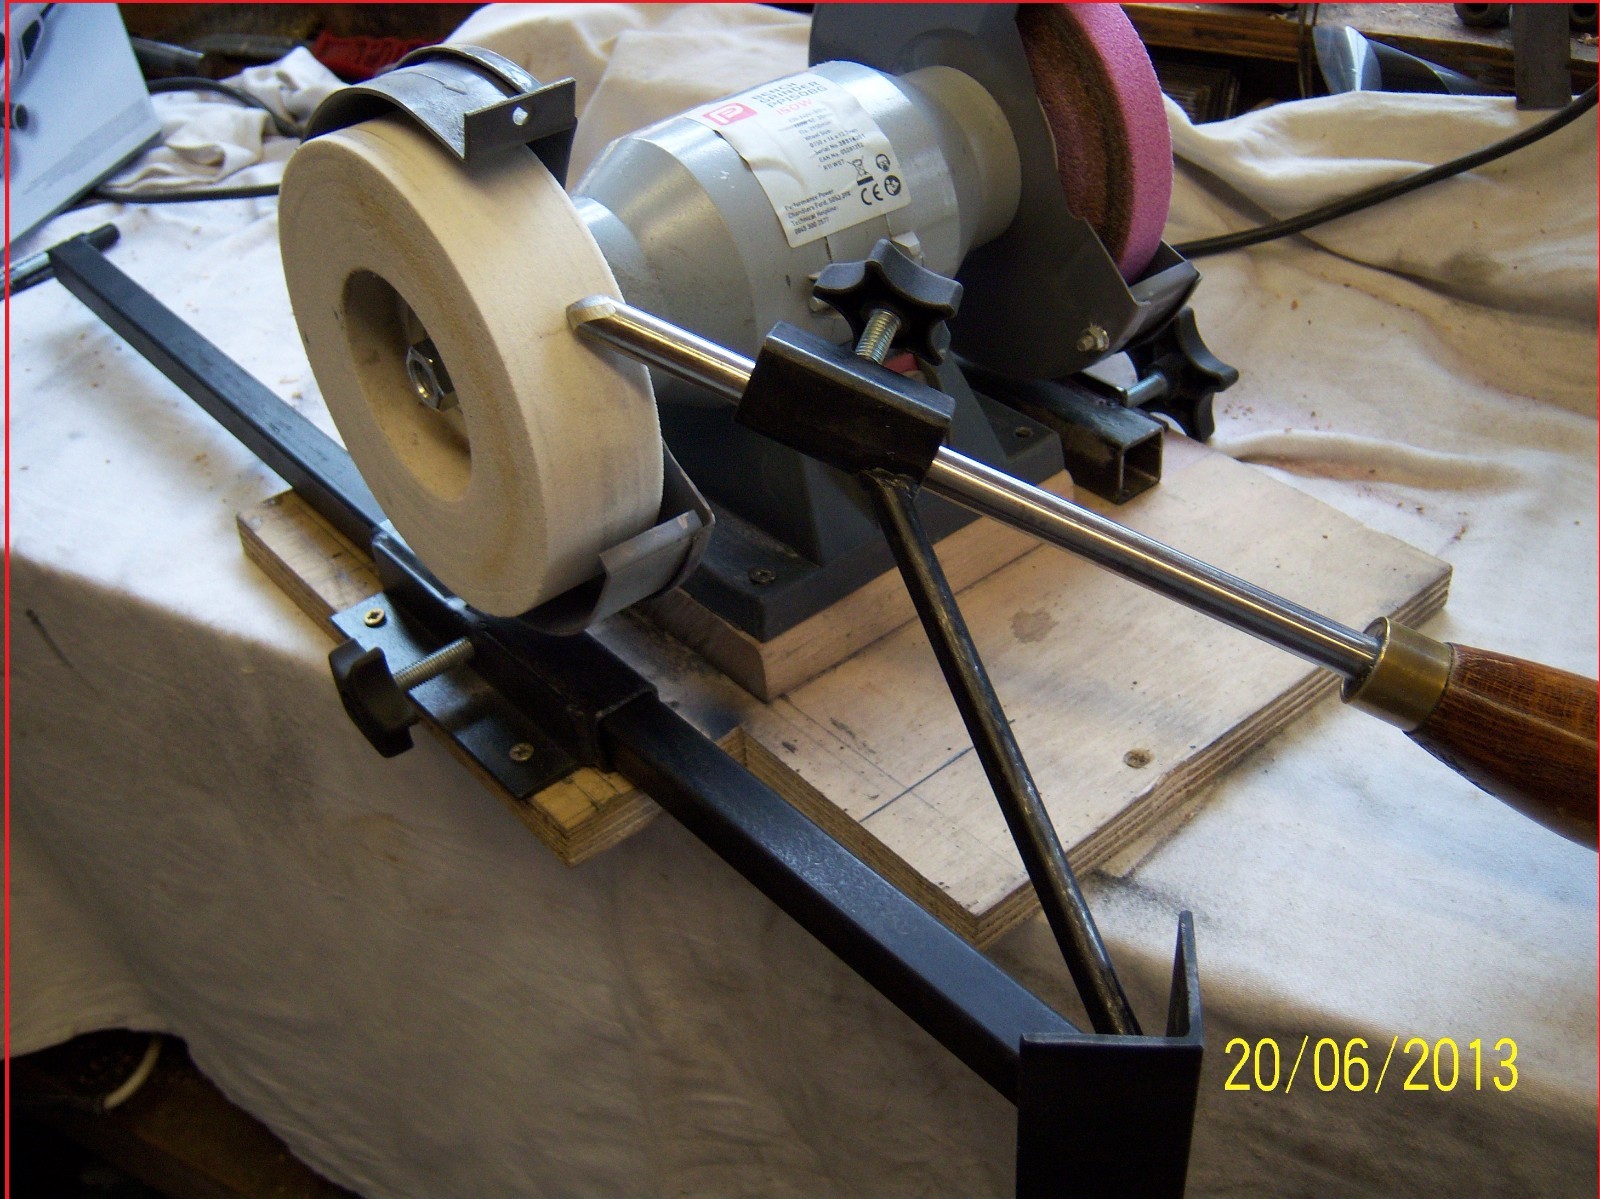
They are pretty handy and reliable. A coin in the bottom of the hole stops the gouge nose digging in. I stand the jig on top, face down, and insert the gouge so it is standing free in the hole, then tighten the jig clamp. The third is a template to set the distance of the jig cradle from the wheel. A dowel of the right length between the cradle and the wheel rim would work, but would not be as positive as a spacer with two-point contact.
I use a narrow triangular scrap of board. I cut it too long, then put it in position, but alongside the wheel. The position of the wheel rim can then be marked on it with a pencil and the curve cut with the band saw. Cut enough clearance in the middle so it contacts the wheel at two points. As an alternative to making a different distance template for each grind, you can use just one distance setting and put spacer blocks of the right thickness in the cradle.
Dan, if you want a specific angle such as 50 degrees on the nose bevel, one way to achieve it is to cut a wooden strip with that angle on the end. Fix the strip in the jig as if it were a gouge.
Replace the strip with the gouge, do a test grind, and refine the settings. Some trial and error might be necessary to get the bevel angle exactly right before you make the templates.
But I would probably just put the actual gouge in the jig and set the approximate angle by eye. The angle can be checked with a protractor after preliminary grinding. Hmm, whilst it is a very neat guide for sharpening gouges, there is an issue with resting plywood against a grinding wheel. The risk is that the resin in the adhesive will melt into the surface of the wheel and expand as it gets hot, forcing the structure of the wheel apart which will potentially result in bits flying off at high speed the surface speed of a grinding wheel can be mph.
Ideally the jig should be set clear of the wheel rather than resting on the wheel surface. Sorry to be boring but safety is paramount. Mike, I have no problem with you raising safety concerns. Your email address will not be published. Notify me of follow-up comments by email. Notify me of new posts by email. Your email address. Templates The key is to use setting templates. Duplicating an existing grind If you have a properly ground gouge to start with, you can usually make templates that will let you reproduce that grind.
Changing the grind If you want to change the grind of a gouge, you have to adjust the jig and grind the gouge until the required angles and shape are achieved. Reshaping If you are extensively reshaping a gouge, rough out the new grind on an angled platform before starting with the jig.
The wings The bevel angle to be ground on the wings is hard to judge without an example to copy. Making the templates The first is a template to set the jig locking angle. Distance template The third is a template to set the distance of the jig cradle from the wheel.
Previous post: Bowl reversing jaws are easy to make using carrier plates. Next post: Dust control at the lathe. What works best? David Gerrard. Thanks Terry, good article.
Brilliant thankyou. Roll the gouge from side to side with a firm even stroke. Attach a piece of leather to a dowel to polish the inside of larger gouges. Use a leather shoe string charged with abrasive to polish the inside of small gouges and veiners.
Tags: sharpening. Share this post Tweet. Author: magintern. Don't Miss a Single Issue! Like us on Facebook.

|
Bowl-making-router-bits Wood-for-turning-on-a-lathe-100 |

Dr_Alban
02.05.2021 at 21:31:40
RENKA
02.05.2021 at 20:45:22