Diy-shaker-style-kitchen-cabinet-doors,belt-driven-table-saw-71,build-a-wooden-weight-bench-map - Downloads 2021
Ashley, your tutorial is amazing! I have the same type cabinets with the rounded edges. You mentioned that in the tutorial but I was wondering if you filled in the gap between the door and the new trim? Thanks for the inspiration to redo my own :. I am interested in this as well. Have the rounded edge cabinet and would LOVE to do this.
Has anybody tried? I realize this was posted quite a long time ago and the OP, followers or blogger may not see this, but I am interested in the answer to this question or to seeing pictures of what the inside of that external edge looks like when you open the door.
Would wood filler work for that? I know you said yours are slightly rounded, mine are noticeably rounded. I have these exact same doors and have been playing around with the idea of doing this exact same process with them for years. I was worried that they would not look good enough. Now I am totally inspired and have decided to go ahead with it. Thank you so much for all your wonderful information. I know I will be using your blog a ton to help me with this project.
Thanks so much!!! These are stunning and will certainly be part of the project. Can u tell me if you primed and painted the inside of your boxes? Is that something you regret either way? The inside of ours was not pretty at all. Hope that helps! Thanks for stopping by! About how much did this cost you? I know our kitchens are not the same size or can probably be compared but would love some idea for our tiny kitchen!
We are currently doing this exact tutorial on our cabinets. We are sanding everything as smooth as we can get but the nature of the plywood is to peel so it has me worried! Wondering how they held up over the years : thanks!
And thanks for making this tutorial for us to follow! It will save a fortune and many hours of filling and sanding as well. Oh yeah. Another thing. Buy your handles from Amazon. Same is true of self-closing stainless hinges.
I love this! We are in the process of buying a home built in and we are redoing the kitchen. Same flat doors with rounded edges except ours look like they have about 10 coats of paint on them! So I was searching on how to change them and came across this blog!
I will be trying this for sure! FYI, in our home we are presently renting, I updated our kitchen with some inexpensive changes. I found these sites and will always go here first for all my hardware, knobs and pulls. I get them from either 99 cent knobs or knob deals.
Well worth it! Thanks for posting this! Love your kitchen redo! What size did you use and how thick are your cabinets? Thanks, George. I love this idea and want to do my kitchen. Did you line it up with the top of the rounding, leaving a little door showing outside the trim?
Or did you line it up with the edge of the door? I am also wondering this exact thing. I am thinking i am going to fill it but i am not sure if that will make it look right.
From the pictures it almost looks like she left the rounded edge, but its hard to know for sure. I really appreciate it. Hi I am trying to do something similar to my cabinets but my plywood is just not smoothing out as much as I would like, did you have a problem with your plywood strips not ending up smooth enough?
This helps the smoothing process! Let me know if that helps or if you have any more questions! Thanks so much!! Thank you! You have great tutorial here! I have been wanting this shaker style cabinet for long. Now, I am thinking to pursue remodeling my kitchen, at first I decided to just repaint my cabinet with white color but I have change my mind, I will now try my favorite shaker style.
I hope my family will like this. I was wondering the same thing so I did some searching. I am seeing that most people use a brad nailer, 18 guage for the trim. Not sure if that is what she used though. Following your guide. It still looks good. I used cabinet grade birch. My carpenter is putting on the strips and I will go from there.
Thanks so much. I decided to be a DIYer and turn my cabinet doors into the Shaker style. I work full time and then come home to my 2nd job of the kitchen remodel. I had Lowes cut the strips. I have to sand all the edges. I then glued and clamped them to the door. Next night, I have to prime with 2 coats of BIN as the doors are stained dark brown. Then, the next couple nights painting both sides of the doors.
I have 18 doors to do. I only have 11 finished. Well, over the weekend, I started putting the handles on the drawers. Took me 3 attempts to get them on straight. TIP…use a nail to start a little whole before drilling the whole. I then tried hanging a couple doors…UGH!!! The first one I did was fairly large. When I open the door, it rubs on the bottom big time.
I tried another door. There are supposed to be 2 doors together in this particular cabinet. No room! This project is much bigger then I ever imagined.
Hanging doors can be quite a pain. Especially if yours are like mine and have to sit in there perfectly. There are different methods for hanging doors depending on what type of hinges you have. As for installing the hardware, I have a tutorial on my blog for that using a cabinet jig.
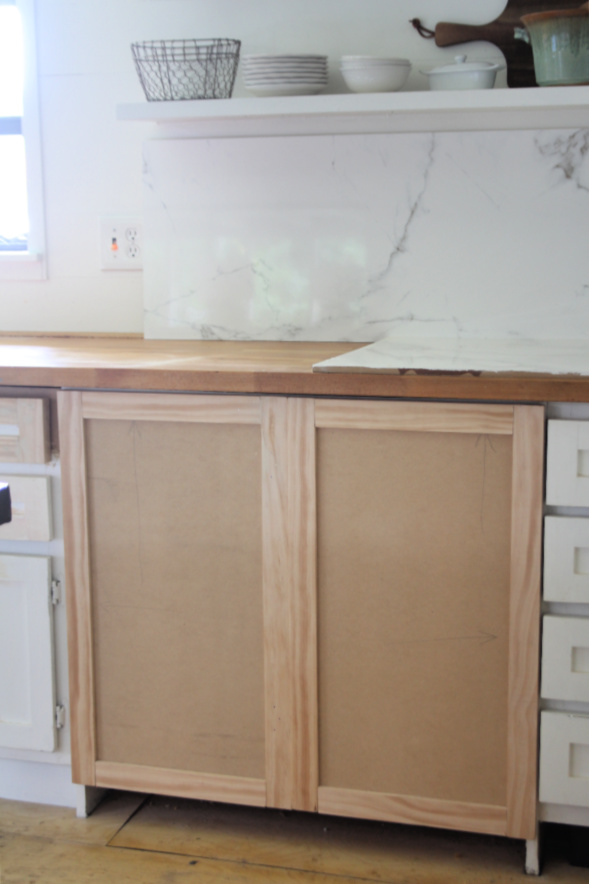
Once you have found the center this tool really helps keep it consistent on drilling the actual hole. Good luck with the rest of your renovations! Did you attach the plywood so that it stopped before the edges started to round, or did you somehow fill in that gap? I apologize for the delay in response.
This is an older post so sometimes I miss the comments. For the rounded corners on my doors I did not fill the gap in. I just set the trim pieces to the edge of the door right before it started rounding off.
Just make sure you are laying the trim pieces consistently across all doors. You can measure it if you want to know the exact difference.
Good luck! Great project idea Ashley! I have probably even worse looking cabinets in my most recent rehab property. This post really turned the creativity light on for me. This is a such a simple and creative way to update your cabinets.
I just saw a blog where someone did the same thing only they used yard sticks. The problem she ran into was that the numbers were really hard to sand down. Anyway, this is a great transformation! Can you please respond to the many questions about how to handle the rounded cabinet door edges? Such a great tutorial! Only bummer is how bad our workmanship is!
It dries super fast and gets frustrating trying to apply it before it gets too thick and crumbly, which resulted in poorly filled holes. You can see the majority of the holes now!
Also, who knew that there are inset and flush hinges, not I! Haha fun, right? Sure sounds like an adventure Lindsey! I hope you love your end result, and I have totally made the same mistakes with product choice! I know this is an older post, but gearing up to attempt a cabinet makeover. I am starting with a half bath to see how difficult it is and how it turns out, before attempting my whole kitchen!
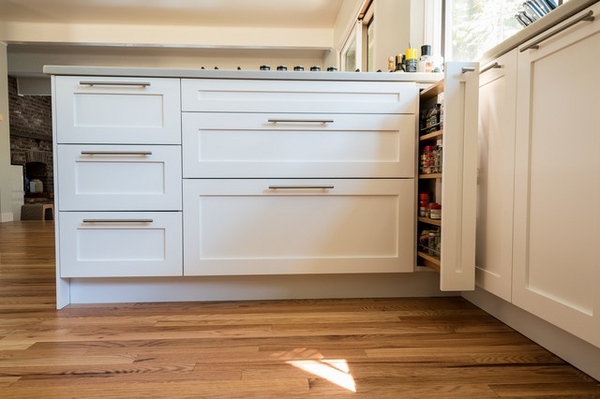
Hi Cindy, so I actually just left my drawer fronts as is. You could certainly add a sheet of plywood to the front of your drawers if you do want them to all be the same. Thanks for stopping by the blog!
Thanks for the great idea! My wife and I are in the process of doing this to our cabinets now, as a temporary upgrade until we can afford new cabinets in a few years.
All for less than the cost of 1 cabinet door! So far they are looking great, hopefully we will have them done by the weekend. Did you have the oak plywood cut at one of the big box stores? Keep an eye out on Craigslist for a saw, there are some great deals to be had once in a while. Thank you so much! The glue is drying…. I see in the original pictures that there is detail on the faux drawer directly beneath the sink.
Did you just fill in those grooves with wood filler and then sand and paint right over? What did you do for any adjustment on hinges? You can use woodprix plans. The best handbooks and very detailed instructions. You can learn much from them and make it yourself. My husband and I are doing this to our kitchen right now. I hope they turn out just as nice as yours did! Did you paint the inside of your cabinets? Wow looks great! I want to do the same thing in our kitchen but the door are all formica.
Also what if i use glue and clamps but no nails since i dont have a nail gun? Hi, I wish To try this. Did you manage to get rid of the grain of your wood or do you still see 2 different textures on your doors once all the job is done?
Many thanks! You can still slightly see the wood grain, but you could not see a noticeable difference between the wood grains. It makes sense that making my cabinets look nice would be a good idea. These cookies do not store any personal information. Any cookies that may not be particularly necessary for the website to function and is used specifically to collect user personal data via analytics, ads, other embedded contents are termed as non-necessary cookies.
It is mandatory to procure user consent prior to running these cookies on your website. Like this: Like Loading More In Interior Design. How to create the most beautiful analogous colors combinations Analogous colors and like color schemes are really easy to have knowledge of.
Viso lighting — spectacular lighting fixtures design ideas Viso lighting is synonymous to modern design, good taste and elegance. Viso company specia…. Neolith countertop — innovative kitchen countertop materials Neolith countertop is an amazing countertop with striking appearance and sleek modern look….
TV frame ideas — frame your TV and blend it in the home interior TV frame ideas appeared over the past decade with the appearance of plasma TV panels. Tropical pools — beautiful and exotic landscape ideas Tropical pools offer a true island paradise atmosphere in your backyard. The main principl…. Load More In Interior Design.
Follow Me. We want to inspire you, to give you great ideas and to challenge you to make crafty things. Be filled with mastery! This website uses cookies to improve your experience. We'll assume you're ok with this, but you can opt-out if you wish. Accept More info. Out of these, the cookies that are categorized as necessary are stored on your browser as they are essential for the working of basic functionalities of the website.
We also use third-party cookies that help us analyze and understand how you use this website. These cookies will be stored in your browser only with your consent. You also have the option to opt-out of these cookies. But opting out of some of these cookies may affect your browsing experience.


|
Miter-max-clamps-yogurt Mitre-fold-blade-90 Woodworking-power-tools-uk-5g Measuring-tools-for-woodworking-3d |

spaider_man
09.05.2021 at 14:38:47
HeDeF
09.05.2021 at 15:23:15