Diy Wood Chess Table Uts,Jet Planes Pascall Queue,Rigid Table Saw Router Insert Zip,Metal Cabinet Locks For Double Doors Note - Step 2
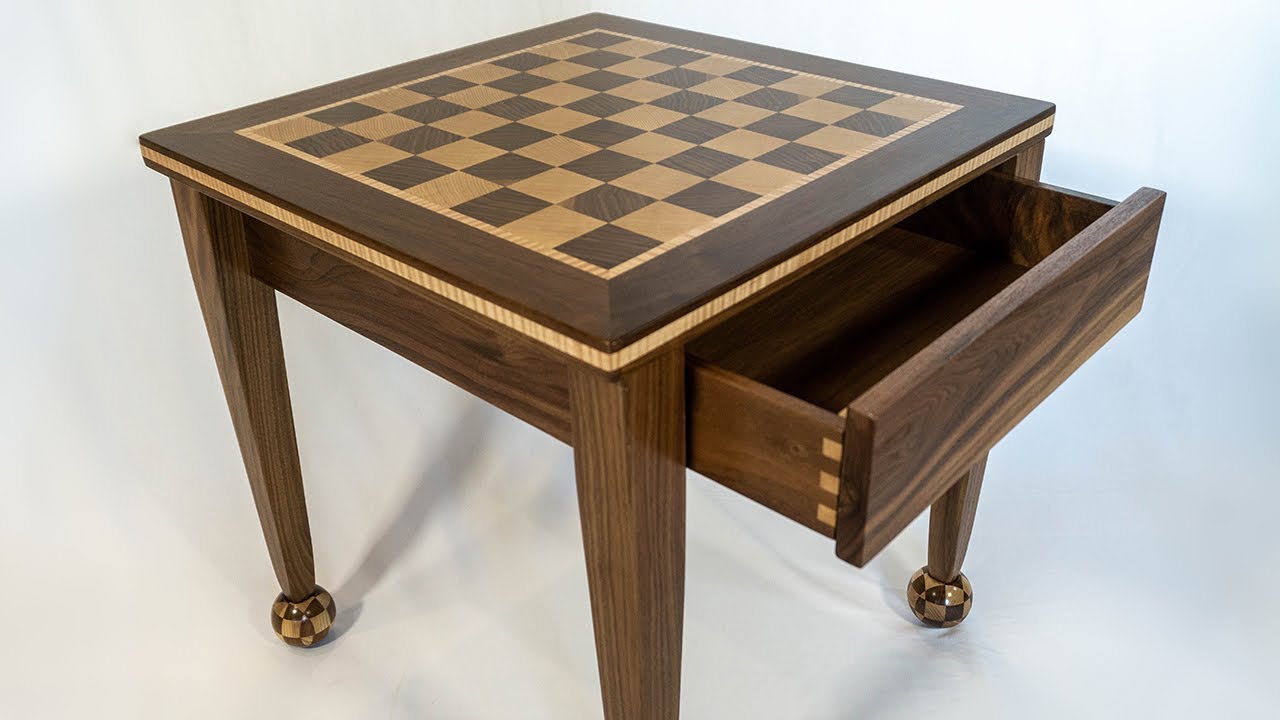
Building your own chessboard can be quite fun, and satisfying to make once you get the best result. It will also make you love playing chess more by using a board that you made yourself.
You can also buy a 1 x 2 boards of wood if you want to skip this step. From the ripped wood pieces, cut each ripped diy wood chess table uts into 4 pieces to inch roughly. You can use a stop to avoid measuring it again and again. Rough cutting the woods will make it easier for you to glue them up, and when cutting them into strips.
Next, lay the strips of wood in an alternate way. Make sure the edges fit well together. Spread the glue evenly on the sides before clamping them up together with the bar clamps. Once the board is completely dried, sand or plane the board to make it flat and even. After sanding the board, cut off the rough edges with a miter gauge. Lay and flip every other wood strip to create a chessboard pattern. Next, glue the strips and clamp them all together. Once dried, sand or plane the finished chessboard.
Rip and crosscut the plywood into the size of your chessboard. Then use a clamp, use, and 1-inch brad nails. Fasten plywood to the chessboard to create a smooth and flat surface at the bottom.
Measure the height of the newly made board in different points, and then take note of the smallest height. Rip an aspen wood to that size. Line the ripped board with the chessboard and scribe its lengths. Cut the wood with a miter saw with the given length. Use brad nails and glue to fasten the pieces at the edge of the chessboard.
Miter a degree angle in the rounded chessboard. Repeat the process on the other sides. Let the mitered boards sit on the chessboard until the glue is fully dried. And there you have your very own DIY chessboard.
I hope this guide has helped you out in creating your own chessboard masterpiece. You can check here for images. Save my name, email, and website in this browser for the next time I comment.
Notify me of follow-up comments by email. Notify diy wood chess table uts of new posts by email. Step 2: Rough Cut the Boards with a Miter Saw From the ripped wood Diy Wooden Chess Table Free pieces, diy wood chess table uts each ripped wood into 4 pieces to inch roughly.
Step 3: Glue the Finished Strips Next, lay the strips of wood in an alternate way. Step 4: Sand or Plane the Board Evenly Once the board is completely dried, sand or plane diy wood chess table uts board to make it flat and even. Step 5: Diy wood chess table uts Off the Uneven Edges After sanding the board, cut off the rough edges with a miter diy wood chess table uts. Step 7: Flip and Glue the Strips Lay and flip every other wood strip to create a chessboard pattern.
Step 8: Cut and Fasten the Plywood into the Chessboard Rip and crosscut the plywood into the size of your chessboard. Step 9: Rip a Wood into Depth Measure the height of the newly made board in different points, and then take note of the smallest height.
Step Scribe the Lengths of Wood Line the ripped board with the chessboard and scribe its lengths. Step Glue and Clamp-It Together Let the diy wood chess table uts boards sit on Diy Wood Chess Table Zip the chessboard until the glue is fully dried.


|
Whiteside Flush Trim Bits 800 Kitchen Drawer Mounting Brackets List |

Desant016
29.07.2021 at 16:26:16
Olsem_Bagisla
29.07.2021 at 20:25:36
TIMON
29.07.2021 at 16:15:28
LEONIT
29.07.2021 at 21:56:55