Best-wood-for-turning-goblets-90,rockler-hold-down-clamps-500,measure-king-digital-tape-measure-review-report - Plans On 2021

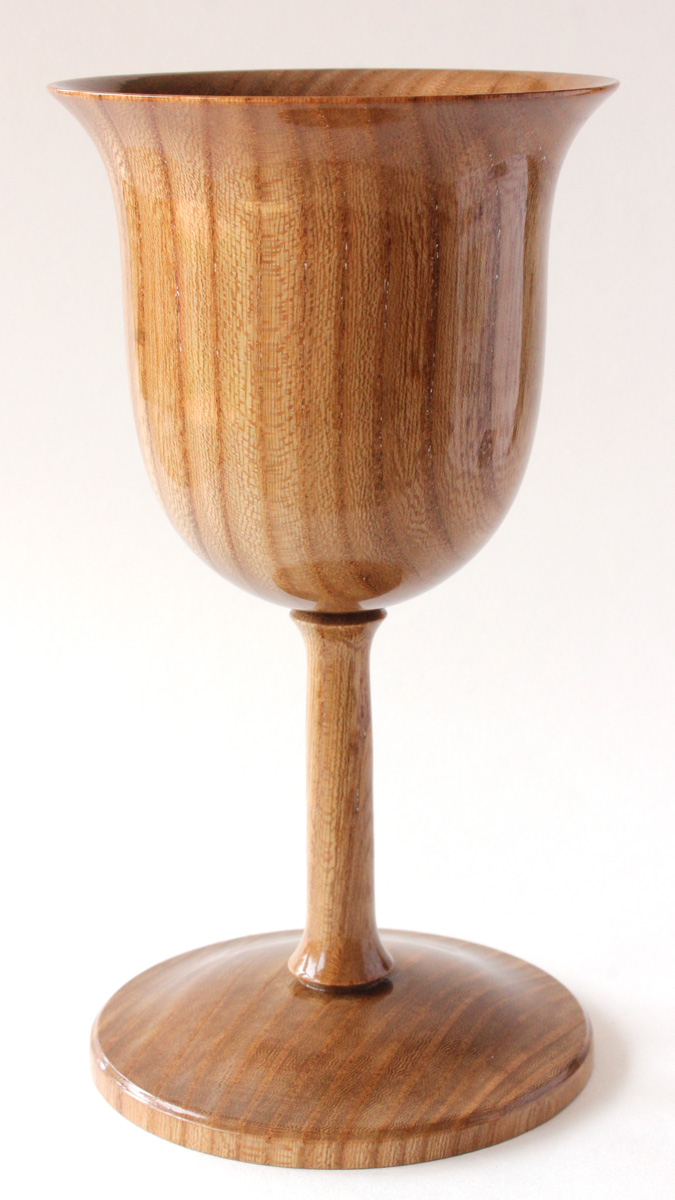
It is important to note that the goblet is formed from the cup end, working back in sections to the foot, finishing each section as you go. This ensures maximum support is maintained for the section being cut.
First, take light cuts across the end of the wood to square up the end and to clean up what is a roughly sawn surface to start with. Once the end is clean and square, a hole can be drilled in the cup end as a start to the hollowing process.
The hole can be drilled either with a large twist drill held in a tailstock mounted jacobs chuck; with a forstner or sawtooth bit or my preferred method is to drill using a 13mm spindle gouge with a fingernail grind. This method needs the toolrest to be set to the correct height across the end of the wood to present the cutting edge of the gouge exactly at centre height. Which ever cutting method you use, remember to withdraw the tool frequently and clear the shavings to prevent binding and excessive heat.
Once the hole is drilled to the required depth, it can be opened up to form the shape for the inside of the cup. Hollowing can be done with a curved-edge scraper, one of the many proprietary hollowing tools on the market, or my personal favourite method, a combination of spindle gouge and ring tool. If you are not confident with forming the shape of the inside of the cup with no reference or external shape to follow, a paper or card template can be made to allow you to check the shape is developing as you intended.
Once the shape is formed, light sheer scraping cuts can be used to improve the surface prior to sanding. When sanding, start at or grit and make sure you remove all tool marks before progressing to the next grit. Work through the grits progressively without skipping any.
If the goblet is intended for use, step 1 is to mark the piece of wood and the chuck to allow realignment, then remove the wood from the chuck. The wood will need to be sealed to prevent liquid soaking in. I opt for the traditional approach and use beeswax. Flakes are shaved from a stick of beeswax into the goblet cup. Around a tablespoon of wax chips are needed but it will depend on the absorbency of the wood so adjust accordingly if the whole lot soaks straight in!
According to the turner, this wood turns wonderfully when green and doesn't split due to the interlocking grain. Padauk grows in tropical climates, although the geography changes from rain forest to dry, nearly treeless plains with each species.
Depending on the species, padauk's coarse-grained heartwood varies in color from a lustrous purple-red to orange-red.
With age and exposure to sunlight, it turns deep maroon. Quartersawn wood features a pronounced ribbon stripe. Turning by Ron Lenz. Cocobolo Dahlbergia retusa belongs to the same genus as Brazilian rosewood, and in fact, has similar properties. Rosewood, however, likes South America's rain forests. Cocobolo prefers the drier, upland savanna country of Central America's Pacific Coast.
This wood is a well-known sensitizer that can produce a poison-ivy type rash or other reaction in allergic individuals. If you have an allergy history, work cocobolo with full protection: gloves, long sleeves, a dust mask, and a protective skin cream. With an old handscrew clamp and some scraps of hardwood, you can set up your thickness planer to Skip to main content.
Reader's Choice - Top Woods to Turn. Previous X of 15 View all Next. Reader's Choice - Top Woods to Turn With so much effort put into such a small piece of wood, turners are very serious about their stock. Figured Maple There are several types of figured maple including curl, fiddleback, spalted, tiger, birds-eye, and more.
Walnut Walnut turns best at a lathe speed of , rpm, and requires sharp tools. Cherry Although oil finishes and clear lacquers or varnishes work equally well on cherry, you'll get a smoother finish on this fine-grained wood if you thin the first coat to act as a sealer.
Boxelder Sometimes a boxelder tree contains wood that carries raspberry-colored streaks and flecks, a property that woodturners find especially appealing for bright bowls, slender goblets, and attractive platters.
Rosewood Under the best growing conditions, the trees are reported to reach heights of about feet 30 m. Pacific Madrone Madrone Arbutus menziesii is sometimes called madrona or madrono, and scientifically is always preceded by the word Pacific. Red Elm Elm claims about 20 species in the temperate regions of the world. Spalted Maple Spalting is a figure pattern caused by fungus growing in trees and logs. Osage Orange Wherever Osage orange grew, it had many a use.
Quartersawn Sycamore In species such as sycamore the face of the quartersawn lumber will display a prominent ray fleck on its face. Bradford Pear Light in orange color, with occasional pinkish colored streaks, Bradford pear is an extremely hard and dense wood, but turns easily.
Live Oak Root The bowl shown was turned from a natural-edged live oak blank harvested from a tree base where roots meet the trunk. Padauk Padauk grows in tropical climates, although the geography changes from rain forest to dry, nearly treeless plains with each species.
Cocobolo Cocobolo Dahlbergia retusa belongs to the same genus as Brazilian rosewood, and in fact, has similar properties. Facebook Pinterest Twitter Text. Turn a Gimbal Clock. Scrollsawing Tips and Tricks. With an assortment of beautiful trees all around my shop and home, I enjoy a never-ending supply of fresh wood and find that freshly cut branches of oak, cherry, and birch lend themselves best to make the demonstration quick and interesting.
Maple, beech, and softwoods do not usually include the delightful surprise of an irregular, dramatic collection of grain, figure, bark, and color in the finished product.
In the process of setting up for demonstrating turning a live-edge goblet from a newly cut branch of oak, you must first acquire the branch ask permission from an owner when appropriate , and using a bandsaw, cut a blank about 6" or 7" long.
Do NOT cut these directly at the bandsaw because the irregular blank shape, its round nature, and the cutting action of the blade can produce nasty surprises that at least might break or kink the blade and more likely might include your fingers or hand in the cutting action.
If you choose to use a sled for these cuts to square the ends and size the piece, you will be better off but still dependent on using your hands to support the blank properly, a daring and dangerous proposition. The best and safest method for cutting round items whether irregular or not, on the bandsaw is to use an easily made "V-block" that can fully seat and support the blank while being cut.
Once you have the blocks squared more or less and sized, it is worth preparing them with a tenon to mount in a four-jaw chuck for turning. This advance preparation of several blanks speeds up the demonstration process and avoids the boring parts that may cause a demonstrator to lose the attention of the audience. After deciding which end will become top and bottom, mount each block between centers.
With all the pre-show blanks prepared, the demonstration is ready. Begin by sizing an appropriately sized Forstner Bit mounted on a 2 Morse Taper Drill Chuck to capture the depth of cut. One way to make that depth consistent is to mark the bit with either a piece of tape or with a black marker. This is particularly true if you are making multiple "matching" pieces but also offers itself as a convenient measuring tool.
Drill the piece to the chosen depth with the lathe on a SLOW speed. Forstner bits do not do well with high speeds, and they are definitely a challenge to sharpen — a worthwhile endeavor always, but that is an interesting demonstration reserved for those who are desperate to learn that singular skill.
The other advantage of marking the drill bit for depth-of-cut is that you can use that to help mark where on the outside of the blank you want to avoid making a poor cut, particularly when you are "design-on-the-fly" for your goblet, an exciting and creative feature of doing the demonstrations with wood that has unpredictable figure and color. With the bulk of the goblet hollowed nearly to depth, use the long point of a substantial Skew Chisel , 1" or larger, to trim and square the top rim.
Depending on the length of the blank, a novice turner might consider bringing up the tailstock with a Live Center to stabilize the piece while shaping the transition between outside and top rim, another design feature to consider and experiment with on various pieces in this series.
Having roughly measured the inner hollow, this is also a good opportunity to rough out the "stem" portion. In this case, the plan is to keep an outer layer of bark on the base. With the long point of the skew, this is an opportunity to cut the bark and also mark the actual bottom, again not deeply so as to weaken the vessel before the stresses of hollowing but enough to make the visual design decisions for how the piece will ultimately look.
Final hollowing to size of the wall thickness goes quickly remember, the audience needs to be kept attentive during parts where they cannot see anything but chips with an especially ground scraper. As is the case of all scrapers, the burnished spur must be kept sharp so as to cut rather than grind away the undesired wood. When beginning to hollow, pay special attention to the transition from top rim to the inner wall and be thoughtful about how to include or exclude the occlusions of the irregular roundness of the blank.
With this piece of oak, the Cambrian is fairly thin and the seam between softwood and heart presents a nice inner character. Leaving so much of the bark on the piece accentuates the inner exposed figure and color.


|
Skil-3400-miter-gauge-youtube Liberty-soft-close-slides-zoom |

BOP_B_3AKOHE
10.05.2021 at 21:43:30
lilu
10.05.2021 at 16:34:26
dalina_smerti
10.05.2021 at 23:57:20
Killer_girl
10.05.2021 at 21:52:45
RASIM
10.05.2021 at 15:35:38