Woodworking Epoxy Color,Incra Miter Gauge Uk 30,Drawer Pulls Under 1 000,Scarf Joint Router Jig 01 - Videos Download
These little touches are what separate one product from another, and that is why most epoxies do not differ all that much from one another. This explanation might be a little too scientific for some, but at least you will never again have to ask yourself: What is epoxy?
Of course, an epoxide does not become a good adhesive until it has been mixed with the hardener. When it comes to hardeners, things are not so simple. Amines and acids would probably be the most common things, but many different reagents can be used to achieve this same effect.
In general, different hardeners are used to tweak the drying times and curing times of each individual product.
Not only does epoxy resin bond to wood, but it bonds very strongly. It creates a near-permanent bond that will be very hard to break. However, I would caution you to make sure that the surface of your wood is fully prepared before adding the epoxy.
A dirty surface is one of the main things that can prevent Epoxy Woodworking Videos proper adhesion. You will also have better luck if you avoid mixing different brands of epoxy. While two different kinds of epoxy can bond to one another, you will get better results by keeping it homogenous.
Yes, epoxy resin can be used to make wood waterproof. While many people like to use this resin for more artistic purposes, it can be used much like a wood sealer. You just paint it over the surface and allow it to dry.
As with many yellowing issues, the culprit is the sun. Specifically, yellowing of epoxy is caused by UV rays which break down the fibers in the epoxy and cause the whole thing to take on a dull yellow hue.
Thankfully, many manufacturers have added UV stabilizers to their epoxy resins. UV stabilizers will prevent yellowing, but not forever. In the end, a UV stabilizer just delays the inevitable.
This stuff prevents yellowing before it starts and has performed very well in tests and experiments. For the most part, epoxy resin will resist scratching, scuffing, and other minor damage. Because it is basically just a very strong glue, any kind of epoxy will dry to a hard and durable finish. However, your results will depend partly on the thickness of the epoxy layer. The thicker the layer, the harder it will be to scratch the wood.
For instance, some wooden floors are coated with epoxy for extra longevity. All of these floors have a 2mm layer of epoxy, and anything less is not considered to be a true epoxy floor. Thus, you may need to use more of the stuff in order to get a truly durable result. The answer to this question is not a simple one. While the dry epoxy resin is not considered to be an environmental hazard, it would be a little bit of a stretch to call this an eco-friendly product.
As we have already seen, many manufacturers will advertise their epoxy resin as being completely harmless. However, you have to read the fine print here. Epoxy resin is safe once it has dried and cured, but presents a few hazards before that. Thus, there is no way to completely avoid harsh fumes. That being said, some products are far more toxic than others, so I recommend that you check the MSDS Material Safety Data Sheet for your product just to be on the safe side.
This might surprise you, but epoxy resin is not suitable for outdoor use under normal circumstances. If the epoxy is left in the sun for a long time, even harsher problems can occur.
As it yellows, the epoxy will turn brittle and eventually begin to peel away. Some manufacturers will add dyes to their epoxy in an attempt to reduce light penetration and thus reduce light degradation. However, even the weaker ones can make a good wood sealer.
You will have to use more coats, of course, but you should be able to get the same level of protection. If you choose to use it in this way, make sure to allow plenty of time in between coats.
That way, the epoxy has more time to seep into the pores of the wood. Thinner epoxies will probably be your best bet here, just because they will have an easier time seeping into those small pores. If you should want to remove epoxy from a given area, it will probably be a difficult task. You will definitely need a scraper, and you will definitely need to repaint any painted surfaces when you are done. As for solvents, acetone will usually do the job.
Just wet the surface of the epoxy mass and give it about an hour to soften and dry. After that, you can use a heat gun or propane torch to heat the epoxy until it turns into a goopy gel-like substance. At that point, you can just scrape it off. One little safety tip: Remember that acetone is highly flammable.
If this seems confusing, you should know that these are just two different types of the same thing. Casting resins are special-purpose epoxies that are meant for easier pouring and casting. The main difference between these two types of products will mainly come from their viscosity. Casting resins are a lot thicker, which is good when you are doing a deep pour.
This also leads to longer curing time, but that is what you want for filling those large cavities. This slower curing time gives air bubbles more time to rise to the surface, leading to a crystal-clear result. When used properly, the simple answer is no. However, like most other things in this world, epoxy could be harmful if used improperly. For one thing, it often gives off some harsh fumes as it dries. It is very hard to remove, so you should wash your hands with a solvent solution quickly.
Finally, we should mention the fact that epoxy produces heat. When its two components are mixed, a chemical reaction occurs, and this reaction is exothermic. They could even catch fire in some cases, so make sure you use a mixing container that can handle the heat. Yes, you can certainly use multiple layers of epoxy for most projects.
In fact, some people prefer to do it this way. If you are using a product that is a little thinner, you may be forced to do things this way.
In particular, it is a good idea to do thin coats when working on a vertical surface. Thick coats will tend to run, so a large number of thin coats is your only real option. Of course, there are certain things to remember when using an epoxy product in this way. First of all, you need to make sure that you wait for the full curing time with each layer.
There is a difference between drying time and curing time, so make sure you understand that. Even when that epoxy seems to be hardened, you must not apply the next layer until the entire curing time has elapsed. You may also have to apply the heat gun on each layer to avoid bubbling.
It indicates the total working time from the moment you mix it until the moment it becomes unusable. Still, it will give you a general idea of how much time you will have. We have attempted to give you the most in-depth article on the web, and we hope that we have succeeded in doing so. We want all of our readers to be informed enough to make smart decisions, and this article should help you to do that. In the end, most of these epoxy resins will actually provide a fairly similar finish and will do so at around the same price.
Of course, there are still some solid budget options on the market, and for our money, the SRC Crystal Clear epoxy resin offers a nice solution on a budget. While it will not provide the hardest finish for a heavy-duty workpiece, it does offer one of the quicker total curing times while still giving you an extra bit of time for the early stages.
Ultimately, this is a bit easier of a product to use for beginners, though you do still have to work quickly. I totally agree that Pro marine is a good choice for newbies. Otherwise, sanding will be taking so much time and eventually you will end up giving up on your DIY idea. Hope this helps. Hi there William! Like your article. There was a bunch of articles I read about wood finishes such as stain, polys, lacquer and more other stuff.
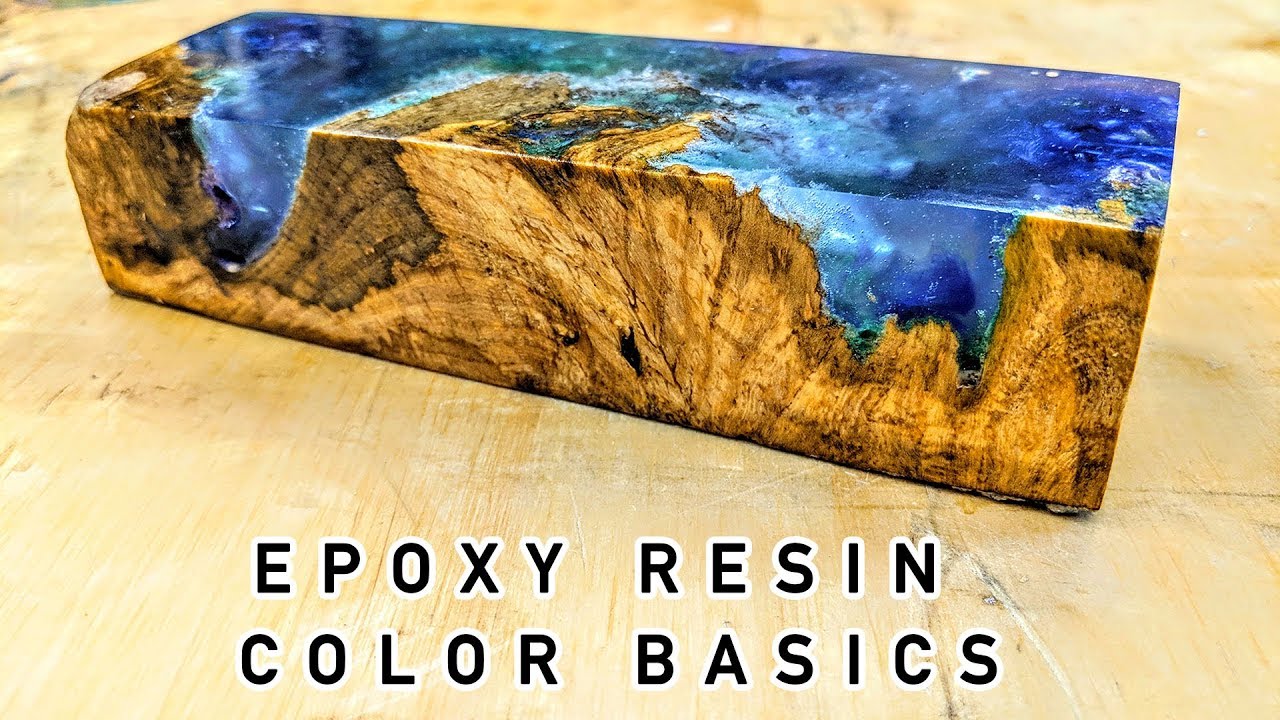
Endless amount of shapes of the river pattern, I can paint epoxy any color I like. I want to do it! Nice to see you on my blog, Patricia. Glad to hear that you want to create something beautiful by yourself, really nice. But yes river tables are magnificent.
Gonna do my first project and i want to do it properly. After i pour one coat of resin when can I do the next? And what about bubbles, I suppose they can ruin the whole final effect. Hi, Denis. You can see the table I composed on top of the article. It clearly shows curing time of each product so you have to wait at least 12 hours for full curing to begin pouring the next level of epoxy.
Curing time is very important, do not mess it up. Bubbles… Epoxy resins and bubbles go together. Bubbles appear while mixing the epoxy, they appear while pouring and spreading the epoxy across the surface. Once you pour the epoxy wait 5 minutes for bubbles to raise up and pop them with heat gun.
It may sound trite but how can I fix my wooden pieces while pouring so that pieces stand still until epoxy cures completely? Looking forward to your answer. There are times when we need answers to simple questions.
You can make it using wooden decks and cardboards, bond enclosure to the surface using glue. Have fun doing your project. Love your amazing review. Is there any conditions wooden piece have to satisfy before applying epoxy? Only certain types of wood acceptable? First of all, you can use any type of wood you like, no problems. Choose what you like the most, do not hesitate.
Before applying epoxy you have to make sure that wood is clean. Remove dirt, flinders, peeling bark and other blemishes. Then sand the wood using sandpaper or orbital sander to make the surface smooth.
It would be great if you could use a vacuum for that purpose. Yes, any epoxy resin can yellow over time, there is no panacea for that. But most epoxy resins have components reducing the impact of UV rays which means the epoxy will stay clear longer but not infinitely. Interior projects got no problem with UV rays. But if you really want to get an outdoor project then I suppose you will need some extra top coat finish over epoxy which has strong UV protection.
What do you think about it? Yep, you can finish the wooden parts of your river table. I think oil is a great choice here; it will seal the wood and give it a polished satin look. Please, check out the article where I listed top oils for different wooden pieces on the market. Hope you will love it. If you had wanted to finish your wood before applying epoxy you could have used wood stain.
Stains are great since they unfold the natural beauty of the wood. But once you applied epoxy do not use any stain because it may color the epoxy which will ruin the entire project. Hi there. Finally got Pro Marines and poured my river table. Love it, now I want to protect it from scratches. What can I use for that? You came up with a good decision, it will be disappointing to mess up a beautiful table. Shellac or polyurethane would be a good choice to protect your piece, these are clear top coats which are nicely suited for epoxy resin.
On the other hand, shellacs is another great option, which can be simply repaired and refinished in time. So for you, I would recommend using shellac since it has a good scratch resistance and you could easily refinish or remove it using a solvent. Great Article!
Quick question for you, can coloring pigments be added to all these brands of epoxy? I have used Glaze Coat on a few things. My first was a 9ft Farm table I made for my daughter using all hardwoods and most were curly or spalted.
Turned out awesome. Going to try doing more live edge tables with color. William, I am doing a bench and rock combination, I plan on doing a waterfall off of the rock and landing it on my bench and I would like to have a lot of bubbles where the falls land.
Just like the real thing, I am the oddity who wants some bubbles. Any ideas of how to accomplish this? Sadly, I have never done anything like that before. By the way, recently on the internet I stumbled upon this epoxy resin sink which has bubbles inside it:. This is how I imagine it: wait for the epoxy to harden but not completely , then pierce the surface with needle syringe and blow bubbles one after another.
Since the epoxy is hardened a little bit, the bubbles will not pop up. I think a sealer is must have here since you need to prevent the paint from penetrating into the epoxy. Of course the paint may be totally dried but I just want to make sure everything will be okay.
After sealer dries apply the epoxy as usual. Just how hard to they cure? I damaged a set of knives recently on wood that had be stabilized with Cactus Juice. Are these products product hard enough to damage planer knifes or router bit?
Any near out or breakage? From your reviews it looks like RTG might be my best option as it sticks to almost anything. Getting the frass — residue from what the termites or worms have damaged — from the holes can be done but getting sandpaper inside the hole to sand may not be doable. Any advice is appreciated. Thanks for taking the time to compare. I completed a large river table for a customer and used SRC. Because it was 2 inches thick I had to make several pours.
Have you looked at their epoxy and casting resins? Think I may try this brand out later. Thanks a lot for the reply. Sorry I should have mentioned that i was going to finish the table top with epoxy as well. To state it clearly, I want to fill the bigger splits, empty spaces with epoxy, by pouring it up to the level.
I want to finish the top with epoxy. I hope that gives more context for my previous question. I have been doing a lot more research about this issue and found that I do need to seal the entire surface of wood, for my application. Your article helped a LOT. To fill the checking and minor defects, I wanted to use West Systems resin and fast hardener. I bought the combination from amazon. For casting, I was going to use Pro Marine Supplies two part epoxy.
What should i use for sealing the wood? What should I use for finishing the table top? Should I buy different epoxies for filling, casting, sealing and finishing, or is there a product out there for all applications. But it looks like it is from UK. I am a little rushing for time. I might not have time for 16 pours needed to come to a height of 2 Inches, 8 hours apart. I would really appreciate any help regarding these ridiculous number of questions.
For sealing, you may use Agra-Life. For finishing, the best option for you is clear spar varnish exterior varnish. For filling and casting you can use the same epoxy. I have used Eco-poxy so far to fill deficits and areas where I removed bark. It has a long set time 3 days but I can pour a greater depth at once. My question is really with finishing — 1. Do you think I would need to then epoxy the entire surface for consistency?
Could I finish the wood with poly-urethane or would that give strange results? You may do so if you think your whole table covered with epoxy will be looking better. If you hesitate use Pro Marine Supplies instead. If i understand this correctly, I sanded and restained a wooden table, so now I have to seal it before I cover with epoxy resin? Also, you will avoid appearing of tiny bubbles coming from wood pores by doing so. William great article.
You have given me some things to consider when i do my River Table Bar. I have one question. If its just one where should i use it? Thank you for your time Kirk. What about which sealer to use, I would recommend Agra-Life. Can anyone rate or review the glasscast 50 epoxy resin please!! In your experience is any one product better then that other? And do you foresee more bubbles because of surface, material of heat differences between wood and metals in the same project?
It may be a few bubbles. Just pour as much epoxy as needed to cover the coins. Then you will be able to easily get rid of any appearing bubbles with a heatgun. When all bubbles are gone pour the next level of epoxy. I do wear a respirator, and have proper ventilation, but the odor lingers for a very long time. Any recommendations on a product that will give me a good result with less toxicity? I live in Minnesota and want to fill in all the holes for bench and table.
Any ideas of the best product to use? Thanks appreciate any ideas. Do you want to keep them outside in winter or you just want to do the pouring and keep them indoors? Anyway, all epoxies on the list require degrees to work properly during pouring, so in your case, there is no outstanding product. Furthermore, you may warm up the epoxy placing it in a warm water bath. Hi William, This is a great read for a first timer, and everybody else of course. I salvaged a worm riddled half cedar log one side still rounded from how the tree grows the other side eaten down to the middle of the log by worms today.
Is that even possible? Reading all the bubble hunting scenarios, I have come to doubt it. Would you have an idea how to approach this? Also, how much moisture is the wood allowed before using epoxy? The more reading, the more questions. Interesting case. You may try pouring sealer into the holes then drain excess sealer so that sides of the holes are sealed. But as I said above, there may be holes that are hard to seal. Hi, I want to fill some large knot holes and bark inclusions in a live-edge black walnut slab table up to flush with the rest of the top.
The depth of the holes and inclusions varies from shallow to an inch deep. I understand I should seal them first before applying epoxy, but after sealing, how do I apply the epoxy — one coat or a series of layers? Is there a particular brand epoxy that would be best for this? After the holes are filled and fully hardened, can I sand the epoxy at the same time as I sand the whole table top?
I want to maintain the transparency so the holes will be visible. I plan to finish the entire table with satin polyurethane varnish; will the epoxy take the varnish the same way the wood does? Thanks very much. Yes, you may sand the epoxy as you sand the whole table. Poly varnish should work, make sure that you sand the epoxy before applying. I did sand 80 sand sand. I made cake and polish.
After applying teak and tunk oil in the videos, the epoxy table glows and becomes transparent. Great article and follow-on advice, so thank you. So I need the epoxy to have a strong lasting bond. Will applying a sealant first affect the bond strength? Should I be concerned with the hardness of the expoxy or any flexibility of it? Since the door will be used continuously and get jolted a lot I want to make sure I consider this. Fully cured epoxy is hard and creates a strong bond.
I never used the epoxy for moving parts before but I think I will work. Thanks for the great reviews of the top 10 epoxies, very thorough and detailed writeups. Do you have any experience with their products or know how they compare to your top 10 list? Hello William, great article. Can you tell me which one of these resins is certified by the FDA as safe for food? I have a large split that I need to fill.
Have you ever done this. This video stated that the bubbles would actually rise to the top which in theory would be the bottom and when you removed the tape you should not have bubbles. Also, do a seal coat first before doing the flood coat? Thank you for any info you can provide. The way of filling you described seems strange to me.
Why not to fill the crack as it is, namely when the slab is its original position. You pour a layer, remove bubbles with a heat gun and repeat. I have a nice live-edge slab of black walnut and am thinking of making a river table. Will ProMarine work for deep, single pours about 1. Better do smaller pours for better results. Hi William, I am looking to redo the Wood on my bay window. My 2 labs love to jump up in the window and have it all scratched up.
If I repaint it white and then epoxy do you think it would hold up? Great, informative review! I have never tried an epoxy resin project, but would like too!! This article really helped and answered a bunch of questions, thank you. Now, when are you going to do an article on the best dyes to use??
Or have you already! Hey Christopher, love the feedback — of course we have an article on both interior and exterior recommended stains to dye your wood. How does that turn out? A good powder dye to use is Mica Powder by DecorRom. Is it ok to seal the wood and epoxy resin with polyurethane…or just the wood and avoid the epoxy.
Yes, it is ok to seal both the wood and epoxy with polyurethane. Polyurethane on epoxy actually helps it outlast. Hi, I want to learn about Epoxy Resin art work with wood. May I know the which type or specifically name of resin to be used for art work with wood.
Any Technical Data Sheet? Tutorial material available to use? I am located in UAE. This epoxy resin by Zdsticky or Dr.
Crafty is good to use with wood or anything at your local hardware store will work. Everything you need should be in the kit and all the instructions too on how to do it. I would suggest watching a video on it too. I use for pouring on countertops, well learning how anyways. Hi Dawn, in the period of self-learning and self-improvement, it is normal to take more time.
Few tips:. Three questions. If all it would take to restore them is a light sanding and polish, a second material might not be necessary. I do a lot of resin art, and have always used Pro-Marine due to price. Your review was helpful in identifying some resins with longer open times, which is a plus in my case. Thanks for the thought you put into this. Hi, John, Congratulations on your work; sounds very interesting and fun.
The resin I use has adequate UV protection but is not entirely suitable for constant sun exposure. This means that over time it will turn slightly yellow sometimes this is almost invisible ; yellowing is manifested mostly in white paint and light colors. If you cover the corn holes for example, with tarpaulin when not in use, you will not have a problem with yellowing for a long time. Exterior polyurethane is a good option polyurethane has a slight tendency to yellowing, but when it is UV protected, it is tiny.
For more roughness of the finish, you can use undiluted varnish thicker and the coating before the varnish is not too smooth.
Polyacrylic does not give yellowing; it is generally crystalline but tends to provide gray colors a cold undertone. For the interior, it will prevent yellowing, but for the exterior, I have doubts. Yellowing will penetrate deeply, and polishing does not have much effect. You can use exterior varnish for furniture and yachts.
They are resistant to external conditions. Keep in mind that some will not adhere well to the resin and others have a yellowish tinge. This polish , for example, is a good option — it does not turn yellow and does not give a yellowish tinge, but it should not get too wet. Great review. Looking for an epoxy with a matte finish. Have an old oak table to cover. What do you recommend? Hello Tom. Matte resin will be a rare product that may be too expensive or not work well.
Usually with epoxy resin are poured decorative countertops that aim to stand out and the gloss is just for that. In addition, the glossy surface can be sanded and polished, for example, if you have unwanted drops from the casting, you can remove them and have an even gloss again. If you want to have resin on your table, you can apply resin, then sand with fine sandpaper, and then apply matte varnish, so the finish will be matte.
If you choose this option, know that the resin and varnish must bond well. Or you can use matte varnish without resin. For great strength and durability, you can use polyurethane floor varnish. There are many products on the market and it is difficult to test them all, but here, another one stood out.
The contractors originally applied an outdoor stain. After less than a year the Wood started to crack and look bad so I took railing down and washed it with lye and then oxalic Acid dangerous project then coated with total boat epoxy and helmsman spar Polyurethane. Epic fail. I used this rustoleum fastkote on my 32 foot gooseneck Oak board trailer deck It was the UV grey color and mixed with sand for traction and it rained about Epoxy Woodworking Projects 2021 10 minutes after my application.
A little of the coating splashed onto the sides of the trailer and was impossible to clean off. But that was over 2 years ago and finish on the wood is still perfect the part that splashed also remains on the painted surfaces Any thoughts on Rustoleum Fastkote or other polyurea coatings for outdoor wood? Hi Jim, I read your story and my thoughts are: if one thing does not happen the first time it happens from the third.
Honestly, in your place, I would consider this option. I have two concerns about your project: — Rust-Oleum Fastkote Woodworking Epoxy is intended for concrete floor of a garage, ie. The polyurea coating is hard and can crack and peel off when twisting and bending the base.
I am working on a river table with rocks and 3d painted fish. The slab I cut with a chainsaw was very thick and 2 gallons of New classic epoxy resin was kind of enough but I am thinking to add my leftover Pro Marine epoxy to level it with the wood. Is it a good idea to add different brand of epoxy in one project this would be my top layer? Hello Elena. The different brands have their own resin formulas and it is possible to see the boundary between the two resins.
For example, if one resin has a yellowish tinge and the other does not. If you still want to get rid of your leftovers, you can do a small test on another part or a small area. If both resins are, for example, water-based, they must adhere well to each other and the result must be good.
Assess how accurate your project is and it is important that it is absolutely perfect. I am suprised iCoat epoxy is not on your list as several of the listings actually use their blend white labelled. They were featured on the show Tanked, that is where I heard about them.
I have used it for craft projects and with wood and it is by far the best I have tried. I used a lot of their colors also and the service from them is pretty great. Hi Ian, Thanks for sharing your experience, this is valuable knowledge!
I am trying to understand. Hi Theresa. For DIY projects you can use the adapted resin by ProMarine : The ordinary one will also work for you, but there will be some disadvantages such as easier yellowing this is not particularly noticeable with wood , more difficult work.
It depends on how perfect the final product should be. I collected agates from the lake we lived on growing up, and I would like to create a table top with them using epoxy. Are there people who do this and how do I find them? I would be too afraid I would ruin it if I tried. You can search for a group on Facebook for epoxy countertops, there are many people who make such countertops and they can help you.
You can choose a person who lives near you and does great things. If you still decide to make the countertop yourself and you want to be sure that you will not ruin everything, I advise you to start with a smaller project such as coasters or just resin decoration.
In this way, you will feel how to work with the resin and you will gain valuable experience for the big project. If you have time to spend on the project you will get a very good result and you will proudly look at your desk every time. Hi John, interesting question. Everything is possible as long as it is worth the effort. The difficulties you will have are mostly related to the short time to work with epoxy resin. In order to be successful, I advise you to mix small amounts of epoxy resin and divide the application work into at least parts for example, seat, back, and armrests so you will have enough time to apply a smaller area.
Once the resin starts to harden traces of the brush will remain and small lumps will appear it is better to stop applying, leave the hardened resin, and make a new one. Otherwise, you may have an unpleasant result. You may also need to discard the brush after one application. Another option to have a permanent coating with a glossy finish is to apply varnish. Your email address will not be published. Save my name and email in this browser for the next time I comment.
Introduction There is certainly no shortage of toxins in the world, and it seems that new ones are being discovered all the time. When it comes down to it, there are a lot of things in the Skip to content Disclosure: This post may contain affiliate links. Top pick. Aside from the fact that this formula contains no VOCs, which will decrease respiratory issues as well lower your risk of cancer, this is also one of the more durable epoxy resins.
Requires a quicker application. RTG has a very tough exterior when cured. Not only does it do an excellent job of resisting scratches, but it can also resist heat up to degrees. This might be very important if you are refinishing a kitchen counter. Easy to mix Bonds with nearly anything Waterproof Self-leveling Tough surface. No good for outdoor projects Extremely glossy. While experienced professionals may get frustrated having to wait that extra 10 minutes, new users and DIYers are liable to appreciate the extra time.
Requires a quicker application Not the hardest finish. By far the top quality of the East Coast Resin epoxy is how quickly it cures at every stage of the process. That said, the application itself can be a bit of cause for concern for new users as it requires more consistency in its preparation than many of the other options that I saw.
Complicated application More likely to bubble. TotalBoat Epoxy — Great Indoor Epoxy TotalBoat Table Top Epoxy may seem like an epoxy resin with an identity crisis, based on its name, but the brand is arguably the best option for most people by far.
The TotalBoat epoxy is noted for being one of the worst performers on an outdoor workpiece. First, this is the only product that I reviewed which can boast a percent waterproofing protection, though since it might otherwise be applied to a boat, I would hope this to be the case.
Has a clear coat Is self-leveling Is percent waterproof Has great heat resistance Got a fast curing time Is blush and bubble resistant. More complicated application Poor outdoor performance. To this end, the MAS Epoxies resin has taken a lot of the guesswork out of applying an epoxy resin by providing not only an entire kit but a step by step walkthrough as well.
Not to mention, it will not break down or leach harmful chemicals over time. This is our go-to recommendation for beginner hobbyists. The self-settling formula goes on easily. Not to mention, it cures rapidly. You never have to worry about your creations being ruined during the fishing process. This is one of our preferred fishes for wooden tabletops. The formula is very inexpensive, leaving you more cash for high-quality woods and nails.
The finish is clear and glossy. So naturally, it compliments wood grain and other natural textures. You can even add dyes to create epoxy resin river tables and other decorative pieces. Order accordingly to ensure that you have enough product to complete your entire project. An inadequate pour is difficult to repair. This marine-grade epoxy resin generates an incredibly durable clear surface coating. The kit contains 1 gallon of epoxy.
It is a ratio of epoxy resin with hardener. You will also need a mixing stick, an epoxy pump, and a plastic mixing container. The finished product has an exceptionally smooth, glossy, and level finish. You can use a variety of tools to apply this epoxy resin.
Brushes, rollers, and even syringes can be used to pour and spread the finish. It can even be dyed to compliment custom wood art creations. We found it super easy to tint and dye this resin. You can mix mica powder, alcohol-based inks, or liquid pigments into the mixed formula. The cured finish is as smooth as glass. It will not yellow or blush.
While we used the finish on wood, it was nice to know that the BPA-free formula could also be used on other materials. Customers have gotten good results on everything from concrete to ceramic. We were pleased to finally have a product that could be used for virtually all of our decoupaging, casting, and craft projects. This makes it easier to set up a suitable working environment. For this reason, we highly recommend it for tabletops, bar tops, counters, and other beverage-related creations.
It even offers higher heat resistance. Its high viscosity and high build properties give it a stunningly thick appearance. Since you can pour several flood coats of this product, you can use it to suspend objects between layers of epoxy. You need to consider the sides and any dents or extra surfaces when calculating the square footage of your tabletop. Casting and tabletop epoxy resins are popular choices for arts, crafts, and home improvement projects.
However, both of these commodities are designed with different tasks in mind. In this article, we provide a thorough and comparative review of casting and tabletop epoxy resins. You mix the 2-to-1 ratio to get a low viscosity liquid with a long working window.
This clear casting resin can be poured in applications as thick as 2 inches. It can be colored with mica pigment powders to create a one-of-a-kind aesthetic. Or else, you can take advantage of its naturally crystal clear appearance.
A single application takes anywhere between 18 and 24 hours to harden. As such, it needs to be stabilized and set in a clean, dust-free environment. UV stabilizers prevent the casting resin from yellowing after prolonged sun exposure. Feel free to use this epoxy for semi-outdoor applications, such as shaded patio tables and bars.
Pourable Plastic is a low-exothermic and low-viscosity product. Plus, it does not have a distinguishable odor. Nor does it contain any VOCs.
We found that it was super easy to work with. With such a slow curing window, you can easily pop any bubbles before your mold sets. Its slow curing time and deep pouring capabilities give users total control over their results. Specially designed for bulky river tables and large castings, the 3-gallon kit by Incredible Solutions leaves nothing to be desired.
It comprises a 2-gallon resin and a 1-gallon curing agent, which should be enough for most bulk casting projects. Both working and curing times are considerable. It is an excellent fit for river tables and live edge tables. Smaller projects like DIY jewelry are a piece of cake with this product as well. Durable as it may be, the epoxy is perceptive to temperature fluctuations and flexing. River tables must be adequately supported, glass and metal materials in them are not continually contracting or expanding due to sudden changes in temperature.
Mica pigment powders are a perfect match for this casting resin: glitter and shimmer, glowing and metallic colorants, vivid colors from grayish violet to peacock green, and last but not least — affordable prices.
Before utilizing dyes in an actual project, take a material sample and see how a colorant works with the epoxy. Begin with a small amount of pigment and continue until the desired color is achieved. The Incredible Solutions team proves time and again that they cherish their customers and are happy to back any resin project. According to the reviews and my own experience, the manufacturer provides easy-to-understand instructions with the kit. The technical support answers any project-related questions promptly, helps you choose the right product for every particular need, plan the projects, and troubleshoot it.
If any delivery or quality issues arise, Incredible Solutions solve them incredibly fast. Over time, the yellowing may start to show. The formula is super clear. And glossy However, it can easily be tinted with a bit of mica powder.
UV blockers ensure that this epoxy can withstand exposure to direct sunlight. However, we do not recommend it for permanent outdoor applications. Keep in mind that deep pours take a long time to cure. It can take anywhere from 32 to 72 hours for the formula to gel.
Meanwhile, it takes 36 to 72 hours for the product to cure. The kit consists of two bottles: epoxy resin and a hardener, 8 oz. It mixes, flows, and levels smoothly, making it one of the top options for the first-time project in the market. The working time of approximately 40 minutes allows you to make your project fly with no rush, while a quite long curing process up to 72h may tax your patience. No worries, though, the result will make you see it was worth it. For even crazier ideas, opt for pigments glowing in the dark.
Then simply recharge the craft by leaving it in the sun. The chemical reaction is unpredictable and may cause extremely high heat and smoke. Casting resins and tabletop epoxies are used for similar applications. However, river tables, live edges, and chunky casts require casting resins that are capable of pulling off thick pours.
Meanwhile, thinner, wider coverage, such as table and bar coatings, require coats of tabletop epoxy. The accelerated drying times of most tabletop epoxies can be problematic to anyone trying to fill a deep mold. High-viscosity, reactive formulas are more likely to crack, warp, and even discolor when poured into a deep mold. On the other hand, casting resins cure slowly.
Slow drying times can be problematic. Dust and dirt are much more likely to adhere to moist surfaces. Nevertheless, creators have more opportunities to eliminate air bubbles and other workable imperfections. Tabletop epoxies also tend to be more durable. They can usually withstand light abrasions and punctures. On the other hand, casting epoxies are easily dented and scratched.
Casting resins tend to have thin, runny textures. As a result, they fair best when poured into a constricted area, such as frame or mold. On the other hand, tabletop resins are thick and gooey. Much like paint, they can be poured over a horizontal surface without needlessly running over the edges.
Ultimately, you need to choose that can be poured to an appropriate depth. A single casting resin pour may be anywhere from 2 to 4 inches thick. Obvious application options for casting resins include river tables, live edges, casts, and encapsulated objects. Long curing times typically translate to extended workability. It is easy to remove air bubbles from resins with long curing times.
However, you must also take extra care to prevent the accumulation of dust and debris. Tabletop resins are typically only used to coat and protect horizontal surfaces. Whereas, casting resins are used for decorative embellishments, encapsulation projects, jewelry, and much more.
Experienced epoxy artists often refer to epoxy resins as deep pours. These formulas are typically used to fill areas that are 2 or more inches deep. Casting epoxy cure slowly. However, a single pour can fill a rather deep recess. On the other hand, it would take several shallow pours of tabletop epoxy to fill an equivalent area.
The results would most certainly lack a crystal clear, consistent finish. Both casting and tabletop epoxies form glassy, crystal clear finishes. However, many people like to amend their formulas with a bit of tinted, metallic, or even glow-in-the-dark mica powder.
Many alternative pigments such as oil-based paints and dyes do not disperse evenly when mixed into epoxy finishes. Casting epoxies tend to have more dynamic mixing ratios than their tabletop counterparts. Most casting resins have a 2-to-1 or 3-to-2 ratio.
Whereas, most tabletop epoxies have a 1-to-1 ratio. Complicated ratios can be problematic when it comes time to creating small casts, such as embedded casts and jewelry. A slight mistake may result in cloudiness or curing issues. Nevertheless, casting resin is essential when it comes to making anything thicker than an inch.
Some epoxy resins contain UV blockers. These additives prevent resins from yellowing after prolonged outdoor exposure. Casting resins tend to have a lower viscosity, longer curing times, and longer working window. More importantly, they are best suited for thick casts. On the other hand, tabletop resins have a higher viscosity, shorter curing times, and very limited working windows.
They are designed to produce thin yet durable films on tabletops and other high-traffic facades. Both of these products work well when used as intended. You should always choose a product that is well-suited for your job at hand. When you do, you can expect the best possible results. Check out these user-friendly products before starting your next epoxy project.
Be sure to check out our tabletop epoxy recommendations for all your table and bar coating needs. How do you choose your epoxy resin? We all know that every craft project requires a unique approach. At the same time, our intentions and expectations for products are going to vary. In the sections below, we go over some of the key considerations you need to make before choosing an epoxy resin for your project. Most artists and craftsmen are looking for a glass-like crystal-clear resin.
To achieve near-perfect results, you need to find a resin that protects against yellowing. This is not as big of a deal if you intend to amend your epoxy with dye or ink. Even experienced craftsmen experience bubbling sometimes.
These unsightly air pockets have the potential to ruin the appearance of your epoxy resin surface. Choose a formula that allows bubbles to rise to the surface. Make sure to only work in an environment with suitable temperature and humidity. When all else fails, use a heat gun or torch to eradicate bubbles from the surface of your set epoxy resin coating. A quality epoxy resin finish should be able to withstand its fair share of rough handling.
Epoxy resin is a traditional coating for tabletops, bars, and outdoor surfaces. Naturally, these surfaces are predisposed to water damage. Hard-wearing surfaces should be able to resist most abrasions. While never suggest using an epoxy resin-coated surface as a cutting board, we do look for products that can interact with objects without developing noticeable incisions. Unfortunately, most epoxy resins are highly susceptible to UV damage.
Even the epoxy resins that contain UV blockers are susceptible to damage after prolonged exposure to UV rays. Two-part epoxy resins harden quickly.
Once you mix the hardener with the resin, you have just a few minutes to pour and spread the coating before it sets. Epoxy hardeners are easily altered by temperature and humidity.
Work times are usually less than an hour. Most epoxy resins must be stored and used at temperatures above 75 degrees Fahrenheit and in areas with very low humidity. Poor working conditions will yield poor results. Self-levelling epoxy will make your job so much easier. You can use this type of epoxy to fill in cracks, inlays, and imperfections on the surface of a piece of wood. As we mentioned before, most epoxy resins come as two-parts: a resin base and a hardener.
In most cases, you mix these in equal parts. While that ratio epoxy resin kit might save you some shelf space, it is probably a recipe for disaster.
Complaints about epoxy resin cure times tend to be two-fold.


|
Things To Build With Wooden Blocks Like 3mm Vinyl Edge Banding 50 Wood Work For Tv Wall Quality |

eee
27.02.2021 at 16:58:55
Ilgar_10_DX_116
27.02.2021 at 21:51:25
anastasia
27.02.2021 at 20:46:57
151
27.02.2021 at 18:10:38