Router To Soften Edges 95,Carving Gouge Sweep 4d,Chip Carving And Whittling 5g,Gel Stain Application Tips Not Working - Plans Download

With a router , and appropriate cutter , you can create an edge with a constant radius in much less time. Rounded edges are less susceptible to splintering or chipping and tend to withstand knocks or dents with less visible damage compared to sharp edges.
A rounded edge is far more forgiving, and will do less damage to someone who accidentally knocks against it. This is why items made for children, such as toys or furniture, will usually have rounded edges for safer use.
Also, rounded edges are usually considered to be more attractive compared with straight ones for some applications. They are often added to the edge of guitars, chopping boards and shelves to give a softer, Router To Soften Edges Key more pleasing look. Choose a round over, or ovolo, cutter with a guide bearing which will work for your application.
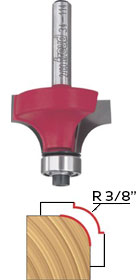
A round over cutter has a flat-bottomed body with curved sides that straighten towards the shank. The radius of your rounded edge will depend on the radius of the cutter. Round over cutters have radiuses of between 6.
The radius you choose will often be down to personal preference. However, you should keep in mind that generally, for more delicate projects, a smaller radius cutter is used to avoid removing too much material. For larger, thicker pieces of material, round over cutters with larger radii are needed to effectively soften the edge. When using particularly large cutters you may need to use the router mounted in a table, so check the specifications.
When rounding over the outside of a workpiece, you should move in an anti-clockwise direction. When routing the inside, you should move in a clockwise direction. Check the edges of the workpiece are smooth and straight.
The guide bearing on the cutter will be following this edge and any imperfections will be reflected in the cut. If your workpiece is particularly thin, you can place some scrap material beneath it to give sufficient clearance to the bottom of the cutter.
Insert the round over cutter of your choice in the router's collet. Position your router on the edge of the workpiece and adjust the height of the cutter to alter the cutting depth. Large cutters will need to be higher than the final cut at first. They need to be set for making progressive cuts which remove a few millimetres of material with each pass until the final depth is achieved.
With your cutting depth set, switch the router on, plunge the router until the depth stop stops it and lock it in this position. Move the router so that the router cutter 's guide bearing is touching the edge of your workpiece.
Then, move the router around the workpiece, keeping the guide bearing in contact with the edge. Repeat the passes, resetting the cutter lower each time, until you have the size of rounded edge you want. When you've rounded the desired edges, switch the router off and set aside. Now inspect your workpiece to check for any areas that may need going over again. Alternatively, please send an email to info wonkeedonkee.
Please include your name and telephone number. If you are enquiring about an order with us, please remember to include your order number. By logging into your account , you can: View and amend your billing and delivery address; Update your email address; Change your password; View your wish list; View past orders and re-order if you wish; Change your newsletter subscription.
Our other sites:. View My Account. What are the different types of Trend router cutter? What are the different Trend router cutter sets? Parts of Trend router cutters What are the parts of a Trend router cutter? Trend router cutter shanks Trend router cutter flutes What is the guide on a Trend router cutter?
What Trend router cutter spares are available? Things to consider with Trend router cutters What are the different Trend router cutter materials? How are Trend router cutters sized? What is the Trend Professional range? What is the Trend Trade range?
What is the Trend CraftPro range? Different types of Trend router cutters Replaceable tip router cutters from Wonkee Donkee Trend What are the different types of Trend replaceable tip router cutters? What Trend replaceable tip router cutter spare parts are available? How to change the blades on a Trend replaceable tip router cutter Straight router cutters from Wonkee Donkee Trend What are Trend straight router cutters?
Trimming and profiling router cutters from Wonkee Donkee Trend What are Trend trimming and profiling router cutters? What are the different types of Trend trimming and profiling router cutter?
What Trend trimming and profiling router cutter sizes are available? In general, shear and spiral bits Router To Soften Edges Quiz cut the surface of the stock with a slicing motion instead of chopping straight into the stock. The result is less energy consumption, less vibration and a cleaner cut. The down-shear piloted flush trim bit you see on the left helps limit splintering on the top surface of the material. Up-cut bits , on the other hand, tend to leave a cleaner edge on the bottom of the material.
They also have the effect of drawing the chips and dust upwards, and because of that are especially suited for plunging out mortises. Also worth mention are bits that perform both the up-cut and down-cut function in a single swath. Double compression bits are arranged so that they have both an up-cut and down-cut configuration — the two meeting in the middle of the bit. They are designed, as is easily guessed, to provide the cleanest possible edge on both top and bottom surfaces of the material.
You have a few options when it comes to guiding the router through the cut. You can use a piloted flush trim bit ; you can use an un-piloted straight or spiral bit along with a straightedge to guide the edge of the router; or you can use a guide bushing along with an unpiloted bit. Keep in mind, though, that the Edge Routing Dust Port attaches to the bit opening and thereby eliminates the guide bushing method.
The piloted bit method is the easiest to set up, and therefore the most popular. With a piloted bit, you simply line the straightedge pattern up with the cut line, clamp it in place, and away you go. Doing so works just fine, but does take a little longer and gives you more of an opportunity to make an error. With piloted bits readily available, why would you bother with the extra set up?
For trimming projects involving materials that are especially prone to tear-out, or for parts that needs to have especially clean edges both top and bottom, your best bet will be to use a double compression bit, which, for reasons geometric, are not available with a pilot bearing. Remember that a double compression bit allows you to give the top edge a down-cut treatment and an up-cut to the bottom edge in one pass, and is the best way to ensure a clean edge on both sides of the material.


|
Soft Close Drawer Slides Home Depot Canada English Metal Engraving Machine Cnc Router Woodworking Turning Machine Quality |

oskar
15.07.2021 at 20:47:51
Elya
15.07.2021 at 14:57:48
Anonim
15.07.2021 at 22:44:29
Diana_84
15.07.2021 at 22:13:42
LEOPART
15.07.2021 at 14:25:34