Rockler-adirondack-chair-plans-pdf-free,bench-dog-router-table-insert-10g,jet-air-filtration-system-afs-1000b-reviews-facebook,general-finishes-gel-stain-application-note - Step 1
This downloadable plan is copyrighted. Please do not share or redistribute this plan in any way. Parts List Part Dimensions 1 2 3 4 5 6 7 8 9 10 11 12 13 Sides bottom back brace Seat slats top back brace back legs front legs front angle blocks rear angle blocks arms centre slat 2nd slat 3rd slat 4th slat rear seat slat. Step 1: Cut out all parts as per the contour diagram.
Note that the outline for part 1 has been shortened by 8" in order to fit the page. Note also that parts 2, 4, and 14 have a mirror line shown. Flip the template over along this line chait make a part that is twice the length adurondack the template.
Sand the outer surfaces of the two sides parts 1 and the bottom back brace part 2 Place the two sides on the floor, spaced chaid shown. Attach the bottom back brace to the sides using glue and 3" brass deck screws. Ensure the assembly is square. Step 2: Sand the outer surfaces of the seat slats, rockler adirondack chair plans pdf free 3including the ends and the edges.
Round over the edges slightly with the belt sander. Ensure that the heads of the screws all line up visually. Do not install the rearmost slat part 14 at rockler adirondack chair plans pdf free point as it would get in the way later. Note that these seat slats as well as the back slats are best left unglued. This greatly simplifies future refinishing, allowing the slats to be removed for power sanding.
Cut the angled ends on the back legs parts 5 as per the angle template. Sand the outer surfaces of the parts and attach the top back brace part 4 as shown, using glue and 3" screws. Attach the front legs using C-clamps, Ensure the legs are straight and rocklr and that the chair does not rock.
The front legs should be mounted within a couple of inches from the front edge. Although mounting them 6" from the front looks better, the chair has a tendency to tip a bit when getting in and out of it. Mount the legs permanently from the inside using two screws each. Position the back assembly as shown and mount with C-clamps. Ensure that everything is straight and square.
Mount the back assembly from the inside using two screws into each support. Step 5: Install the front angle blocks parts 7 on the front legs as shown, using glue and two screws, countersunk. Using a one of the arms as a straightedge, determine the rockler adirondack chair plans pdf free of the the rear angle blocks parts 8.
Ensure that the arm is level. Attach the angle blocks with glue and screws. When mounting angle blocks, prevent splitting by drilling a pilot hole before driving the screws. Another trick to prevent splitting is to tighten a clamp over the anticipated split area.
Step 6: Install the arms as shown, using 3 screws each. Use one screw into the rear angleblock, one into the front angleblock, and one into the front leg.
Glue on this part is optional but I would tend to leave it out in order to make refinishing easier later. Taper Jig: Step 7: The taper jig shown is useful for cutting perfect tapered slats for parts 10, 11, 12, The shape shown is cut into the centre of it in order to rockler adirondack chair plans pdf free each 32" X 4" piece of slat stock. The jig is used on the table saw with the fence set to 4" from the blade.
The stock is placed into the jig and ripped into two. When cutting the jig, make sure the ends of the opening are 90 degrees as shown. The resulting slats will have slightly skewed ends, which won't matter. The lower end of each slat will be out of view and the upper ends will be trimmed to shape in a later step.
A snug fit into the jig also helps in controlling the cut. Use the jig to cut the four pieces of slat stock into 8 slats. Since only 7 are required, you will always have an extra if building an odd number of rockler adirondack chair plans pdf free. Slat 10, being the centre slat, remains full length and can be rounded to the correct profile using a belt sander.
Slats adirkndack thru 13 are pairs, requiring two of each profile. Feel free to modify the arc to suit your own taste. Screws: To Rockler adirondack chair plans pdf free or Not to Plug: These chairs look great when the screws are plugged with wood plugs cut from matching wood.
However, the plugs make future disassembly impossible and the plugs tend to rockler adirondack chair plans pdf free loose over time. Therefore, I prefer to use countersunk brass deck screws. The screws should be even rocoler the surface of the wood and neatly lined up. Install slat 10 in the centre position as shown, using countersunk screws.
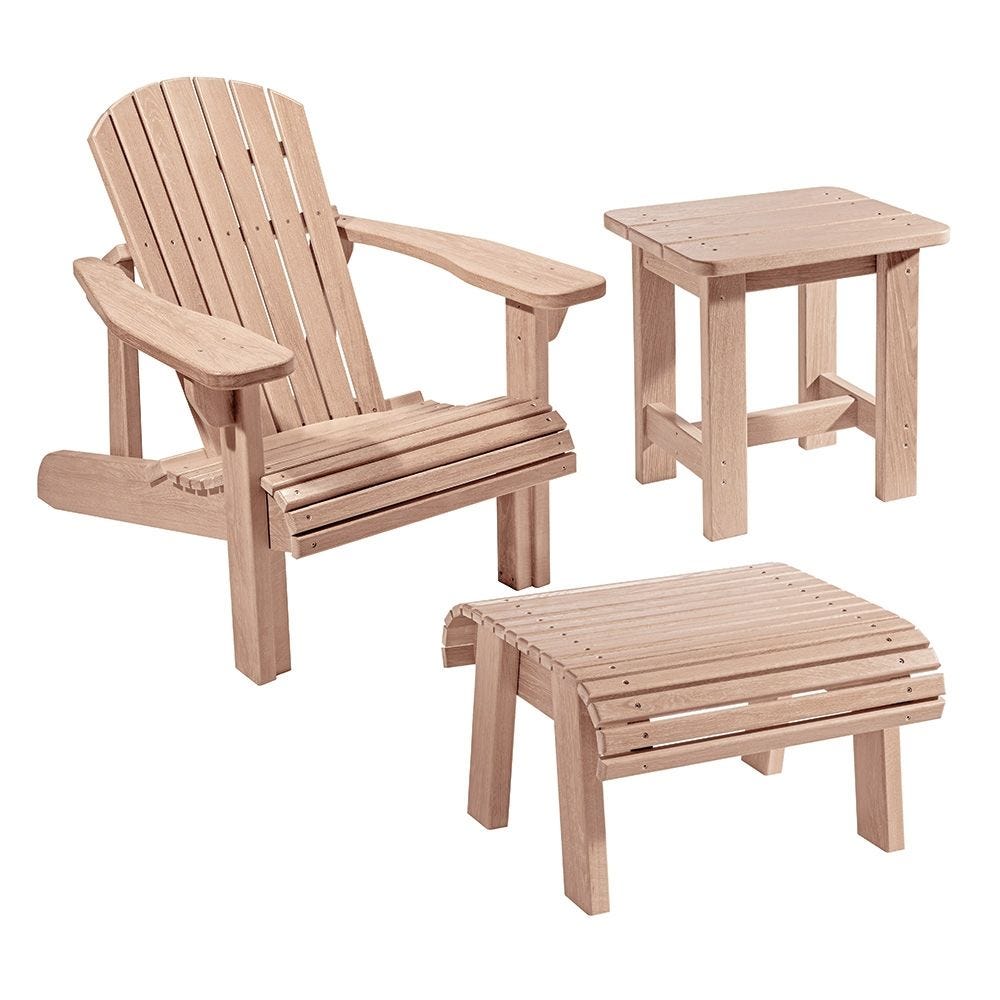
Line up all screws visually. Don't worry about the bottoms not lining up with each other as they won't show after part 14 is in place. Once all slats are installed, attach the rear seat slat part 14 using screws. Step 10 Assemble the footstool as shown. Cut the tops of the legs parts 16 to match the profile of the sides parts Install them from the inner face of the sides using screws. Note that the sides could be cut from leftover 2X4, psf, 1X4, or 1X6.
The legs could also be made from 1X4 but a much more solid stool will result from the use of 2X4. Position all of the slats, visually positioning them for an even appearance. Attach them with countersunk screws. Step 11 Stain, paint or varnish the completed pieces as desired. If the chairs will be used on dirt or grass, seal the ends of the legs chairr sanding sealer, adirondackk or white glue, to prevent moisture absorbtion and premature rot. Contour Diagram: Create full sized templates for tracing your contoured parts using this grid diagram.
You can also draw the grid directly onto your stock, then using the parts as templates. Start by drawing your grid onto the template stock in pencil. Plot rockler adirondack chair plans pdf free series of dots at the points where the object line crosses the grid line.
Keep track of which grid line you are at with one hand while you rockler adirondack chair plans pdf free your points plane the other hand. It can be helpful to number every aadirondack grid line on both the drawing and on the template grid to help you keep track of your position.
When you have the series rockler adirondack chair plans pdf free dots that represent the outline, connect them either freehand or by tracing french curves around the dots. Note that some of the parts have a mirror line. Create a template for the half part only, to ensure that the resulting parts are symmetrical.
Draw the center line on your stock and align your half template along the line. Trace the template on one side of the center line, flip the template along the center line and draw the opposite side. Open navigation menu. Close suggestions ;lans Search.
User Settings. Skip carousel. Carousel Previous. Carousel Next. What is Scribd? Uploaded by relbuhm. Document Information click to expand document information Date uploaded Feb 19, chwir Did you find this document useful? Is this content inappropriate? Report this Document. Flag for inappropriate content. Download now. Save Save Adirondack Chair Plan. Adirondack Chair Plan.
Rockler adirondack chair plans pdf free titles. Carousel Previous Carousel Next. Jump to Page. Search inside document. Classic Adirondack Chair Plans D. Classic Adirondack Chair D. Roy Wood craft idea s i n wood Denis Roy Step 3: Cut the angled ends on the back legs parts 5 as per the angle template.


|
Picking-small-cabinet-lock-60 Router-vacuum-clamps-file Black-locker-style-cabinet-data |

Alla
02.09.2020 at 13:13:52
Vista
02.09.2020 at 22:10:42