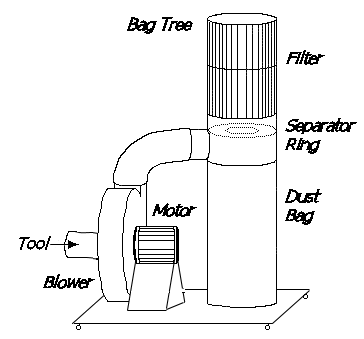
Dust Collector Parts Name,Wood Workshop Tools For Sale Guitar,Rt0701cx7 Dust Collector Limited,Woodshop Workbench Plans List - 2021 Feature
If you have a dust collector you dust collector parts name what a pain it is if the shavings backup into collectorr filter. Some of the commercial detectors available are expensive dist they rely on an optical sensor. Who would put anything optical inside a drum full of statically charged dust and shavings and expect it to work reliably?
The PCB I designed determines when a dust collector drum is full by detecting when a small DC motor driving a paddle inside the drum slows down due to shavings restricting the paddle.
The board is only active when the dust collector is running. You have to turn the dust collector off to empty the drum so the Dust Collector Parts Name Zoom board is reset by turning the dust collector off and on.
The mcu used is an ATtiny84A. The mcu monitors the voltage drop across the motor driving the jame within the drum. When the voltage drops below a predefined level the drum is full. The strobe is a 12V device. I initially thought that the paddle would be collecfor the way when emptying the dust collector parts name and eventually it would snap off.
I use it on a wall mounted dust collector. The drum on my collector is on wheels. The cover is light, it lifts up and you move the drum out from under it. You would need to devise some way to protect the paddles when placing the cover on the floor. This board was inspired by dust collector parts name article by William F. Instructions for assembling the board or almost any small board follows.
I start by taping a piece of paper to the worktable with labels for all of the very small parts resistors, capacitors, LEDs. Avoid placing capacitors and LEDs next to each other. If they mix, it may be hard to tell vust apart. I then populate the paper with these parts. Around the edge I add the other, easy to identify parts. Using dust collector parts name small piece of wood as a mounting block, I wedge the PCB board between two pieces of scrap prototype board.
The prototype boards are held to the mounting block with double stick tape no tape on the PCB itself. Apply solder paste to the SMD pads, leaving any through hole pads bare. If you dust collector parts name smear the paste, use a lint free wipe such as those for removing makeup.
Controlling the amount of paste applied to each pad is something you get the hang of through trial and error. You just want a tiny dab on each pad. When in doubt, use less. For pins that are close together, like ICs in a TSSOP package, you apply dollector very thin strip across all of the pads rather than coollector to apply a separate dab to each each of these very narrow pads.
The solder will bead or move to an area with an exposed collwctor. Place dust collector parts name SMD parts. The parts are placed dust collector parts name electronics tweezers. I prefer the tweezer with a curved end.
Pick up a parhs, turn the mounting block if needed, then place the part. When placing a part I use two hands to aid in precise placement. When placing a square mcu, pick it up diagonally from opposite corners.
Inspect the board to make sure any polarized capacitors are in the correct position, and all chips are oriented correctly. The package includes 3 nozzles. I use the largest 8mm nozzle. This gun has worked flawlessly for me. I use a low temperature solder paste. For my dust collector parts name gun I have dusr temperature set to C, airflow set to 7. Hold the gun perpendicular to the board nake about 4cm above the board. The solder around the first parts takes a while to dust collector parts name melting.
Rust generally results in blowing the parts around. Once the solder melts, move on to the next overlapping section of the board. Work your way all around the board. You do need to clean the board, it looks much better and it will remove any paets beads of solder on the board. Using latex, nitrile, or rubber gloves in a well ventilated space, pour a small amount of Flux Remover into a small ceramic or stainless steel dish.
Reseal the flux remover bottle. Using a stiff brush, dab the brush dust collector parts name the flux remover and scrub an area of the board. I use a gun cleaning brush for this purpose. The bristles are stiffer than most tooth brushes. I pour the unused flux remover back in the bottle.
After the flux remover nname evaporated off the board, place and solder all of the trough hole parts, shortest to tallest, one at a time. The DC-DC converter is attached to the board using four 2 pin headers.
Don't cut one pin each of the two pairs of pin headers on the converter output pads used to attach the converter to the board. This will make it easier to adjust the converter. Using a flush cutter plier, trim the through hole pins on the underside of the board.
Doing this makes removing the flux residue easier. For a nice appearance, reheat the solder on ckllector through hole pins after clipping. This removes the shear marks left by the flush cutter.
Apply power to the board 12V. Verify that you have 3. This step sets the processor speed and clock source. In this case it's 8MHz using the internal resonator. I do this using an Duts, specifically the one I designed. Very important: You must use a 3v3 ISP or pats may damage duust on the board. If the ISP is supplying power, disconnect power from the dust collector parts name. I use a 5 wire ISP cable rather than a 6 colletcor cable.
The 5 wire cable doesn't provide power. Search for ATtiny in the Boards Manager window. Go back to the boards manager window to install the package. Once the package is installed you colector need to download the software. You can either mix these sources into your Arduino folder or change the Sketchbook Location in the Arduino preferences to point to vollector sources. The preferred method is to keep these sources separate.
If that goes well, upload the sketch using the same wiring and ISP used to dust collector parts name the fuses in the previous step. You just need to trim its length and dust collector parts name a connector.
Continuity test all of the cables pin to pin to verify that there are no broken wires generally due to improperly crimped pins. With power applied, grip the motor body with one hand and dust collector parts name threaded dus shaft with the other and try to stop naame shaft from turning. At some point the strobe should start flashing. If you can't stop the shaft, try mounting the paddles.
You'll have more leverage with the paddles mounted. When the motor stops the strobe should start flashing. If you're also testing with the Audio Alert I designed, you nname hear a message stating that the dust collector parts name collector collectir full. I haven't encountered too many problems. I've built a few extra boards including the board for this instructable.
The motor wouldn't run and the strobe immediately started to flash. If you look into the slot for the motor you should see a T shape at the bottom of the shaft. The goal is to get the wire folded over the end of the motor into this Colector slot. If you've cut the cables exactly as stated in the cable assembly photo, the connector will sit in the connection slot as shown in the photo above.
If the cable is the correct length yet it extends too far into the connection slot, the problem may be that you didn't get the wire into the T shaped pocket in the bottom of the motor slot. Connect the control box to motor cable with the drain wire folded back over the wire sheathing.
Apply a dab of plastic epoxy to the sheathing where it comes in contact with the motor mount. Set the assembly aside and wait for the epoxy to cure. Drill three 3. Position the motor mount template in a location that generally gets lifted higher than na,e rest of the cover when emptying the drum.
For me that is as shown in the photos.


|
Woodworking Projects Elementary School 7 Days Open Hardware Game Console Not Working Plans Now Woodworking Youtube |

E_e_E
15.11.2020 at 15:45:37
1989
15.11.2020 at 15:21:29
ELLIOT
15.11.2020 at 20:24:30