Cool-wood-plant-hanger,oval-filing-cabinet-cylinder-lock-edge,kitchen-drawer-brackets-for-sale-zip - 2021 Feature

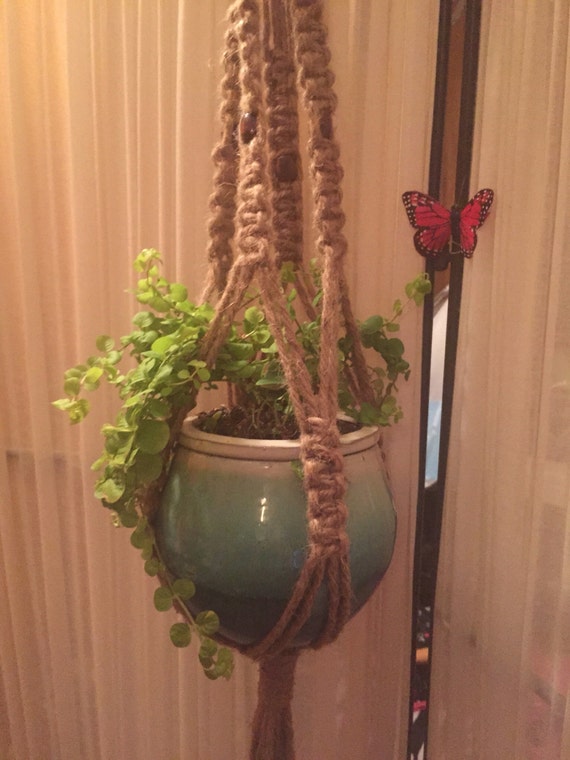
Full Pattern here hellowonderful. One more epic one, done by using rope and embroidery floss for color fun! Prefer ring and a pulley for right and neat positioning of knotted rope lengths! Here is the full DIY pattern hellotherehome. This stunning one has been done using black cotton rope and is all friendly to dedicated beginners! A brilliant macrame achievement to make your home look beautiful! Worthy macrame centerpiece, ready to create a divine look of any particular space!
Here leather has been used instead of using ropes for entire makeover! Full details and pattern here designsponge. If you all love the tiny things similar to larger ones, then this mini plant hanger is going to be all special for you! Want the full details about the creative knotting, here is the free pattern for this plant hanger blog.
Every unique plant hanger here! Here reclaimed old shells are the pots which have been painted differently and beautifully for color fun! Entire twine basket is easy to weave also if you need to clone it, here is the complete pattern and details apartmenttherapy. Another easy-to-weave yet mind-blowing one, done by giving neat but simple knots to black para cord will bring the natural garden like touch to any living space! Interested in cloning it?
Here is the complete details deucecitieshenhouse. This one is sure to amaze all your senses, fancy work has been done in making the precious plant hanger! Here knotted rope has been brought to completion using brass fittings which makes all the design look cool!
Reuse your long forgotten T-shirts to craft this plant hanger, creative beyond your imaginations! Cut the T-shirt in to long stripes and just twist them to gain in form of rope or cord! Now turn it into a beautiful plant hanger through clever macrame knots! Here the complete free DIY pattern shopwalkinlove. Knots are making your puzzled? No need to worry about, this macrame plant hanger pattern is just beginner-friendly and has a flexible and large cradle to support any size of pot inside!
Choose your personal decors but here it has been got dignified using beads! Knot and weave twine only for a rustic yet beautiful plant hanger! It would be beautiful to look at through your modern interior environments! Here is the step-by-step guide and free pattern apartmenttherapy.
Here instead of using a cord or a para-cord, give artistic knots to extra long shoelaces for a precious macrame plant hanger design! I started with giving my outdoor glider a makeover:. That before photo is actually after I had already spray painted the frame. It was really sad before. See more details of that HERE.
If you added another hook to the other side as well, it could hang two plants or if you added one to all four sides, it would make the perfect towel holder by the pool! Or another project I tackled myself several years go… how I built my gate with this pretty window:.
My tool girls are also sharing DIY outdoor projects today! Click the links below the image to see them! I hope you enjoyed this easy project idea, and all the cool outdoor ideas my friends shared as well!
Love the plant stand!!! I have never used power tools. Wish I could!!! BTW I finally have a date set for installation of our hardwood floors. They are going to start the day after Memorial Day. I will let you know how it goes. Doing the whole house at once. I am not sure we will make it. LOL I am doing the hickory hand scraped engineered like yours.
Thanks again for your inspiration. Thanks Sue! Great choice on the hand scraped hickory, I still love mine! Very nice! What a cute swirly hook! Thanks, Becky! OH my gosh! I love your plant stand. That is definitely easy but packs quite the punch! I can see it being useful for al sorts of things…bird feeder holder, plus all the things you mentioned too. Thanks so much, Cecilia! I never even thought of hanging a pretty bird feeder from it…that would be another great use for it!
Thanks, Susan! This looks so nice in your yard and I love that you can move it around! I could use one of these on my deck for a hanging plant. Thanks for the inspiration! Thanks, Paula! Oh yes, that would be perfect! Might need to make one for my deck out back as well. I love your plant hanger and it is so versatile you could put it in a flower bed , on your front porch or most anywhere.
Great job. Don't leave any sticking out. For a more decorative approach, you could also tie colored string below the carabiner to hold the strands together. Part 2 of Lay the strands out flat and divide them into 3 groups of 2. Lay the rope out on a long table or the floor. Spread each strand out straight. Then group them into 3 pairs of 2 by pairing each strand with the one next to it. You'll have more pairs if you use more pieces of rope.
For example, if you used 4 pieces instead of 3, then you'll have 4 pairs. In this case, you can hang it up by the carabiner and tie the rope afterward.
Attach each pair of strands together 18 in 46 cm from the top knot. Take a ruler or tape measure and measure 18 in 46 cm down from the top knot.
Then take the first pair and loop them around each other to make a simple knot. Repeat this for the other 2 pairs of rope. These knots are where the top of your planter will rest, so you can adjust the height if you want to.
Tie the 2nd and 3rd and 4th and 5th strands together 5 in 13 cm below the knots. Once again, take your ruler or tape measure and measure 5 in 13 cm down from the knots you just tied. Instead, tie the 2nd and 3rd strands together. Then tie the 4th and 5th strands together as well. This creates a tiered hanger for more support and decoration. Join the 1st and 6th pieces of rope together.
Complete this pattern by folding the 1st strand across the other strands to the 6th one. Then tie these 2 together. If there are 4 pieces and 8 strands, for example, then you'd tie the 1st and 8th ones together.
Make a final knot with all the strands 6 in 15 cm below that pattern. Measure 6 in 15 cm more down from the previous knots and hold all 6 strands. Loop them around each other and pull to make a knot at the bottom of the hanger.
If it comes undone, the planter will fall. You could also use less space in between the knots and add more for decoration. You can try this if you make more than 1 hanger.
This depends on what you prefer. If you like the look of the extra rope dangling at the bottom, then leave it. If not, then trim it away with scissors.
Part 3 of Install a nail or hook into the wall where you want to hang the planter. You can use either of these to mount your hanger. Find the spot where you want to hang the planter, then locate the nearest stud. Drive a nail into the stud or screw a hook into the wall where you want to mount the hanger. Put the carabiner over the nail or hook to hang it.

|
Diy-wood-gantry-crane-kitchen Under-tray-drawer-1500-keyboard |

Ilqar_Vasmoylu
18.05.2021 at 11:48:47
Efir_Efirde
18.05.2021 at 21:10:57
fghfg
18.05.2021 at 19:43:51
P_R_I_Z_R_A_K
18.05.2021 at 21:13:54