Clamps For Gluing Chairs,Rikon Disc Sander Zone,Minwax Tung Oil Review Uk,Lathe Supplies Uk Zero - Plans On 2021
However, keep in mind that while purchasing the longest possible clamp will provide the widest clamping range, it might not be the most logical move.
These clamps are small, light, and easy to maneuver around a tight shop. For larger projects like cabinets and doors, however, inch or even inch clamps might be necessary. For massive projects, many manufacturers do sell brackets to convert two smaller parallel clamps into one longer clamp.
Avoiding gaps between boards or pulling together challenging joinery sometimes requires a bit of extra pressure from parallel clamps. While many clamps can exert a ton of force, only the best parallel clamps can do so while still retaining their shape. Heavy-duty clamps can exert as much as 1, pounds of pressure, easily drawing bowed boards and tough joints together. And because of how parallel clamps slowly apply pressure, they work just as well for light-duty projects.
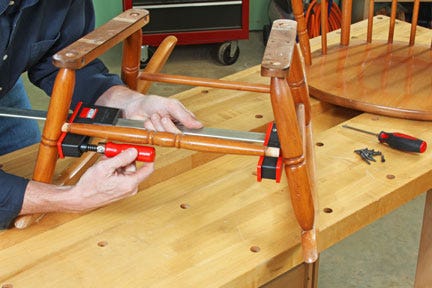
Woodworkers can use the same clamps for gluing up thick hemlock doors as they can for ensuring perfectly flat maple cutting boards. Jaw design is what makes parallel clamps stand out from the crowd among clamp types. The jaws are designed to be perfectly parallel under force, requiring substantial reinforcement at each jaw. Beyond the jaws, these clamps feature screw-type micro-adjustments to add more pressure to the workpiece.
To use parallel clamps, simply place the workpiece between the jaws, slide the clamps together on the ratcheting bar, and slowly apply pressure with the screw-adjustment handle. As the screw turns, it applies more pressure to the jaws, pulling joints and boards closer together. Many jaws even feature quick releases, making releasing and spreading the jaws apart much faster—an excellent feature in production shops or when working one-handed.
When a clamp applies 1, pounds of force to the end of a board, there is a lot of potential for crushing the grain, marring the surface, and ruining the project. While this method might not target pressure particularly well over a small gap, it does help reduce some of the damage a powerful clamp can create.
Another point about surface protection: Some of the best parallel clamp manufacturers sell attachments or brackets that hold the workpiece up off the clamp bars. These standoffs keep the field of the workpiece from scratching or marring as well. Setting up a long parallel clamp can be a bit of a headache. Working one-handed, which is often the case in woodworking glue-ups, can exacerbate the issue.
To help make setup easier, many of the best parallel clamps feature ergonomically friendly designs. Ratcheting bars for fast setups, quick releases for when the project is dry, and comfortable screw-adjustment handles with nonslip pads make setup and breakdown much easier. When it comes to versatility, most parallel clamps have a trick or two up their sleeves. Not only can you purchase separate brackets for connecting clamps together, but many clamps can also spread objects apart.
By removing the adjustable jaw and spinning it around, a clamp becomes a spreader. It can pull tight, friction-heavy joints apart with the same amount of pressure and force as when securing them together. This can be especially beneficial in humid shops where wood tends to swell quickly during test fits. And remember—for other woodworking clamp types, you might consider a right-angle clamp or a trusty set of spring clamps.
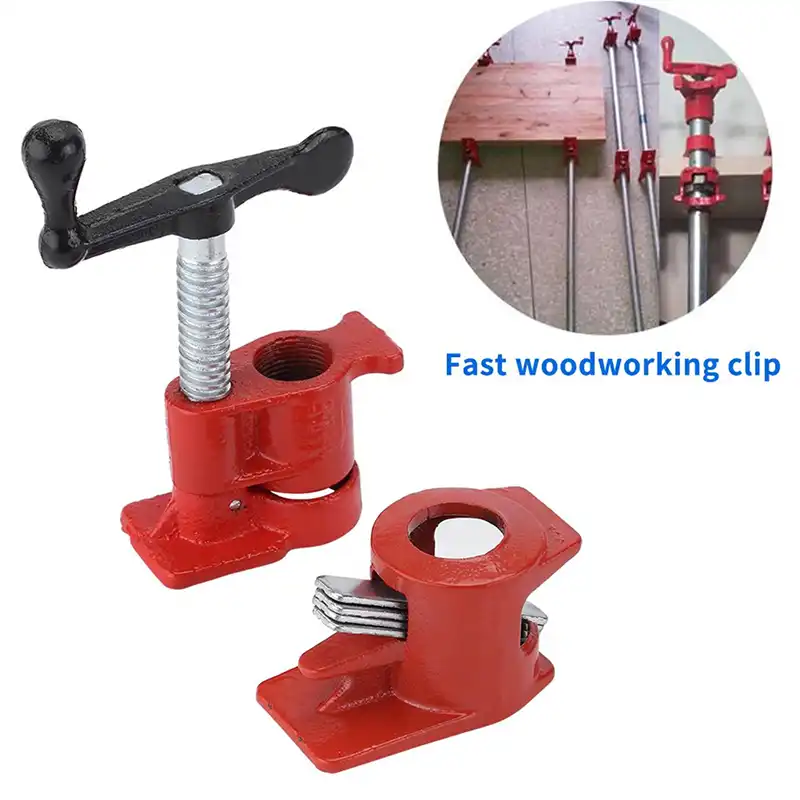
With a bit of background on parallel clamps, shopping for a set for a workshop becomes easier. Keep reading to discover these top picks for Miter Clamps For Picture Frames some of the best parallel clamps on the market. Be sure to keep the abovementioned considerations in mind when comparing these products, as there is an option for almost every application. A pair of H-style or pipe clamps offer the ability to secure projects of various sizes, since the clamps themselves fit onto a metal pipe of your choosing.
If you need to clamp a large tabletop, long shelves, or other similar projects, simply choose a pipe that is long enough for your purpose and slide the pair of H-style clamps onto opposing ends of the pipe.
Instead of needing to have an array of long clamps for large projects, several set of Bessey H-Style Pipe Clamps, along with a few different pieces of pipe, is all you need to clamp projects of any sort. The H-style design also allows air to Miter Clamps For Granite University circulate on both sides of the project, which may be important for glued , stained, or painted pieces.
A ratchet clamp uses a trigger system to quickly apply and release pressure, allowing for easier one-handed operation. The Dewalt 6-inch Trigger Clamp applies Woodworking Bar Clamps For Sale 06 pounds of pressure and has a throat depth of 2. The jaws can be opened to a width of 6 inches, and you can also easily convert it into a spreader clamp.
Constructed of reinforced nylon plastic and heat-treated steel, this clamp feels solid and sturdy. This is a medium-duty woodworking clamp, though larger and more heavy-duty versions are also available from Dewalt. One of the most recognizable types of woodworking clamps, the Husky Drop-Forged C-Clamp is a handy tool to have in your shop or shed.
Constructed of drop-forged steel, this clamp measures 8 inches long with a throat depth of 4. Technically considered a "light duty" clamp, this Husky C-Clamp is still versatile enough to handle a wide range of tasks and users say it has hundreds of different uses around the home, garage, or shop.
You'll especially appreciate that the textured clamping face provides sufficient grip. It adjusts easily and smoothly but stays tight once positioned. Additionally, Husky offers a lifetime warranty on this woodworking tool.
Useful in projects where you need to join two pieces of wood together, a face Miter Clamps For Trim 500 clamp is an important woodworking tool for craftsman and DIYers. The Milescraft 3-inch Face Clamp is a popular option if you need a clamp that is specially intended for use with pocket-screw joinery or on any task where you need solid clamping with no marks left behind. This face clamp from Milescraft has round, oversized clamp pads that apply distributed pressure. While several sizes are available, this model is suitable for use with material up to 2.
This face clamp offers both value and durability and is a nice addition to popular pocket hole jig kits. To make mine, I bought some pound bags of 9 shot for reloading shotgun shells at a sporting goods store.
When I need to glue up an unusual shape, I put the piece to be clamped on my bench and put a bag or two of shot on top of it. They conform easily to most shapes. The bags are pretty durable, but be careful not to puncture them. The shot is very small and even a tiny hole will quickly cover your shop floor with shot. The easiest way to glue banding to the face of a plywood carcase is with the case on its back. You can't lay it on a benchtop because you have no room for the clamps, and sawhorses always seem to get in the way of what you're doing.
Here's how I solve the problem. Before applying the banding, I clamp two long bar clamps to each end of the carcase as shown right. Then, I glue the banding to the side pieces and clamp them with bar clamps shorter than the "legs" on the ends. To face the ends, I move the "leg" clamps around the corner to the sides and re-clamp, then glue and clamp the banding to the ends.
I always had a tough time clamping a tapered project until I devised these tapered clamping blocks. Sometimes I need one per side, although one for every other side works for the splined joints in the glue-up shown. I rip an angle on one edge of each block to match the slope on the side of my project. Next, I attach a stop of scrapwood or sheet metal to the narrow end of each block.
After dry-fitting the clamping setup, I glue and clamp the project as shown above. To clamp corner braces in cabinets, I cut biscuit slots in all three sides of the brace as shown above—two to glue the brace to the case and a third to position a temporary clamping block. Then, I glue the brace and corner biscuits as usual and put another biscuit with no glue in the slot between the brace and block.
A pair of short bar clamps, acting on the temporary block, keep everything snug until the glue sets. My junior-high students have made hundreds of heart-shaped keepsake boxes following plans that call for slicing off the box's lid on the bandsaw.
Doing this requires that the blade guide be raised about 5" above the table. This exposes a great deal of blade and places the operator's fingers too close to the blade for this woodshop teacher's liking. To help my students complete this project safely, I devised the adjustable jaw safety clamp shown at left. The key to the installation is that the rear jaw of the clamp must be at a right angle to the miter slot.
This clamping method also works great for other projects and on other tools, such as a tablesaw and shaper.
Peterson, Lancaster, Calif.

|
Cnc Wood Designing Machine Analysis Rikon Belt Disc Sander 30 Wood Planks Supplier Singapore Osebni Epni Planer 2021 |

Sex_manyak
15.03.2021 at 18:22:26
4irtanka
15.03.2021 at 10:41:47
0110
15.03.2021 at 15:45:26
Princ_Baku
15.03.2021 at 15:29:56
Ninet
15.03.2021 at 17:42:52