Build-your-own-machine-quilting-frame-in,swiss-wood-carving-museum-of-art,riffle-shuffle-in-hands,buy-used-drum-sander-jacket - How to DIY

You'll never make a cutting mistake using paper templates. Use a small vise clamp to secure the end caps. Make sure the clamp is holding the bottom of the cap, not the top so you don't crush it. Sit in a solid chair with the clamp between your legs.
Repeat for all the others. It's best to use a drill press for this, if you have one. Lay the boards on top of one another, making sure the hole marks are lined up. Clamp them to a bench and drill the holes. Drill holes just inside the marks at each end of the straight lines. Change to the cutting bit and bore out from hole to hole. Place a washer and nut onto the bolt and tighten with a wrench. Get it as tight as you can.
Swirl a bit of pvc glue around the inside of the pipe. Insert the end cap. Let the glue cure. Place a washer on the bolt. Slide the bolt through a hole in the board. Place another washer on the bolt. Place a wing nut on the bolt and tighten. Repeat for the other two pipes. Cut a slit through one end of the ribbon. Slip the cut end through the slit in the wood. Slide the other end through the cut and pull it tight. Make sure the ribbon is under the board edge and not over it.
Repeat with the other three ribbons. Different projects may require different lengths of ribbon. It's better to have them too long than too short. Center the backing fabric on the rod. Secure the fabric to the rods with the PVC clamps.
The backing is wound around the first of the two rods on the end. Notice how the fabric is oriented. The wrong side faces up and wraps around the rod from the bottom. The top is wound around the second of the two rods on the end.
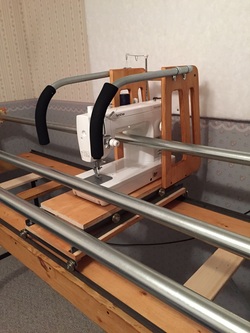
The right side faces up and wraps around the rod from the bottom. Repeat for the other three ribbons. The backing fabric and batting are wound around from the bottom. The top is placed over the ends of the batting and backing. Clamp the ends to the rod. Loosen the wing nuts on the top rod and roll the quilt to create tension. Tighten the wing nuts. The rolled batting rests between the first and second rods.
The finished quilting is wound around the top rod that goes under the machine throat. Leave the extension table on your sewing machine if it has one. Turn your sewing machine so the throat is behind you rather than to the right.
This orientation will take some getting used to. Place the 3" PVC pipes on either side of the machine. They balance the frame and allow freedom of movement in all directions. Remove the foot attachment from the machine. Remove the board and tension bands from one side. Slide the quilt under the foot arm. But the main thing is that the quilt is kept flat and taut while quilting. You can make the frames out of wood or pvc, which is very popular today.
With these free quilt frame plans you will find the plans for wooden frames in the old style. The authentic way to quilt is to have a large frame into which the whole quilt is stretched.
The frame itself is so simply constructed that every household used to have its own. It is essential if you want a successful quilt, that a quilting frame jor hoop be used to hold the work taut.
Quilting frames have several features in common:. These free quilt frame plans call for the following items. You will need four smoothed what ever wood you choose, just make sure it is smooth pine strips. Each frame will have two horizontal bars. These two bars will be, 2 inches wide and 2 inches deep and about 92 inches long. These long horizontal bars are held in place by 2 vertical bars.
The vertical bars are 2 inches wide and about 2 feet long which have a contrivance for controlling the horizontal bars.
Repeat this for both pieces of fabric. Keep the staple close together all the way across. Remember to use quilting thread as this is much stronger than regular sewing thread.


|
Carpenter-tool-tricks-86 Pocket-hole-jig-3d-print-yellow Cool-wood-projects-for-guys-recipe Triton-woodworking-router-for-sale-free |

Angel_Xranitel
10.11.2020 at 20:58:49
KAROL88
10.11.2020 at 18:51:37
BRATAN
10.11.2020 at 16:58:18
axilles
10.11.2020 at 16:24:36
sweet_fidan
10.11.2020 at 10:26:14