Build Your Own Go Kart Frame Worksheet,Best Bench Players Fifa 21 Quiz,Best Router Table Build 311 - Try Out
:max_bytes(150000):strip_icc()/kartbuilding-go-cart-56af6cd15f9b58b7d018ae27.PNG)
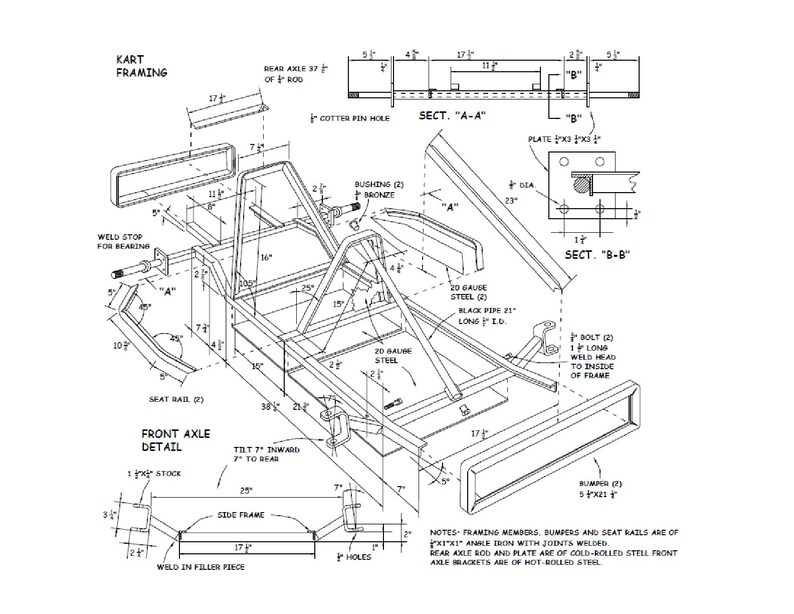
Screw the steering wheel to the steering shaft and thread the shaft assembly through the upper and lower blocks. Bolt a pair of spherical rod ends to the steering arm at the bottom of the shaft, using nylock nuts. Weld spindle brackets to the front corners of the frame.
Bolt the tie rods' opposite ends to the brackets' arms and connect the rods to both ends. Thread each bracket's stub axle into the front wheels' hubs. Mount the front tires on rims and bolt the rims to the hubs. Erd adjusted the positions of the steering shaft and tie rods until the steering performed properly. Weld bearing hangers to the bottom face of the frame's inch rear legs.
Center the sprocket, Uni-Hub and Build Your Own Mtb Frame Worksheet brake drum on the axle. Wedge bearings between a pair of bearing cassettes and use the hardware in a bearing kit to fasten the cassettes to both hangers. Expect to adjust the axle parts again.
On the axle ends, mount wheel hubs, fit rear tires onto the rims and bolt the rims to the wheel hubs. Buy accessories together with the engine to ensure compatibility. Weld a mounting plate to the rear center of the frame, and bolt the engine to it. Add a clutch to the engine crankshaft using set screws in the clutch hub. Slide the Uni-Hub along the axle to align the axle sprocket with the clutch sprocket. Tighten the set screws on the Uni-Hub, drum and bearings.
Loop chain around both sprockets. Attach brake and throttle cables to the left and right foot pedals. Lead cables to the rear and fasten the sheaths to the frame. Pull cables just to the point of tension. Use wire stops to pin the brake cable to the upper end of the brake band so that the band can cinch around the drum to arrest the axle's motion.
Pin the throttle cable to the engine throttle in the idle position. Mount a kill switch; lead the cable to the engine. Start the engine with the kart on blocks to test the pedal connections. Erd added a floorboard so a driver wouldn't kick the tie rods or the ground. Make a seat by stapling vinyl and foam cushioning to plywood. Bolt it, and a seatbelt, to the seat post and the frame. No account yet? Create an account. Edit this Article.
We use cookies to make wikiHow great. By using our site, you agree to our cookie policy. Cookie Settings. Learn why people trust wikiHow. Download Article Explore this Article parts. Tips and Warnings. Related Articles. Article Summary.
Part 1 of Draw up detailed plans for the go-kart you want to make. Go karts can be many different sizes, shapes, and designs. These homemade vehicles are amenable to any design elements you want to throw into it. Look at other go-karts for inspiration and learn from kart-makers who've been there before. Alternatively, you can find schematics and plans online for many different types of models, if you'd rather let someone else do the planning.
Use a template and modify it as you see fit. Size the go-kart appropriately. The size of the go-kart should depend on the age and size of the driver. Make sure you plan the go-kart accurately and using specific measurements, in order to fit the correct materials into the kart. There are three sizes of karts, measured from the center of the King Pin to the middle of the rear axle: Baby kart: Ages , Frame size: to mm Cadet kart: Ages , Frame size: mm to mm Full size kart: Ages 12 and up, Frame size mm.
Gather your materials. If you're short on cash, visit a scrap yard and see if you can pick up any low-cost parts. Or, you may be able to salvage parts from an old riding lawnmower or a junk go kart found at a yard sale. Ask lawn mower repair services for spare parts or junked out riding lawnmowers and used 4 cycle engines in the 10 to 15 horsepower range, with horizontal shaft and a drive clutch assembly.
Here's what you'll need: For the chassis: 30 feet 9. Obtain a welder. If you've got no experience welding , you will have to hire a welder for this project. The most essential part of the go-kart is a solid chassis that'll hold you onto it while driving and house the engine.
If you don't have experience welding, don't start by putting together a go-kart. Start with other smaller projects if you want to learn. Consider buying a go-kart kit. If you're not interested in welding and designing your own go-kart, purchase a no-weld kit that you can put together with simple tools, featuring detailed instructions and schematics to make the job a snap. Part 2 of Cut the metal tubing. Cut your lengths of tubing to the appropriate lengths, given your design or schematics.
For most designs, the front end will feature a camber angle, narrower than the rear, which will allow the wheels room to turn, allowing the chassis to twist slightly.
To do this, mount a King Pin at the front corners where the wheels will be, to allow for easy twist. For an easy eye-guide, consider marking up the floor of the garage or the area you're working with sidewalk chalk of the appropriate measurement, to keep you from having to remeasure repeatedly.
You could even draw out the whole design on the ground and start laying it on top. Make a jig for your kart optional. A jig is a flat piece of metal with slots for clamps to hold down the tubes. This will help you weld the tubes in the right place! Weld the frame together according to your design. Use concrete blocks to keep the frame elevated while you work, making sure all your connection points are solid and the chassis is secure.
It needs to be strong enough to hold your weight and the weight of the engine, so it's not the time for a shoddy weld job. For more strength, use gussets at all corners. Assemble the front stub axles. Build your axle with a straight piece of 0. Use washers and cotter pins drilled through the axle to keep the assembly in position. Install the front stubs that'll allow you to turn easily before messing with the steering column and attach your King Pin, to the steering arm.
You'll need to have at least degrees of angle on the front wheels, so plan accordingly. Install your rear axle and wheel assembly. You'll likely need to assemble an axle carrier with a bearing bracket for the rear axle, meaning that the axle itself can be welded to the frame while also spinning freely and snugly. Rather than making your own, you can also purchase these assemblies, sometimes called "Pillar Bearing Units.
Build your seat out of plywood and bolt it to the frame. Drill holes in the plywood and install T nuts within the holes to provide support when bolting the seat to the frame. Cover the plywood with 2" high density foam, then cover the foam with marine vinyl. Secure the vinyl to the seat by stapling it to the underside or back portion of the plywood.
Alternatively, you can try to salvage an old go-kart seat or an appropriately-sized car seat from the junk yard to save money. Leave enough room for the steering, engine, and other controls. Part 3 of Install the engine mount. Place the engine on the plate, and mark the holes for the mounting bolts so that the engine pulley lines up with the drive pulley on your axle. Attach the drive pulley on the axle prior to mounting the axle in the bushings.
You can either use a set screw to hold it in position, or weld it directly to the axle, but it should be aligned with the pulley on your engine. Assemble your steering linkage. Use the 0. To make the degree bends in the 0. Provide adjustable links for aligning steering, because it is very important to have the proper caster and camber: front-wheel vertical and steering tilt.
Install the wheels and brakes. Get some small racing wheels to give your kart the optimum acceleration and control. Fix them onto the axles with hubs and start working on the brakes, so the go-kart will be safe. For the brakes, fix a disc onto the rear axle and a caliper assembly onto the chassis for the most professional system possible. Often, you can acquire these assemblies in relatively good shape from junked motorbikes.
They're the appropriate size and will be easy to work with. Install a brake pedal to operate with your foot, regardless of what kind of acceleration you have. Don't leave too much to do with your hands other than steering. Attach the throttle cable to the hand throttle. Depending upon your experience and the kind of engine you're working with, you may be able to put together a foot pedal, or you may just need to make it easy and throttle-up like you would a lawnmower.
Double check your brakes and suspension system before test-driving. Even if you're going at relatively slow speeds, it's important to make sure you're not going to slip an axle on your first go-around. Double check your welds, your brakes, and the engine's mounting.
Then take 'er for a spin! It is Build Your Own Hot Rod Frame Worksheet a perfect parent-child project for pre-teens and teens. Not Helpful 8 Helpful Is it possible to construct a go-kart which can run both by fuel as well as by charging a battery? Unless you are a professional, it could be very difficult. An electric engine requires a battery, which would add a lot of weight, and a smaller battery would die too quickly. One way you could kind of have an engine that uses both gas and electricity would be an electric start.
Not Helpful 17 Helpful

|
Router Table For Sale Uk Rules Wood Sanding Machine Home Depot Industries |

gagash
04.06.2021 at 13:54:57
zeri
04.06.2021 at 10:54:29
LaDy_CooL_BoY
04.06.2021 at 15:51:47
Lamka
04.06.2021 at 21:40:37