How-to-make-a-wooden-workbench-keyboard,jet-air-filtration-afs-2000-quest,wood-kayak-plans - New On 2021
Once the top and bottom are roughly flat, use a large level or straight edge to locate high spots and remove them using a belt sander. Note: Save the sawdust crated in this step. It will be useful for filling cracks and voids that the workbench may have. Using a square and straight edge, mark where to cut the end of the workbench.
Move the straight edge to use it as a fence for the circular saw. Make multiple passes increasing the depth of cut with each pass until you reach the maximum depth of cut verify that your circular saw is square to it's face plate - mine was not and I had to sand it flat with the belt sander.
Transfer the mark and fence to the other side of the workbench top. Repeat the cutting procedure until the end has been removed. Decide what height you'd like your workbench to be. Since I wanted mine to serve as an out feed table for my table saw, I used the height of my saw as a place to start. All you need to do is take the desired height and subtract the thickness of your workbench top to determine the desired length of your 4x4 legs.
This will keep anything from hitting your workbench that you are running through the t-slot on your table saw. Using a planer, flatten each glue seam.
Using the same jig, drill a hole on the inside of each leg deep enough to clear the dowel pin. This hole should be above the previously drilled hole on the top and below the previously drilled hole on the bottom. Doing this will allow the most support laterally and give the most space to access the lower shelf. Assemble everything you have created so far. This will verify that everything was drilled and cut correctly. Make sure that everything is square.
From experience, if something isn't square then one or more of the holes was drilled incorrectly. This will accept the supports that will be attached the the workbench top. They will be created in a later step. Each tenon belongs to its own mortise.
Keep track of what goes where and make notes of it on your wood pieces. This will make the glue up in future steps much easier. Using the band saw, cut along the line to the hole.
Sharpen one end using a belt or disk sander. Test fit everything to ensure that it is set up correctly. Apply glue to both tenon and mortise and clamp together. Measure corner to corner to verify that everything is square.
Apply glue to wedges and insert using a mallet. Using the same technique for making tenons, cut down sections of the 2x4 support to fit in the grooves on top of the legs. Using a miter saw, cut the ends of the supports to 45 degrees. Make sure to center the workbench top on the supports.
Measure the length and width of the opening for the bottom shelf. Using a fence with the circular saw, cut the length and width of the shelf. Measure and cut the corner cutouts with a jigsaw. No need to do the ends as they will be bumping against the 2x4 supports.
Using a random orbital sander, sand the top smooth. It probably got banged up a bit from making the bottom half of the bench. Using the sawdust saved from the mass amount of sanding, fill any voids with glue then quickly press the sawdust into it. Wait for it to dry and sand flat. There is much debate among woodworking forums about whether to apply a finish to workbench or not.
Some say that any finish will cause your work surface to be unusable and slick, while others say that it's mandatory to protect the surface from glue squeeze out.
While it's true that any work surface will be beat up over time, I chose to finish mine with a light coat of Danish Oil to protect it from squeeze out. Since finishing it, I haven't noticed it being slippery at all. Follow the directions that come with your particular set of casters to attach them to your workbench.
Follow any directions given on your particular vise. This is the one I purchased based on it's price and quick release mechanism. Using this technique still allows for a strong hold while not leaving bolts showing on the top of your workbench. I decided not to route out my workbench to integrate the vise further. If you plan on using bench dogs you will want to do this. Looking back on this project, the most difficult part was the mortise and tenons. I practiced on many boards and I suggest you do the same.
I tried many techniques, but I was never pleased with any of the results. If you have found a nice keyboard, you have to strip it and look what's on the inside. If it looks something like this, you should be ok! But if it looks different, you may had chosen a difficult keyboard.
If you start making a template for the lasercutter, you will need to get everything exactly right, so the keys matches the electronics. Otherwise the keyboard will not work. So do this very precise! The bottom: This is not hard, you have to make it the right size and you have to make the inlets correctly! The sides: They don't have to be very high. Like 20mm inclusive the protrusions , also here you have to make sure that they are fitting correctly!
The top: This part is the hardest and it will take the longest! So prepare yourself: It will take a long time. You have to keep enough distance between the keys and you have to design every key exactly the same. Every point on the electronics and key must be in the exact position where it must be. If you do that right, and you have all the keys don't forget the LED light holes you are ready for cutting! Enter your email address and a donation, if you wish, to download the plans.
DIY Network. DIY Network has a free workbench plan that remains attached to the wall and features a fold-up table so you can tuck it away when not in use. You'll find everything you need in this workbench plan including a list of materials and tools as well as step-by-step building instructions.
Wood Magazine. This free workbench plan from Wood Magazine is for building a workbench that also serves as an outfeed table for a table saw. Download the PDF of the workbench plan and use the instructions to build this sturdy and functional workbench. If you're looking for a quick workbench that won't cost you much money then this Hammer Zone plan is a great project for you. Detailed instructions, a material list, and lots of pictures will make this workbench plan easy to carry out.
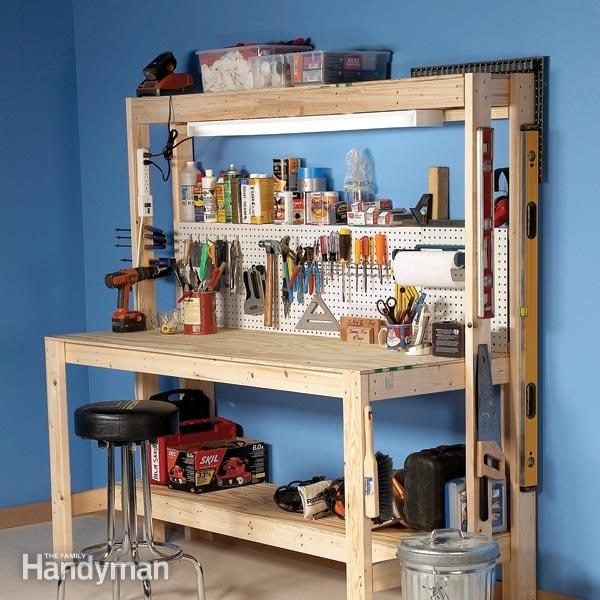
The Family Handyman. Use the user comments, videos, material list, and instructions to build this simple workbench. Another Family Handyman workbench plan that is perfect if you are small on space. It includes a fold-out work table, a roll out table saw stand, a metier box table, drawers, shelves, cabinets, and pegboard. Use the step-by-step instructions, tools, and materials list, as well as the user comments to finish this modular small space workbench.
This workbench plan will show you how to build a folding workbench that's on wheels so it can be moved quickly and easily. Easy Build Workbench Plan. Free Workbench Plan. Easy Workbench Plan.


|
Buy-drawer-slides-js Titan-belt-and-disc-sander-system Kitchen-drawer-slides-parts Rockler-tools-salem-nh-02 |

Krowka
31.10.2020 at 16:36:43
dracon
31.10.2020 at 11:35:45
KOMENTATOR
31.10.2020 at 11:14:52
StoRm
31.10.2020 at 14:23:13
RADIK
31.10.2020 at 17:49:43