Woodturning Tools Grinding Angles Example,Best Wood For Wood Burning Projects 201,Pocket Hole Jig Trinidad 6th - How to DIY
For the beginning woodturner, though, confusion comes in many forms: the number and variety of woodturning tools creates a lot of problems with decisions about getting started. The beginner's tool categories are simple, but some tools may not be present in every type of beginner's set--roughing gouges are a good example, because they're not much help in light duty and miniature turning.
And, of course, each turner develops custom configurations from the basic tools as they learn the craft, and Woodturning Tools Usa Korea their own needs. But for the beginner, confusion may rule more often than not, so a look at the different jobs of gouges, skews, scrapers and parting tools may help a prospective or new turner select a decent set, or a decent array of single, turning tools.
Make sure the turning tools have been sharpened and honed before starting. For ease of turning, and fast finish, along with modest cost, something on the order of soft maple, or butternut or a similar wood is recommended for testing your new tools. Prepare at least two pieces for bowl turning and two more for spindle turning.
Sample sizes are variable, but for the regular lathe, a 2" x 2" x 12" turning square, along with a 6" or larger bowl blank, work well. Start by checking the difference in size of the varied tool types--mini versus standard. Most of the mini tools are about 10" long, while the full-size tools are no smaller than 15" and may range up to 24". Given enough time, you'll discover that there are a great many other tools, both smaller and larger, than those described here.
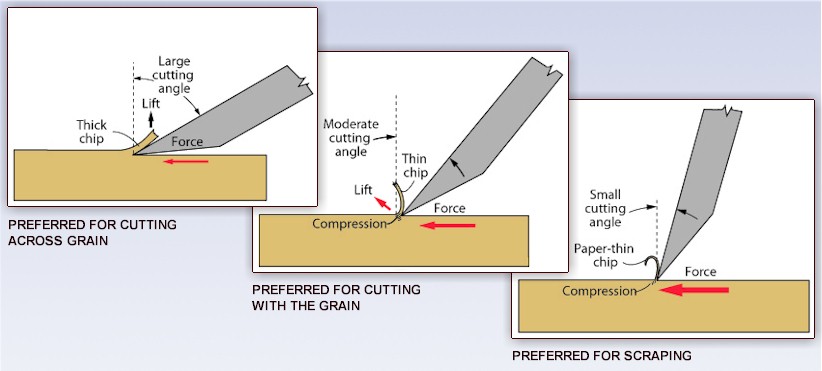
Begin with the roughing gouge: this gouge is square across the tip--that is, the arced shape has its edge on the same plane all around. The roughing gouge is the tool used to take the wood from square or other non-round shape to the early round stages, and is designed to remove material quickly.
As roughing gouges get wider, their arc tends to become flatter. Roughing gouges are usually used on spindle stock, turned between centers. Bowl gouges have deeper flutes and remove wood faster than spindle gouges, but are meant mainly for use in end grains, unlike the roughing gouge. The results tend to be smoother than those left by roughing gouges. This is a gouge type that creates a lot of different opinions as to what angle of flute is best: the simplest procedure is to get a standard gouge HSS and try the original angles.
If those don't suit, start grinding different angles until you reach one that you really like, that really suits your style of bowl making. Spindle gouges are shallower and more refined versions of roughing gouges, removing less material--usually--with each pass and bring round objects closer to their final shapes. They are generally ground in a fingernail shape, in a half arc, versus the flat nose of the roughing gouge. Diameters are usually smaller.
Like the roughing out gouge, the spindle gouge is used to quickly remove material. Their shape also makes them suitable for cutting beads and coves. Spindle gouges are useful even in finishing up the surface, as they're needed to clean up hollows and similar spots where skews don't work. Skew chisels are used to refine the surfaces produced by the gouges. Comprehensive, well written and good neutral discussion.
And I sharpen often — several time during the turning of each gouge. So often that I just never turn the grinder off while I am turning. Sharpening often is good.
Thank you for every other magnificent article. Where else could anyone get that type of info in such a perfect way of writing? I have a presentation next week, and I am on the search for such info.
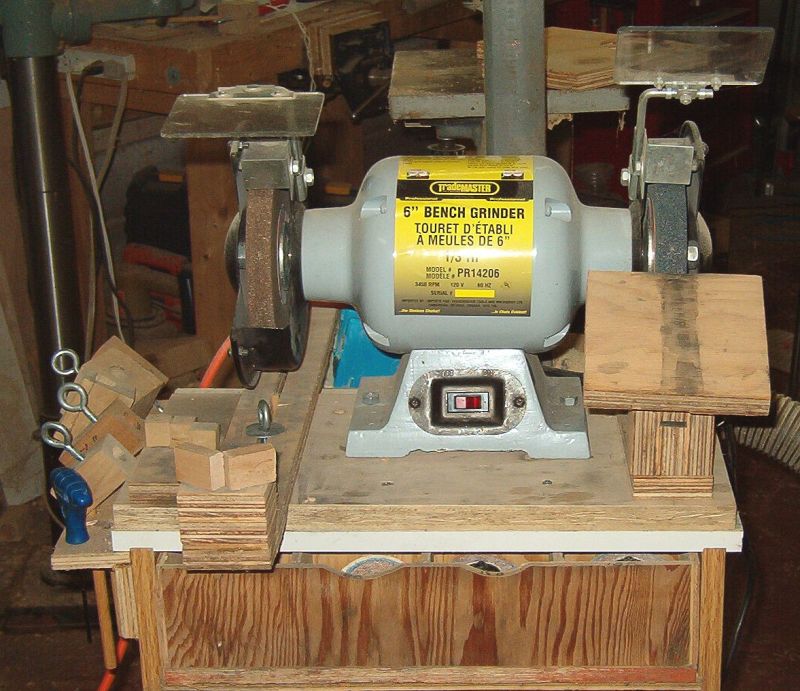
I have been doing wood turning for over 30 years. From their opinions I have found angles that work best for me. I find wood turning to be personally rewarding and relaxing. I enjoy experimenting! It is amazing how much beauty is hidden inside wooden blanks. I am new to lathe work, I have been sharpening by hand but getting a bench grinder very soon.
I do buff my chisels using some autosol on a piece of leather to take the fine burr off but wonder if I would get a better cut leaving them unbuffed.
Would you have an article on tool rest height and positioning of tools while cutting by any chance? In general, a burr left on your tools is what does the actual cutting. Usually, that burr is very small and can only be detected by running your finger again the edge.
For tools like negative rake scrapers, I apply a burr with a burring tool. Regarding tool rest height and positioning tools, I have an article all about Avoiding Catches, check it out.
I have heard a lot about buffing after sharpening and have tried same, my first attempts caused rounding over of the edge so I gave up on that. However, after sharpening there is sometimes a wire edge left may be due to my inability to do it proper I do use a proper jig. Some people swears by buffing, What are your thoughts on it and some advise on proper method to do.
Incidentally, your advice on sharpening is superb. Typically tools are buffed to look good for purchasing. If you are turning a great deal you will need to be sharpening often and adding buffing can be time-consuming. The wire edge you mention can be formed a number of different ways.
Thanks for the comment and Happy Turning! Thank you so much,. Thank you for your kind words! My goal is to make it easy for anyone to understand the details behind making and turning wood bowls. Thanks again and Happy Turning!!! Thank goodness, someone who tells it like it is! Nice article well written and to the point. Namaskar sir warm thanks for sharing your valuable information. Regards Anand P Deo. Thank you for your kind words.
I am working on a video version of the how-to-make-a-basic-wood-bowl Check back soon. Thank you! Thank you for the comment! Super article; last year At the Utah Wood turning symposium I took in several sessions on turning bowls and platters given by Stuart Batty.
He also advocated a micro bevel on his gouges. He also advocates freehand grinding if you feel up t it. Once I returned home I started grinding and using 40 degrees as the angle for all of my gouges with the exception of one gouge which is ground at a much higher degree 65 for getting down in those deep and steep areas of the bowl walls.
Your article has prompted me to do a bit of experimenting with different angles. One major advantage I have found over the past year since free hand grinding, is that I sharpen more frequently especially before the final cuts and it has greatly improved my final product befor the sanding process begins. I attribute this to going over to the wheel more frequently and touching up the tool as before I was reactant to take the time to set up the grinding gig and set the angles correctly which took up more time.
I thank Stuart for that and now your article to get me on a better track to have sharper and more consistent bowl gouge tools. Thanks for the great comment Bob! Experiment and have fun. Happy Turning! If you have a newsreader or a news page you can add this RSS and you will see all new posts when they arrive. I will be adding email subscription in the near future for updates. Stay tuned. FYI — New article coming tomorrow. Just a suggestion… I see a new addition to your site.. Update notice to the listed email of this new information.
I will be adding an email sign up in the near future. Username or Email Address. Remember Me. Like so many things in woodturning, there are numerous answers. Why are there so many answers? Here are the approximate bowl gouge sharpening angles for various bowl gouge styles. Micro Bevel Gouge Detail Photo.
Thanks, Kent, for sharing your knowledge and expertise. Thanks for sharing. See, we all have to do what works best for us. All the best to you! Just read your article.
Thank you for the information. I really appreciate your expertise. Let us know what you find. Hi Bob, I would need to see it. Email a pic to me at kw at turnawoodbowl. Bob, A fingernail profile is fine if that works for you. Bob, Sure you can sharpen without the Vari-grind jig.
Good luck with it, Kent. Tom, Thanks for writing and you fine compliments. Ken, Thanks for the comment and sharing your thoughts on gouge angles. Hello Samantha, Thanks for your thoughtful comment.
Thanks again and Happy Turning, Kent. Not my take on angles is similar to Odie's. No matter the angle you have to have it sharp and then learn how to use the angle you grind to. What I am saying is that each different angle requires different handling to achieve results and learning to use that angle is critical to success. Bill Boehme Administrator Staff member.
I think that I have seven or eight and still looking for the one that will be my key to greatness. I use a Tormek for most of my sharpening so the edge angles don't drift much. I've been putting a pulled bur on all of my scrapers for at least a decade using a burnishing rod. He demonstrated that a grinder "bur" will only last for a few seconds while the hand formed bur aka, pulled bur will last 45 seconds for the wood that he was turning. Lately I've been changing things slightly. Mostly due to sharpening ease.
I used to have all sorts of angles. Whatever I thought best for that tool. This required having different jigs to set the Oneway Wolverine jig or moving to another sharpening system. Now I'm going back to what should be. Ease of sharpening so it becomes a very simple task that can be repeated accurately and with minimal effort.
So what I'm using right now is the slow speed grinder with the Oneway system. I have the V arm on one side with a CBN wheel. The V arm is locked in one position and never moves. It sharpens my swept wing bowl gouges at a 55 degree nose or close I wasn't picky when I set it I had been using the same grind and clamped the arm there. To sharpen my spindle and detail gouges which are 35 degrees I use the same V arm setting but put a V block in the V slot. I put the Wolverine jig in front of that V block.
This moves the spindle gouges up the stone to give me the 35 degrees. On the other side of the grinder is a grit white wheel. It has the Roborest set permantly at 45 degrees.
Because of the way it bumps against my Oneway jig I can lock it in the same position all the time if I have to remove it. This position actually gives me less than 45 degrees but not I sharpen my Stewart batty ground bowl gouge and one wide spindle gouge free hand at that setting.
This also works great for my negative rake scrapers. I have ground them on both sides to that same angle so when I wear the burr off I just flip the tool and grind the other side for a new burr. I hone my skews for the vast majority of it's sharpenings so I rarely have to use the Roborest in that position.
Parting tools are sharpened free hand. I have 6 that for whatever reason have a slightly different grind. It's easy to just do those by eye and feel. I'm still playing with the strip sander and Tormek. I'm leaning toward the Tormek but just don't have all the jigs I need to true the stone and do bowl gouge grinds.
I will let you know what I think once I get all of these which of course costs way too much money I didn't like the Tormek in my old shop because I had to remove the water each night during the winter because my shop would freeze on occasions.
In my new well insulated shop that isn't a problem so I'm going to see if leaving the water in there is a good or bad thing. My Hunter tools of course all stay the same angle about 30 degrees and never need sharpening.
You shouldn't leave the wheel sitting in the water overnight or else you will wind up with the wheel frozen to the shaft because of corrosion even if you have the stainless steel shaft with the LH threaded EZ Lock nut. But you don't always need to completely remove the water tray Once you get proficient you will be able to smoothly move the tray up and down and latch it in place with the greatest of ease.
If your Tormek is an older model like mine that has the older water tray without a magnet to collect the filings, here is a solution that I posted in the Tormek forum about nine years ago: Many Tormek users place small super magnets in the water tray to collect metal filings which helps to keep the stone clean.
However cleaning the fine metal powder from the magnet is a messy and somewhat tough job because of the high strength of the magnets. I used a product called "Goop" which does a good job of adhering to the plastic. Other adhesives like epoxy and super glue have poor adhesion to the plastic.
After the Goop dried, I applied a thick coating of Goop over the magnet for two reasons. This step isn't necessary, but it helps the water tray to sit more level without rocking when I lower it to get the stone out of the water, but don't plan to dump the water. BTW, John, if you have the older Woodturning Tools South Africa Email style water tray like mine that doesn't have the flared sides, I personally think it is better for sharpening turning tools because the flared sides on the new style water tray can sometimes interfere with sharpening certain bowl gouge grinds.
I have both water trays and I very rarely use the new one. Zach LaPerriere. Gerald Lawrence said:. My BOB tools are mostly 70 degree bevels. I have some 60 degree beveled bowl gouges, but just find the 70 to work and fit better in the transition and across the bottom of the bowl.
It may have been Stuart Batty who commented that more blunt bevel angles take more pressure to push through a cut. That is possible, but when I use that type of gouge, it is for finish cutting and not bulk stock removal. Detail type gouges are all around 35 degrees. SRG is 45 degrees, but I seldom use it as other tools work better.
I can't tell that it either is better when using as a skew chisel. I can take a honed, or a honed and burnished shear scraper and get just as clean of a surface as I can with a skew, which could be my skew skills and not the tools. I can get the same clean cuts with a honed Big Ugly tool which surprised me since the Tantung metal is rather coarse compared to micro grained carbide.
I do have Woodturning Tools Grinding Angles Control one Big Ugly with Stellite as the cutting metal, and it is slightly finer than the Tantung. The more blunt angles ones seem to cut better with a burnished burr than a grinder burr.
The skew type NRS cuts about the same with a grinder burr or a very light burnished burr. If I take that burnished burr and turn it down to the other side, I can hear the old burr breaking off, kind of like celophane krinkling noises, but it still turns a nice burr.
Care must be taken to keep the burnisher no more than 10 degrees off of the bevel angle, so almost parallel rather than at 70 or 80 degrees which makes too much of a hook. I do all of my shear scraping with scrapers. I have been doing a lot of experimenting with 3 different edges. Grinder burrs, and grit, honed with no burr at all, and burnished burrs.
I am, at present anyway, preferring the burnished burr for the cleanest surfaces. For most shear scraping, it seems that the grit grinder burr does a fine job. The honed and no burr edge also is really clean.
I don't use swept back gouges at all any more. Only thing I can think of to use them for is shear scraping. I do need to do a comparison with the same steel to see if the more acute included angles of the gouge wing will make a cleaner cut than the more blunt angle of the scrapers I use.
I don't think it would ever work to try to burnish a burr on gouges All this information from my initial question is a lot better and more that I expected. I make small items as the bowl type turnings just have no market that I can find around here and I really don't like making them. I mainly do pens, mechanical pencils, seam rippers and a few other small turnings, the seam rippers especially are hot sellers for me. Lately I have been using my versa-chisels ground at approximately 35 degrees and they work great.
I don't know what happened as I used to use those tools with no problems whatsoever.


|
Metal Shop Project Ideas Baby Lock For Kitchen Cabinets Australia 2x4 Scrap Wood Projects Model |

QARTAL_SAHIN
28.05.2021 at 17:33:27
impossible_life
28.05.2021 at 14:25:56