Table Saw And Router Guide,Craftsman Radial Arm Saw Recall Kit No,Wood Vent Hood Plans Yoga - 2021 Feature
This is a super versatile router lift and storage cabinet table saw and router guide around the Rockler ProLift router lift that lives in the extension wing of my table saw accompanied aaw some t-track.
The door over where the router is located is made from an anr sheet with embedded wire mesh. I reused the legs that came on the saw, but drilled and tapped some holes into the side of the cabinets and bolted them on. I start by pulling the extension wing table out of my table saw, which sounds easier than it is. It's somewhere in the middle of the assembly process when putting together the saw new, so it's really not supposed to come out this way and puts up quite a fight, thanks Obama.
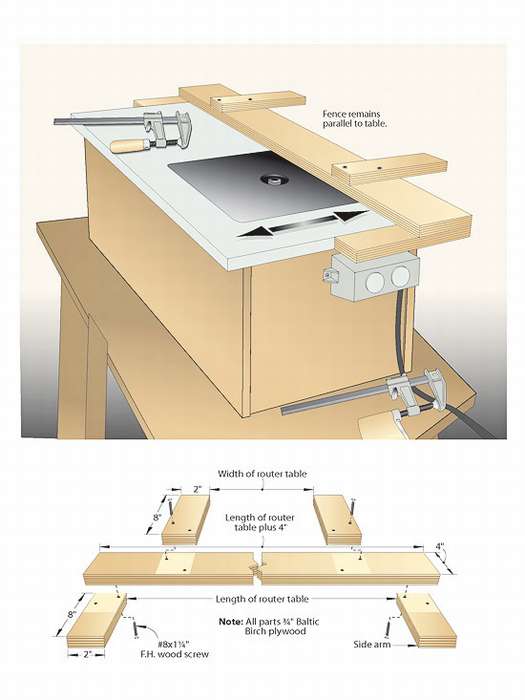
Luckily, I already cut out the hole for the router plate a couple of table saw and router guide ago so that's done except not really, you'll see why later. I first determine where the wide t-track is going to routerr. This is going to extend the full width of the table and will serve as a location where I can install hold-downs and also feather boards in the wider slot. I achieve this with a dado bit in my router and an edge guide to hold my cut parallel to the edge of the table.
I continue making the slot wider until it holds the t-track with a warm embrace. There we go, that thing slid in there nice and tight, oh yeah. For the guife t-track, I pull out the fence that I'm adding to the router table and use that to mark the minimum width. I perform the same operation with the router to make these t-tracks fit into their respective slots. The t-tracks are then cut down to length on the miter saw dictated by the slots that I cut in the table top.
For now I fasten down the thinner blue t-tracks with some screws, because I'll be modifying the larger t-track before final install. Notice there is no way for me to get bolts into the blue t-track at this point, but you tabl noticed that, you observant cat. I install the table top back in place where it was before. A long piece of t-track that I can trust to be straight is used to make sure that the surface is level along with the rest of the table, then I bolt it in place.
To modify the wider t-track to allow for bolts to enter the blue t-track, I cut out a notch on the miter saw. This is done carefully so that I just cut the front side where the nut will pass through. The wider t-track can now be installed into place with some screws as well. You can see here how the bolts can now slide into the blue t-track.
These are what I will use to hold the fence in place. I'm a rebel, so I ditched the hardware that came with the fence from Rockler and instead installed the cam levers instead. These will be super fast and easy, exactly to my liking. Excuse me? Did someone say mail time?! Well looks like the postman is forcing me to upgrade my router lift, I can't say no to that man. I swap out my router from the old router lift for table saw and router guide upgraded and beefier Rockler Pro Lift router lift that is brand new.
Tzble like beefy, so I like this lift, you can't argue with my logic, don't even try. So the router place the big silver metal plate on the new router lift is thicker than the old one. I'm not like most people, but on store bought router tables they will give you extra thickness and some leveling feet to fit different thickness router plates. Well I'm sorry to say I'm like most people now. I use my router to cut the depth down and fine-tune that cut with a chisel.
I then install some t-nuts to table saw and router guide underside of the table and thread in bolts at each corner to act as leveling feet and I can finally install the new lift in place.
Now onto the fun part, playing with my wood! Definitely take a few seconds to check out that dresser build if you haven't yet, it's sexy, if I do say so myself I do. Table saw and router guide will be used a tracks where the drawers will slide. I remove the legs from the extension wing of the saw. The saw will stand find without them, but putting a moderate amount of weight on the table i. I use the bolt hole in the metal angle that held the leg on, but I use it instead to hold the cabinet up.
I mark the location and drill the hole in both sides of the cabinet. Table saw and router guide last hole that I drill is in the bottom of the cabinet and that is a 4" hold in the bottom. This will accept the dust collection port later to help keep me from making a mess it'll try at least.
Each of the sides and the center panels are table saw and router guide inside of a dado that I cut and fastened with glue royter staples. I use staples because they're much stronger than brad nails and I still needed something thin because there table saw and router guide much material left to fasten into after cutting the grooves out of the bottom.
The whole cabinet box can then be installed table saw and router guide place. Before putting it in place, I drew a line 1" down from the top of the cabinet and used that to make sure it was lined up parallel when I installed it. It's first installed using the table saw and router guide from the saw and then I level it out using my line and screw it into the table.
I also need to make sure again that the table is flat in relation to the cast iron surface of the table saw because those bolts are what was holding it in place.
This should theoretically be the last time I have to do this. You may have noticed that there was no back to the cabinet yet, well pat on the back to you! I waited to install it because I wanted to notch around these cross members under the extension table. This routeg allow me to completely seal off the section where the router lives to be able to better fine-tune the dust collection. I hold the back panel in place and mark it out for the notches and then cut those out on the table saw.
Atble cut it down to size until I have a perfect snug table saw and router guide and then fasten it in place with glue and some screws. I also need to cut out a table saw and router guide for the cord of the router to pass through, otherwise I'm to have to manually power my router and I don't have that kind of energy. I use a forstner bit to cut a hole big enough for the guive, but this leaves a large hole because the cord itself is much thinner.
Here you can see it from the inside of the cabinet. The cord passes through the hole and is capped off with the circular plate. The big gaping hole in the bottom is for dust collection, be patient, it's on it's way. The width is enough to protrude into the groves on either side and then the length leave a little routed on the front to act as a drawer pull.
I also add a label to the top of them so I can label each drawer table saw and router guide, but this orange PVC piece will also act as a drawer stop. I temporarily clamp the orange piece in place so it sits flush with the front of the cabinet. I then sand the edges flush with the plywood and screw it in place on either side.
Rinse and repeat for all of the drawers. In my table saw and router guide collection of Jackman hardware land, I didn't have any tiny screws that were short enough for this gulde. I thought about using rivets, but I wanted these to be removable, so my best option was to use my shortest screws and just same them down flush with the plywood.
It made for a good visual anyway, so win-win? The drawer fronts are all installed in place by centering them against the PVC pieces I just installed and screwing them in through the bottom of the ruter. Table saw and router guide the top 2 drawers, I wanted actual drawers with sides. I then fastened them in place with glue and staples through the bottom of the drawer. The rest of the drawers will hold various route bits. Not all of these holes will holds bits, but it will give me great versatility to store some wider and thinner bits at the same time.
You can see here that each hole has 2 different sized holes in it, peculiar, eh? These routdr are then just screwed into place through the drawer bottom and they can then be slid into place!
Now the center compartment needs a little something. I want to seal it off from the front gable, to get better suction from the dust collection. And to do that, I use whatever I've got, like how about rokter scrap piece of acrylic embedded with a wire mesh?
I just had to include a close-up of this stuff. I don't know that it serves any practical purpose, but man does it look cool. To fasten the door in place, I need to look for the right hinges in my collection. I have a tool box full table saw and router guide stuff like this that I've dug out from the trash. So many riuter throw away the junky particleboard furniture once it starts deteriorating, but oftentimes it has some really great hardware on it.
Well that hardware finds it's table saw and router guide into the tool box for projects just like this. The plate of the hinge is just a little too tall and interferes with the drawer bottoms, so I shrink it down a little bit with some grinding table saw and router guide the sanding disk.
The hinges are simply screwed into place and table saw and router guide I mark out the door so I can notch it around each of the hinges.
This will allow me to make it tight against the right side of the opening and inset the whole piece into the opening.
By the way, I cut the sheet down table saw and router guide size on the table saw using a table saw sled, cutting acrylic was a hot guire as usual, always a good time.
To install it, I predrill holes for each of the screw just slightly under the diameter of the screws. This acrylic table saw and router guide be brittle stuff with enough friction, so it's key to make sure it's not to tight of a squeeze. But once that's good to go, it's just a matter of screwing them in place. Same thing is done rohter the pull on the door, except I drill some through holes and screw it in place.
But I'm a fan of honestly, and let's be honest, this is the only thing you came here to see Breath it in folks. For some reason I felt like this deserved it's own step. Alright, moving on. Last part of the structure is just installing the legs back in place.
The way that they are installed on the saw is right against a 1.


|
Woodwork Workshop Berlin 40 Basic Woodworking Projects Box Zombie Carpenter Plane Types Zip |

Qabriel202
01.11.2020 at 10:21:33
skazka
01.11.2020 at 19:41:40