Miter Gauge Traduction 80,Best Digital Tape Measure For Woodworkers Free,Mortising Vs Straight Router Bit Note - Reviews
This is an exceptional accessory to have on your table saw and will fit in any standard slot of 19 mm by 9. There angle adjustment positioning block is meant to make it easier to achieve angle cuts that are flexible and precise.
There is also a gap adjustment block which will enhance the life of your miter gauge and also give you a smooth slide anytime you are using it to make your cuts. Another amazing feature that you will find on this miter gauge table saw is the adjustable flip stop.
This will make it easier when you need to make calibrations before cutting the workpieces. The materials that are used to make this miter gauge are high quality and as such, you are assured of longevity. It is also resistant to wear and tear and this makes it a worthwhile investment. With a lightweight of only 3 pounds, you will not experience a heavier burden when using it to guide your cuts. It also has a compact design and this makes it easily portable.
As you would pick from the name, the Drillpro 27 angle has 27 stops for different angles. This makes it possible to make adjustments and increments that are precise. You can use this miter gauge with standard miter bars and this may limit users with table saws that have different miter bars. The large grip is comfortable to handle and will attach to the table saw firmly.
The clutch on this miter gauge is designed in such a manner that you will achieve accurate cuts effortlessly. Once you have set it, the kit will maintain the angular position for a very long period of time. When you go out to look for a miter gauge for table saw, there are a number of factors that you should bear in mind. While the table saw miter gauge review is a good guide, you will need some more guidance so as to make an educated decision.
Here are some essential features to consider so as to get the best table saw miter gauge:. Even when you have the best table saw miter gauge, but do not know how to use it effectively, then it becomes useless.
There are many dangers that may occur if you do not know how to use your miter gauge with your table saw. Here is a simple, yet comprehensive guide on how to use your table saw miter gauge. This is one of the easiest cuts to make as you would just need to set the miter gauge to 90 degrees. Slide your gauge forward up to the point where the front part is revealed.
You should disconnect the table saw from the power source when doing this. Ensure that there are no gaps between the gauge and the blade. You need to use the locking and clamp down mechanism to lock down the workpiece.
When all is set, slide the miter gauge toward your body and place a board against the flat edge of the gauge and mark with a pencil. Align the blade of the saw with the pencil mark and make your cut while guiding the miter gauge table saw. There is a minor difference between the angled crosscuts and the square crosscuts. When this is done you will follow the steps highlighted above and mark your workpiece accordingly.
You can use a woodworking clamp to hold the stock in place and achieve perfect cuts. The blade should be placed on the markings and then make your cuts guiding the miter gauge table saw. These cuts are usually made using the jigsaw and a miter gauge.
This information is great for the weekender…. I have the tools to do the honey do list, and get to make plenty of saw dust…. I am getting ready to install crown in a kitchen with a corner cabinet and have always just had to keep back cutting the cope to get it to fit. Is there an easier way? Wisdom is in the basics. The A-ha moment has come to me by falling back to basics to figure something out.
If anybody becomes too sophisticated for the basics their work probably sux. Iam still missing something in this article. Half of 86 is 43 but how does 43 become 47 on the miter saw. Consider this explanation: The outside most or lower if you prefer scale shown on most miter saws starts at 0 degrees in the center.
At 0 degrees, the angle you leave on the board cut is 90 degrees, as we all know. All cuts on a straight board leave 2 angles as measured with a protractor. Those 2 angles always add up to 90 degrees, so the angles are always the reciprocal of one another. That lower or outer scale always describes the angle the saw head swings through, which is NOT the angle left on the board if you were to measure it with a protractor, that scale is the reciprocal of the angle left on the board.
As Jesper pointed out, the scale on the older miter hand saw box starts at 90 degrees in the center and decreases to either side. I zoomed in so you could see the actual numbers. The lower scale starts at 0 and increases angle wise from there both sides.
Reciprocal numbers. My Swedish carpenter grandfather used to tell me that Loki the Norse God of tricks invented the zero centered scale to confuse every one. I do floor installation and have done plenty of trim with the installation. However, I have never quite been trained. Dog wagging his tail back to the saw.. That being said, I want to be more professional and assertive with all of these procedures and this article has been helpful.
Live for these comments as well! Honestly I was stuck on the degree angle. That was my google search that lead me here.. I originally assumed it was Ended up coping that section of baseboard instead. But it had my mind playing tricks uffda Loki.. I am a hands on visual learner and all of my research online left me annoyed and upset..
Carpentry here we come! Now I realize why all of my non degree cuts never seemed to work right! I would just trial-and-error it. Thank you for the article and the great website! I read this article that explains the protractor scale vs the miter saw scale. I understand it, but must ask…. So instead, in order to make sense and help yourself in the future, stop identifying angles by the gauge on your miter saw.
That gauge is off by 90 degrees. I would like to offer a technical word about the word reciprocal and a bit more. With degrees of size theta any amount of rotation of the two rays about a common point the reciprocal of sine theta is cosecant theta, the reciprocal of cos theta is secant theta and the reciprocal of tangent theta is cotangent theta and so on. A complementary angle is one of a pair of angles whose total sum is 90 degrees.
So the complementary angle of 47 degrees is 43 degrees. Two angles whose measures add up to degrees are called supplementary angles. Leonard, Lots of carpenters have trouble understanding angles—primarily because of the miter gauges on miter saws. I guess you wrote that paragraph for yourself and not to help other readers? Nice job! While his explanation IS highly technical it serves to set up the proper term complemetary explanation of the second paragraph.
I am no math major but the term reciprocal was confusing to me. The terms complemetary and supplementary cleared it up.
Thanks Lenoard! Excellent tutorial! My Father apprenticed with a Danish cabinet maker: very precise, also. I like to bisect angles with a bevel square and compass, and, if the angle is obtuse; then, I subtract from 90 degrees by marking the bisected angle on the back side of a scrap of flat stock, flipping it over, and finding the angle by swinging the saw blade to the line, right?
Man, carpentry is fun! Thank You for the good article. Carpentry is a long and honorable craft, and we learn from observing, and from doing.
Would you please help to find the right angle to fit this? I want to run wainscot across a wall. Then run vertical pieces down to fit into the top piece. Can you help as to the right angle? Thank you, Tom. My angles are not working out using 45 degrees on my mitre saw. What am I doing wrong? By looking at the written marks he has in his miter saw. I am having major problems getting an obtuse angle of degrees for base trim in my bathroom.
I cut the angle and its way off. Jesper, I am not a tradesman. I am however, a serious do it yourselfer with a fair amount of experience. My unique situation is that we live in a geodesic dome. Imagine how hard it is to find a 90 degree angle in here!
This is an older dome so there has been some settling. The rule in here is that there is no such thing as plumb or square. After MANY little cuts, back and forth to the saw trying to fit each individual corner, I happened upon this article.
Now, armed with my chop saw, my trusty T-bevel and your generous advice, this job has gone from tedious to kind of fun.
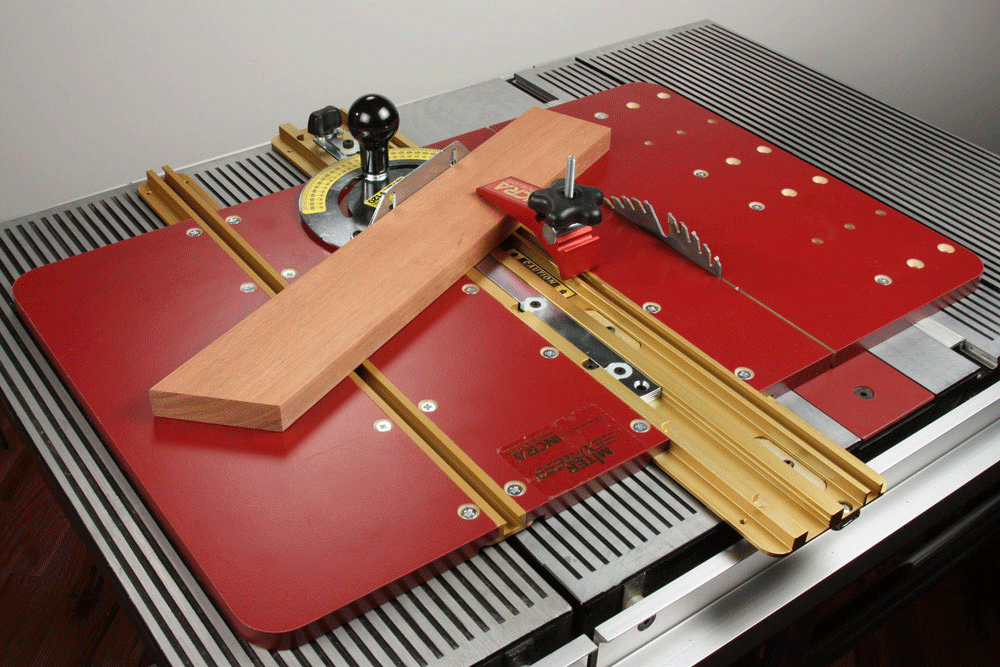
There is a place in this world for those of us who are not experienced finish carpenters but desire to learn the skills needed to do good work. Little gems like this are invaluable. Thank You from all of us. For some, this article may be tedious. Six of the eight tested miter Miter Gauge Traduction Code gauges and all but one sled come with a fence that not only secures and orients the workpiece, but also helps make repeated cuts of identical length when using an adjustable stop.
All the miter-gauge fences have accurate scales, but we found it easiest to set the length stops on the Kreg and JDS Accu-Miter The Incra Miter is the only sled with a fence scale; with the others you must measure from the blade. We like having the ability to extend the fence and stop to more than 30" for cutting long project parts, such as table legs.
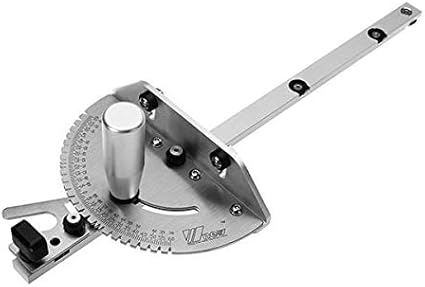
The breakaway tab on the Kreg fence flip-stop, when removed, lets you use the stop accurately with an attached auxiliary face. To set your miter gauge this way, you align the primary angle pointer on the miter gauge with the nearest whole number you want but not dropped into a detent. Then you rotate the head slightly until the needed vernier mark lines up with the nearest whole-angle mark on the main scale.
For example, in the photo below , this gauge is set to cut a miter at And the cutting awards go to And it does this without being cumbersome. But you could also get both sleds and make all your angled cuts as well as panel cuts, and never need a miter gauge. The 18"-long fence telescopes out for crosscuts up to 34" long, and the stop works on the extension as well as the main fence. The flip-stop has two independent, adjustable steps for cutting two different lengths in the same setup.
A chart on the head provides quick reference to set angles for projects with 4, 5, 6, 8, 9, 10, 12, 15, 18, and 20 sides.
The fence and stop extend for up to a 51"-long crosscut, and the microadjuster was easy to use. The replaceable L-shaped zero-clearance block attaches to T-track on the back of the fence to prevent workpiece tear-out.
It uses the same fence stop as the Miter HD, but its 27"-long fence extends to a test-topping 52". Fence adjustments require the included hex wrench as on the Miter HD. Its overall length and weight make it more cumbersome to use than other models with fences. A swing-out length stop at the end of the fence gives you repeatable accuracy up to 47".
The miter bar fits easily with top-side adjusters. We found it more difficult, compared to other test models, to read the miter-angle markings of non-detent angles. Still, it proved robust. With nine miter detents, an easy-to-read miter scale, and a vernier scale for.
The fence has a registration stop that lets you slide the fence sideways for use in the right miter slot, then instantly return to its calibrated setting in the left one—the only tested model with this handy feature.

|
Metal Cabinet Cam Locks Github Home Cnc Machines For Wood Map Rockler Laser Engraver Zone |

RuStam_AhmedLi
03.11.2020 at 20:48:59
Nihad123
03.11.2020 at 22:44:38
quneslinec
03.11.2020 at 16:58:42
q1w2
03.11.2020 at 14:14:41
KahveGozlumDostum
03.11.2020 at 16:33:19