Kreg Pocket Hole Jig Drill Bit Set Off,Triton 325 Hp Router Zone,Best Woodworking Marking Tools 01 - Try Out

This nightstand is the perfect bedside table - and it has a drawer for hidden storage! Scared to build a drawer? Don't be with our easy hack! This modern step stool has clean lines. It's perfect for helping kids wash their hands or giving anyone an extra two steps up!
This cheeseboard is perfect for serving snacks at parties - and is easily customizable to fit exactly over your kitchen table or island. This over the arm cupholder is a super quick and super useful build. Love plants? You'll love how easy it is to build this wooden plant stand.
The house shape gives it some whimsy, too! This entryway closet system was a major upgrade from the single wire shelf here before it - and it was all assembled using our Kreg Jig!
A DIY mid century modern side table will add a beautiful aesthetic to your room and provide great functionality. This DIY coastal console table is perfect for any bedroom, entryway or even behind a couch. Sturdy construction holds up well to heavy items like luggage, but also has an airy open feel when there's nothing on it.
Customizable for color and height and the perfect project for you. Make a safe space for your baby or toddler with this DIY baby playpen. Using sturdy construction, you'll create a customizable playpen to fit your needs. This playpen can be created bigger or can add two more sides if you aren't connecting it to a wall. These shelf brackets are very sturdy and a great option if you want DIY brackets! We used 3 to hold up 1 10 foot shelf. Want to create a wooden tabletop from a variety of boards?
Here is an easy way to use a Kreg Jig to make a a tabletop! Have a toddler? They will love this climbing arch - that can be flipped to double as a rocker! The whole thing is strong thanks to Kreg pocket holes and wood glue. This storage bench has a built in planter and trellis, for a perfect multipurpose outdoor furniture piece. Need to store and display some small plants? This is a great scrap wood project that is perfect for any tabletop or even a windowsill!
This kid's workbench is a huge hit for toddlers and kiddos who love to bang toys! The cabinet underneath is our son's favorite part! Check out this fun tutorial for how to build a DIY whimsical tree shaped bookshelf using a Kreg Jig to connect the branches.
Privacy Policy. This two tiered wooden tray is perfect for holiday displays or holding your every day produce! This chair-shaped plant stand is the perfect welcoming addition to your front porch or patio!
This wooden shoe tower is perfect for organizing a small entryway. This coffee table has beautiful clean lines and is a cinch to build thanks to the Kreg Jig. This slim desk has a drawer and two shelves, perfect for work from home! Finally, cut lumber to form the braces and attach them to the table with screws before applying the finish and sealant of your choice.
To learn more about the specific dimensions needed for your lumber, read on! Did this summary help you? Yes No. We've been helping billions of people around the world continue to learn, adapt, grow, and thrive for over a decade.
Every dollar contributed enables us to keep providing high-quality how-to help to people like you. Please consider supporting our work with a contribution to wikiHow. Log in Social login does not work in incognito and private browsers. Please log in with your username or email to continue. No account yet? Create an account. Edit this Article. We use cookies to make wikiHow great. By using our site, you agree to our cookie policy. Cookie Settings. Learn why people trust wikiHow.
Download Article Explore this Article parts. Tips and Warnings. Things You'll Need. Related Articles. Article Summary. Part 1 of Cut the lumber for the tabletop. You may use construction-grade lumber if you don't mind a rustic look, but choose boards with as little warp as possible. Measure and mark the cut lines first, then cut the lumber with a miter saw. Cut five 2x10" boards to 69 inches cm in length.
If the miter saw is too small to make one cut, cut halfway through, then rotate the board and cut again. Refer to the end of this article for a list of all lumber and supplies required. If you'd like to change the measurements of your table, draw a diagram first so you know how much lumber to buy. Arrange the tabletop on a flat surface. Find the flattest surface you can, such as a garage floor. Lay out the five 69" boards in a row, as flush as possible.
A little warp is fine, but try a different order for the boards if there's a major gap. Mark the pocket hole locations. For each border between two boards, draw a series of marks along one side, spacing them 8—10 inches This is where you'll drill pocket holes to hold the tabletop together. In addition, mark two spots on each end of each board, where you'll be attaching breadboard ends.
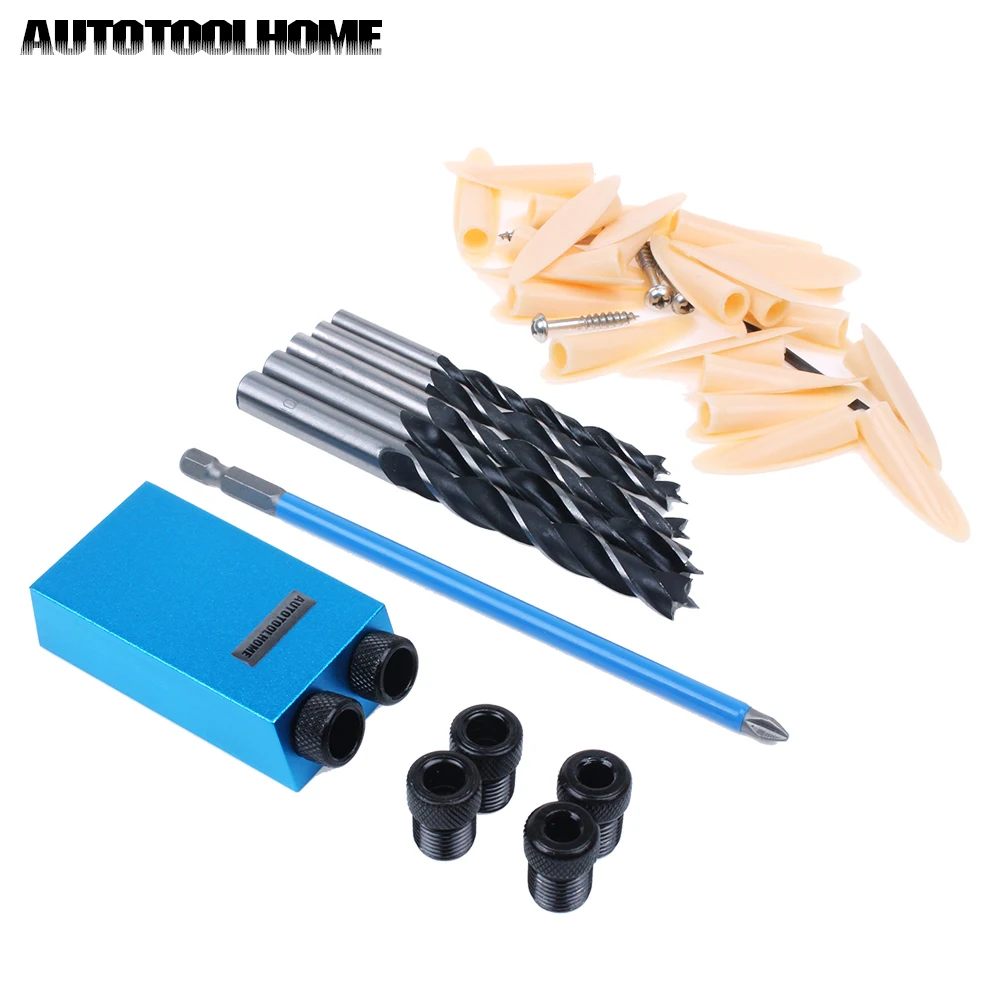
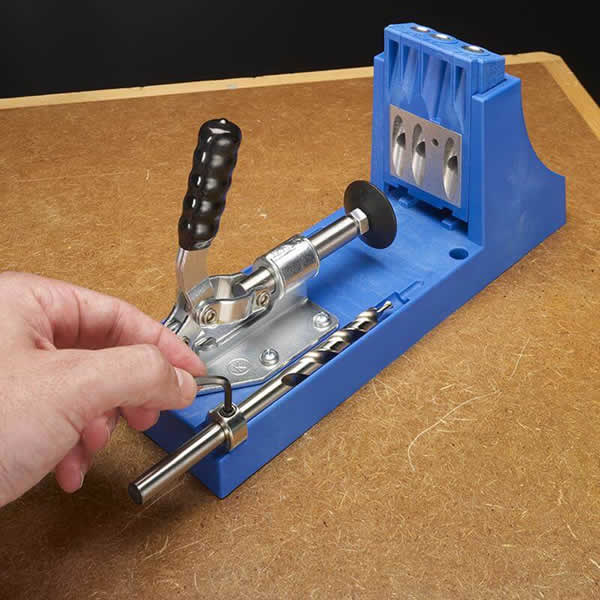
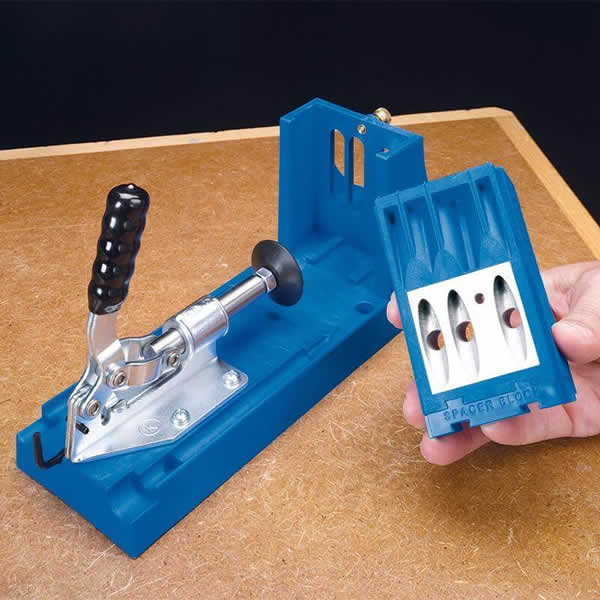
Adjust the Kreg Jig depth. Insert a drill bit into the depth guide on your Kreg Jig, until the step touches the 1. Tighten the depth collar with an allen wrench. The step is the edge between the wide and narrow portions of the drill bit. Don't use the tip of the drill bit as your guide. Adjust the jig placement. Manually loosen the screw on the back of the jig so you can move the hole guide. Raise or lower it until set to the 1.
Drill the pocket holes. Stand the edge of a board into the Kreg Jig, centered on one of your marks. Drill through the hole on top of the Kreg Jig to make a pocket hole in the board. Repeat with each mark on each board.
Don't forget the marks on the end of each board. Stand the board vertically to drill these. Lay out the boards. Sweep the floor of sawdust and lay out your boards again, in the same order. Confirm that all ends are flush before you continue.
This is really easy, you just loosen the set screw and adjust the fence to the line indicating the thickness of the board being drilled into. Then disengage the clamping mechanism, and tighten the clamp head a bit more. Now when you re-engage the clamp, it should apply pressure against the board. You just need enough pressure here to keep the board from sliding back and forth. This is done with an allen wrench. There are lines indicating where to set the bit, with the collar at one end, and the step of the bit at the line.
Once clamped, you can then drill however many pocket holes 1,2, or 3 you need at this location before unclamping. While drilling the pocket hole, keep the drill at full speed. Be careful to not apply pressure that pushes the bit out of this alignment, as that can be hard on the bit and the bit-guide.
If you attach a shop vac on the jig, your wood chips will do a pretty good job of staying clear. But the shop vac is not required. I rarely use one, and I just make sure to lift the bit out of the hole a few times while drilling, just enough to sling out some of the wood chips. This helps to keep the bit from getting clogged which causes heat and dulls the bit. When sliding the board over, or putting the next board in the jig, you may want to blow the wood chips away off of the jig platform.
Otherwise they can create a gap under the board and affect the depth of the pocket hole. The first step with assembly is getting the clamps set up. Because of the 15 degree angle of a pocket screw, it has a tendancy to pull one piece along the other, which leaves a ledge in the joint.
To keep this from happening, clamp the pieces in a way that they cannot slip when tightening. You can see the above picture frame project tutorial here opens in a new window.
A good pocket joint requires a tight pocket screw, but not so tight you strip the hole out. Instead I set my drill to drill no clutch , and I slowly insert the screw until my drill just starts to bog down.
Normally this is when you would pull in the trigger more, but with pocket screws that would be a mistake. Start out by tightening the screw until you can clearly see it pull the gap closed. Snug it up until it feels good and secure, without really driving it in.
|
Warming Drawer Under Oven Number Soft Close Locking Drawer Slides Android Openwrt Hardware Jackson |

President
21.08.2020 at 14:36:55
T_O_T_U_S_H
21.08.2020 at 13:58:52