Carving-kit-cost-control,woodworking-supplies-veneer-gmbh,wen-belt-and-disc-sander-review-64 - How to DIY

Add all three to Cart Add all three to List. Sold by MySweety and ships from Amazon Fulfillment. FREE Shipping. Sold by Gruory and ships from Amazon Fulfillment. Customers who viewed this item also viewed. Page 1 of 1 Start over Page 1 of 1. Previous page. Next page. Customers who bought this item also bought. Here's how restrictions apply Add both to Cart. Have a question? There was a problem completing your request. Please try your search again later.
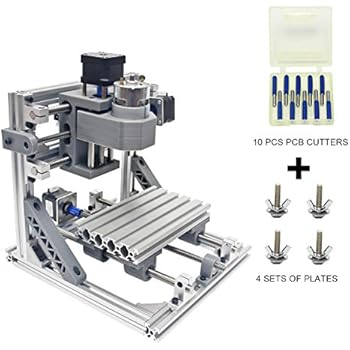
About product: Profile Dimensions: 33x40x24cm Engraving area: 30x18x4. The main advantages of offline controller : Do not need to connect computer. Module Available: If you are an experienced CNC engraving enthusiast looking for an upgrade, you can add the module kit to the machine. Material that can be engraved: The machine is quite neatly packed and it comes with an assembly instruction booklet.
Simple Assembly: 1. Open grblControl software If you need the manual and software of this engraving machine, Please see the link in the third point description. Package inclueds: 1pcs Full set engraving machine 1pcs offline controller 4pcs clamp 10pcs bits 1pcs extension rod with ER11 collet. Compare with similar items. Product information Color: Black Technical Details. No Batteries Required? Would you like to tell us about a lower price?
See questions and answers. Customer reviews. How are ratings calculated? Instead, our system considers things like how recent a review is and if the reviewer bought the item on Amazon. It also analyzes reviews to verify trustworthiness. Customer images. See all customer images. Top reviews Most recent Top reviews. Top reviews from the United States. There was a problem filtering reviews right now. Please try again later. Verified Purchase.
Instructions are limited, but a fun assembly, think Ikea here. Fairly sturdy. Good software came with it. Grbl works well, my board came programmed, all wiring is just plug and play.
I recommend putting rubber feet under the extrusion to help with noise. Also, the brass collar to adapt the motor to the tool can be a problem, as any machinist knows not to use set screws with non weldon shank tools.
A 5mm to er11 collet adapter is available, I already ordered one. Try to keep the tools short as well, I see some videos with it hanging way out, just causes chatter and breakage. The stepper motors are the small nema 17 motors. I also wrapped my spindle and Z axis cables with flexible nylon loom, to decrease the chance of failire. May look like a toy, but at 10k rpm, things go flying. Update : 12 hour run, no problems. Ordered blocks to check squareness of the machine, but the one non adjustable axis is flat within.
Will update values of other axis, but the rest are adjustable. Download a newer version of the grbl control called candle. The older version. Update, blocks came in. Was able to get x flat to the table. Not bad for this type of machine.
ZX was out. No adjustment available for the Z square as it's a 3d printer part, but probably won't make much difference on this type of machine. I also designed and printed a case for the woodpecker cnc board, will be on Thingiverse in the next couple days. Images in this review. Having a lot of fun with it. Reasonably easy to assemble with the instructions on the cd. It probably took me about 45 mins or so to be honest. I was concerned at first about the plastic frame sides but they are actually pretty solid.
The whole thing is pretty solid all assembled. I made a project in Fusion and exported the gcode. Opened it up in the provided candle software and got a preview of the code.
Looked good. Loaded it into the included memory card and ran it that way. So I can still use the thing. The clamping method has a little to be desired.
My only gripes are that one of the slide bearings failed after about 30 hours of machine time. I just ordered a new one. Life goes on. I want about to pitch a fit over it.
In the future i May look at expanding the size capabilities, adding end stop, and using it with my laser since there is a spot on the board for it.
I enjoy using this. I bought it for pinewood derby car designs nownthat my sons at that age. We will have a fun learning experience together with this machine. Inkscape has gcode and laser code extensions available for download Photos are: a model of my face I carved out. Because my friend threatened to be less mature than I. Having a lot of fun with it By.
Scott on December 1, Color: Black Verified Purchase. First of all I'll give you a little of my background.
Everything from small 5 axis machines to machines with 50 feet of travel. I've written and published 2 CNC programming manuals that are used by major corporations to train their employees. So I've been around the block a few times. On to this cool little machine. I came up with a special personal project and didn't want, or need, to use a large CNC machining center to cut plastic.
There are many sellers to choose from but only a couple different variations when it comes to the actual hardware and electronics.
They all, like this one, have to be assembled! There's no way they could sell these at this price point if they put them together and then had to figure out how to ship them. Assembly is really not that difficult if you watch some videos in advance and then take your time. I spent 1. In reading some of the reviews for this machine AND ALL of the others, the screws included to mount the table to the linear rail bearings are too short.
No big deal. When I ordered this machine I also ordered M5x16 socket head cap screws Actually I got a set of M5's from 8mm to 20mm long just in case. These replaced the M5x12 screws that are packaged with it. So that was a non-issue right from the start. Like I said, the package came with a CD. It has the assembly instructions and all the software that's included.
The instructions were easy to follow even though there were few written words. Look at the pictures and make it look the same in real life. There's only 1 dimension that needs to be fairly accurate during assembly. The manual points out that the vertical legs need to be I had a dial caliper handy, so that was easy for me.
If you don't have one, the distance isn't as critical as the fact that both legs need to be the same distance from the back end of the side rails. Use a tape measure and be as accurate as you can be. This is important because it controls how square the X axis of the machine is with the table. They're phenolic resin. It's very durable stuff and this design makes assembly WAY easier and more accurate than the others. The structure will be much more rigid and use fewer parts in the process.
So there will be less to align and less to loosen up as time goes on. After everything was assembled it was time to look over and connect all the wiring. The board is marked with where everything gets plugged in. However, the spindle motor has no markings as to which is positive Red wire and which is negative Black wire. So I just randomly plugged the 2 in and paid attention to the direction it turned when I first powered it up.
Looking at the spindle motor from the top, it should turn clockwise. If it doesn't, swap the red and black wires, like I had to, and it'll all be good. Running it backwards won't damage the motor, but milling tools and drills are designed to spin clockwise and don't work very well if they don't. Once it was all wired I plugged in the offline controller and gave it power. It worked. First time. X, Y, Z all moved as they should. The spindle motor turned on and off. Pretty exciting. Copied it to a micro SD card.
Inserted it into the offline controller and sent it. Off it went. It did exactly what I told it to do. The machine defaults to metric movements. If you run a program that is in inches G20 and then manually move the machine with the offline controller, it will do bad things. The controller defaults to a 5mm step when you do a jog move. It might be a good idea to have the power cord handy in case you need to unplug it before it goes too far!
That covers number 3 in the list of needed programs. It's on the CD. They all do pretty much the same thing. They send a line and wait for the machine to do it, then send another line until it completes the job.
Candle also allows you to move the machine manually and set the X, Y and Z origin points that are necessary to tell the machine where you want it to start.
There are MANY programs available that are open source, but difficult to master. One of the easiest to learn is Easel. The next two knives are chip carving knives with ergonomic-grip handles. The short blade places your hand in very close contact to the wood, giving you total control over any cut.
Ergonomic handles do not fit all hands. Check the width and length of any ergonomic handle before your make your purchase.
The last two chip knives, far right, have the same short blade as the ergonomic handled tools but use a short, narrow wood handle. Chip carving knives can be used as bench knives in relief carving, chip carving, and for whittling.
Flexcut Chip Carving 3 pc. Set with Sharpening Compound. Utility Knives and Craft Knives. Utility and craft knives are not made to withstand the stress and pressure of wood carving. This tools are made with low quality steel and made to be disposable. In comparing the these knives to the standard carving bench knives you can see that the tip will be prone to breaking, a safety hazard during caring.
They are excellent for cutting your pattern paper, sharpening your soft pencils that you use in tracing, slicing masking tape, and for other preparation steps.
Xacto X Basic Knife Set. Spoon Carving Knives and Tools. Extra Supplies for Avid Spoon Carvers. Quality Steel vs Cheap Knives. Not all knives are made with quality steel blades. This is a lifetime of carving investment and well worth the price. While the knife looks beautiful the steel is low quality.
It rusts easily and will not hold a sharpened edge. The plain wood handled bench knife, while visually not as attractive, is high quality steel and has seen about two decades of hard use. I strongly suggest that you purchase any carving tools from carving supply houses, not from the large box-stores. Take time to check the customer reviews to discover how other carvers values the tool.
Sharpening Stones and Leather Strop. The sharpening stones that you use for your garden tools are not suitable for your fine steel carving knives. They are far too coarse and will leave deep scratches along the cutting edges. Shown in the photo is a beige Japanese water stone top left , and a set of profiled fine-grit, red Arkansas stones top right.


|
Build-a-toy-boat-kit-30 Wood-shop-bbq-food-truck-menu-for-sale |

orxan_yek
02.01.2021 at 12:18:10
NEFTCI_PFK
02.01.2021 at 20:22:31
TIMON
02.01.2021 at 14:37:18
Hayatim
02.01.2021 at 21:18:50
ZaraZa
02.01.2021 at 22:19:48