Woodworking Vise Placement Yield,Best 111 Bandsaw Blades Model,Belt And Disc Sander Machine Mart Zip Code,Cnc Router Engraving Machine 90 - And More

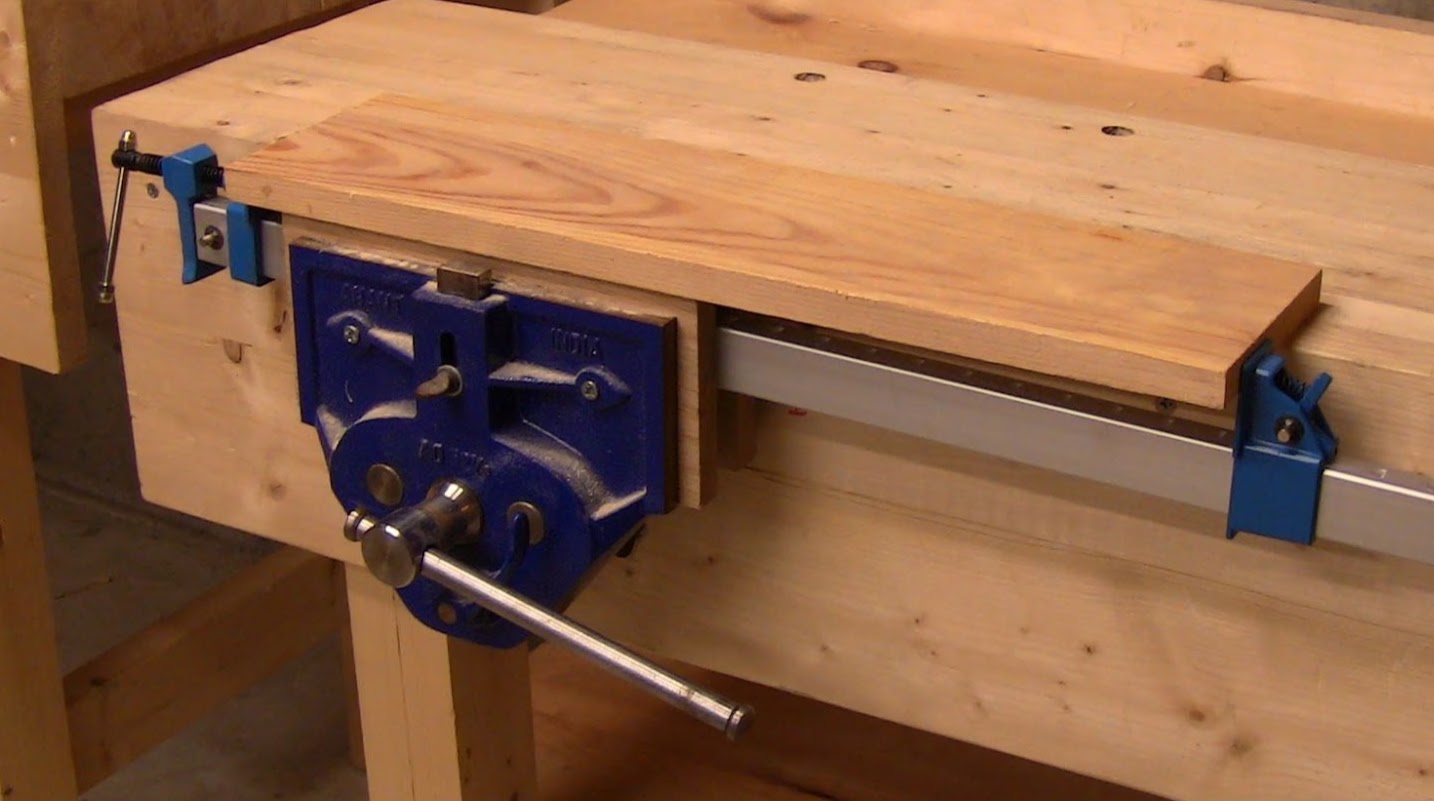
It is a pipe clamp vise that rests on two legs giving the user the most stable clamping. The jaws of this tool are crafted from cast iron and covered with a zinc-plated clutch to provide the tightest holding as well as durable service. Bessey offers the tightest hold and further protects the materials from unprecedented damage and scratch. In place of the commonly used threaded screw, this vise introduces a threaded spindle that moves the pivoting jaw in and out.
Besides, the handle of this tool is a crank-style for easy and convenient moving of the handle without friction. Additionally, the higher base mounting in this vise allows you to work on a clean work surface. You can even shift this vise to your chosen position so that you enjoy more comfort while working. It is portable and the best woodworking vise if you are looking to shift your working Woodworking Vise Placement locations.
This tool is excellent for both professional and domestic use making it a perfect fit for optimal performance. Besides, it features a rapid nut mechanism that lets you do faster to clamping and reposition of workpieces. All you need to do is a simple pulling of the vise nut lever upward and hold it if you are looking to disengage the vise nut.
After that, you can adjust the vise jaws as you want and release the lever. Once the main handle rotates, the vise nut will be engaged, tightening its jaws. This woodworking vise comes with a buttress thread in the main screw. The design of this buttress thread allows for tighter clamping. It makes the opening and closing of the jaws smoother. One more thing about this vise is that it comes with an end stop that ensures there is no excessive opening of the vise.
The pre-drilled holes in this tool allow for faster and easier mounting on a workbench. Besides, there are further pre-drilled holes on the jaws that will enable you to mount wood facings to keep your workpieces safe. The Yost series has a reputation for producing some of the best woodworking vises in the market, and Yost DI is no different.
It comes with a ductile iron body that is 3X more durable than cast iron Vises. Extreme Grip Machinist Jaws feature comes with serrations that grip parts better. Additionally, it comes with self-align Pipe Jaws that conform to the part that they grip, hence reducing the marring and increasing clamping pressure.
It further comes with the Quick Action Pull pin that gives you room to rotate the vise quickly and with ease. This vise has up to twelve different locking positions. Above all, it features a reinforced anvil and 4 mounting tabs that securely attach it to the Work Bench. The Wilton is another best woodworking vise that you should consider for your workshop. It has a reputation as one of the best-performing wood vises out there.
Wilton is more or less the same as the famous Yost series of woodworking vises. It can work with a workbench with 3-inch thickness; all you need is to install it at the top of the workbench. The fixed jaw of this tool has a hole where you can screw it at the side as well as at the bottom in your workbench.
If the bench is going to be used for woodworking leave it as it. Best Woodworking Bench Vises. Workbench Woodworking Wikipedia. Bench Vises Wood Magazine. Woodworking Bench Vise Placement Ofwoodworking. Custom Woodworking In Fayetteville Ga. Fisher S Shop Woodworking Plans. Fine Woodworking Clubs. Leave A Reply Cancel Reply. Save my name, email, and website in this browser for the next time I comment.
Wood Woorking Expert. Home wallpaper Vise Placement Woodworking Bench. Will Myers Moravian Workbench Woodworking Workbench Woodworking Bench Workbench With a vise mounted on the left holding a plane in my right hand allows me to present it to wood clamped in the vise while keeping my right arm comfortably in line with the wood and the bench on my right. You might also like More from author.
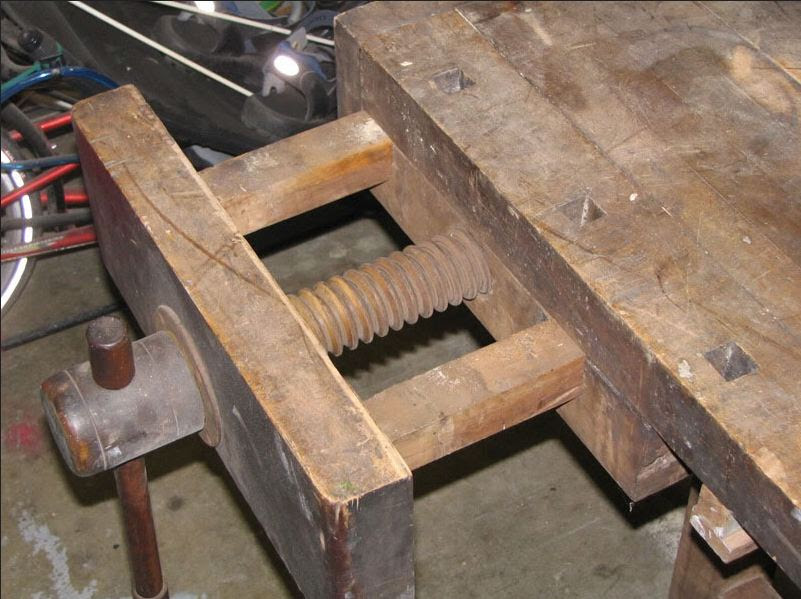
Countersink the holes in the rear jaw Photo A , and then attach the rear cheek with flathead wood screws and the front cheek with roundhead screws and washers. Make your spacer block s. Use two for an end vise to provide dog clearance. Plane them to your determined thickness, and size them in length and width to suit the mounting hole surfaces on the rear jaw bracket, as shown in Photo B.
Sandwich the blocks between the bracket and the bench, trace the locations of the mounting holes, and drill clearance holes through the spacers. Reattach the connecting bracket, washer, and roll pin. After turning the benchtop upright, hand-plane the tops of the wooden cheeks flush to the benchtop.
Because most vises include an integral dog, it makes sense to incorporate a row of dog holes into your benchtop. Glue the block to a hooked standoff that registers against the edge of your bench as shown in the photo. Make sure to align the hole with the dog on your vise. Draw a centerline down the rear face of the block for positioning reference. Use a square to lay out the dog hole locations on the bench, spacing them 6" apart starting from the end of the bench.
Guide a circular saw along a secured straightedge to rip the length of the notch up to the crosscut. A flush-mounted face vise offers the most versatility, but it requires more work to install. As with the previous method, handling is easier with the vise disassembled.
First, Woodworking Vise Placement Fee lay out the notch in the benchtop. Its length should be the width of the jaw plus 1". Make the crosscut into the benchtop edge with a backsaw. Then clamp a straightedge to the bench to guide a circular saw to cut the length of the notch. Rip the notch until you intersect the previous crosscut Photo C , and then finish up with a handsaw.
Attach the rear cheek with 10 flathead woodscrews after countersinking the holes in the jaw. Center the block along the width of the notch, with the edges of each aligned flush at the front.
Clamp the block in place, and then attach it to the benchtop with lag screws and washers, as shown in Photo D. To make the wooden cheek for the rear jaw, first measure the thickness of the jaw. Crosscut the piece and bandsaw the interior to make the U-shaped cheek filler.
Then crosscut it to fit the benchtop notch. Countersink the holes on the rear jaw and attach the cheek as shown in Photo F. Position the vise on the spacer block with the cheek nestled in its notch. Mark and drill pilot holes, and attach the vise with washers and lag bolts Photo G. Use a straightedge to ensure the face of the jaw is flush with the edge of the bench. Make the front cheek, and attach it with washers and roundhead woodscrews, reassemble the vise, and turn the benchtop over.
Hand-plane the cheeks flush with the benchtop Photo H. My bench had radiused edges, so I chiseled away the sharp point at the corner of the cheek.

|
Blue Bear Lead Paint Remover 3d Jet Planes New Zealand 63 Amazon Uk Woodworking Tools 02 |

Olmez_Sevgimiz
28.07.2021 at 20:59:25
Djamila
28.07.2021 at 10:54:44
Hellboy
28.07.2021 at 12:40:33
MADE_IN_9MKR
28.07.2021 at 19:14:43