Wood Flooring Sanding Machine Pdf,Power Carving Tools Uk Ipo,Mallet Hammer Vertaling 75 - Reviews

If you get dust clouds, stop and make sure the dust bag is properly attached. A respirator or at least a dust mask is a good idea in any case. Eye and ear protection is also recommended. If you see a tight repeating pattern of marks — "chatter" — there is likely something wrong with the machine. Make sure the sandpaper is loaded flat, the belt is not worn or compressed, and the parts are tightly assembled. Decide where to start.
Most machines are set up so one side of the drum is slightly lower than the other, and sands more aggressively. If this is the left side, start on the left wall.
If this is the right side, start on the right wall. Sand at a slight angle to the grain. For the first stage of sanding, you can move at a 7 to 15 degree angle to the direction of the boards. This will help level slight variations in the floor. It also minimizes the chance of "dish out" or "waves," when a loose or Wood Flooring Sanding Machine 7th uneven floor gets sanded more in some spots than others. Move constantly as you sand. Sand the whole area at the same angle.
Do not stay in one place, or the sander may eat through deeper than you intended. This coarse sanding should remove the old seal and level out uneven parts of the floor. Start at a brisk walking pace. If this doesn't seem to get through the old finish, slow down to a moderate pace. This is not a major concern with orbital sanders, which are not powerful enough to cause immediate damage when they stop in one spot.
Continue until most of the floor is sanded. When you get to the wall, move the sander back to your starting point and slightly to the side, overlapping your first pass. Walk to the wall and repeat until the whole area in front of your is sanded. If you need to go over one spot more than once, lift the lever for a moment as you reverse direction.
This will briefly raise the drum off the ground, avoiding a mark on the ground where it reversed. A drum sander cannot reach the edge of the wall. Just leave the edges unsanded for now — you'll use an edge sander for those areas later.
Finish the shorter side of the room. There is now an unsanded area at one end of the room, where you stood at the beginning of each pass. Turn around and sand this area moving along the same angle as before.
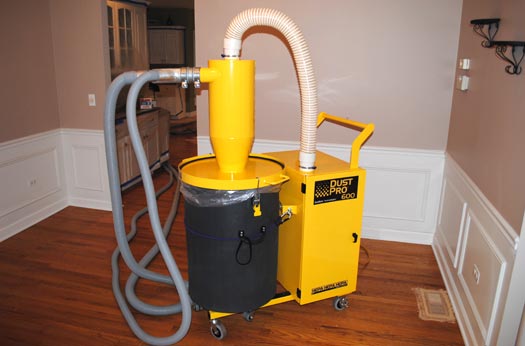
Vacuum the dust. Let the dust settle, then clean it up with a professional vacuum designed for fine dust. When choosing a machine to rent, look for one with soft wheels that won't leave a dent in your unfinished floor. Keep your respirator on until the dust is clear. Empty the sander's dust bags when they get half full.
Part 2 of Switch to medium grit sandpaper. By now your floor will be free of the old finish, but many scratches may still be visible. Load grit sandpaper onto your drum sander to deal with this problem.
Ideally, use aluminum oxide ALO sandpaper loaded with medium tension. This can leave deep scratches in your floor. Sketch pencil marks on the floor optional. At this stage it can be difficult to see how effective the sanding is. Try drawing light, zig-zag pencil marks across your floor. When the pencil marks have disappeared, you know you've sanded that area.
Start on the opposite side of the room. On your first pass you did a "long run" followed by a "short run" to fill in your starting point. Start from the opposite wall this time so your new "long run" and "short run" don't have the same dividing line.
If you use the same pattern as before, that line may become visible, especially if you plan to stain the floor. Sand along the grain. Do not sand on the same diagonal path as the first sanding job, or you may end up with stripes on your floor. Sand directly along the boards instead. As before, vacuum up dust once this stage is finished.
Remember, never turn your sander on or off while it is in contact with the floor. Buff with 80 grit sandpaper. This is easier and more effective with a floor buffer, but you can use a drum sander. This will remove the grit scratches. Vacuum the floor again once you're done. Finish certain floors with grit paper. This is only necessary if you plan on staining the floor, or if your floor is made from maple or birch. The grit scratches are more noticeable on these surfaces.
Part 3 of The new strip floor has been installed and given a little more time to acclimate to the house environment. This allowed the floor to relax and for any small cracks or raised edges on the strip flooring to occur prior to sanding and finishing. The first step to finishing a strip floor is a thorough cleaning and inspection of the floor. The entire area should be swept clean.
All nail should be counter-sunk bellow the depth of sanding. Nails that come in contact with the sanding equipment can ruin the sanding drum or produce sparks which can cause fires. Most of the sanding is done by a large drum driven sanding machine. The Wood Flooring Sanding Machine Canada two types are belt and drum machines. I prefer a belt machine to a drum sander.
On a drum machine the sanding paper is wrapped around the drum and inserted in a slot. The slot on the drum can have the tendency to cause imperfections on the floor. Belt machines have their sandpaper wrapped around a drive drum and also a tensioning roller.
The belt machine runs cooler than the drum design. The sandpaper is more expensive for the belt machine but easier for the novice to install. This becomes more of a factor on worn rental shop equipment. When renting a drum or belt machine you should inspect the drum for damage.
Any damage will cause imperfections in the floor. The small wheels should be inspected to ensure they are round and clean otherwise it will cause imperfections. Prior to leaving the rental shop find out how the machine is set up to run. My machines start on the left wall and work towards the right.
This ensures my wheels are always running on new sanded flat floor. Each cutting pass will make the floor flatter. Make sure you have an adequate electrical circuit at home. Low voltage will damage the machine also cause imperfections in the floor.
The machines I have never touch the ground unless they are actually sanding. This protects the drum and wheels from damage. Sanding machines are very sensitive and just about anything can correspond to an imperfection in the floor. When not in use for ten minutes the drive belts are loosened.
Imperfections in the belts will correspond to imperfections in the floor. Always start the machine and let it warm up prior to sanding for this reason.
Prior to actually using the machine on your floor, practice raising and lowering the drum on a piece of plywood.
The machine must be moving across the floor when the sanding drum is contacting the floor. It is similar to learning to drive a manual transmission car.
Except each time you forgot to let out the clutch and the car lurched foreword; the sander you will leave a large deep sand mark in the floor that might not come out. The edger machine spins a round disk and is used to sand where the big machine can not reach. Edgers have small wheels in the back, which help the unit glide over the floor. Do not press down on the front of the machine or the sanding disk will gouge the floor.
It is important to understand where the on the disk the unit is sanding the floor. The edger is positioned such that this area will contact and sand the floor with the direction of the wood grain. An edger should easily glide across the floor. If it does not check to see if the unit is not set right or the rubber disk is distorted. A hand scraper is used to reach areas in the corners of the room where the edger can not reach.
Care should be taken to work in the direction of the wood grain. Going against the grain will cause deep gouges. Areas hand scraped should be blended in by hand sanding or an oscillating sander. Floor buffing machines outfitted with abrasive screens are use to blend all the different types of sanding that were done to finish a floor.
Otherwise a picture frame effect could be produced due the differences in sanding methods. The buffer is also use in between coats to smooth out imperfections and promote intercoat adhesion. Using the proper abrasive sequence is one of the most critical factors to a successful job.
The initial sandpaper grit will be determined by the finish manufactures recommendation for the final grit and the amount of overwood in the floor. The sanding sequence should always be adhered to and never skip more than one grade of paper per step.
Skipping more than one grade of sandpaper will leave the floor with scratches. This is due to only the very top on the peaks of the scratches would be removed. The deep Wood Flooring Sanding Machine For Sale valley of the scratch would remain. The wood floor finish would not fill these valleys and the floor will wear prematurely. Always start with the least coarse grit possible needed to efficiently sand the floor. The courser the starting grit means the more steps needed to remove the scratches.
On a typical oak strip floor the finish manufacture might recommend ending the sanding sequence with a grit screen. The sanding sequence might start with 60 grit sandpaper proceed to grit sandpaper and finished with the grit screen. The floor has been cleaned and inspected. Any damaged boards that were found have been repaired.
The area should be sealed of with plastic to prevent dust contamination into other areas of the building. View example of a Clarke orbital floor sander on Amazon.
Pricey, no? This is why most folks rent. In my opinion, the U-Sand—another model commonly found on offer for rent—is far more difficult to control, and because its sanding surface is relatively compact, it can take longer to do the job.
Making matters worse, four-disk units like the U-Sand offer little or no padding under the disks, so the abrasive does not lie flush to the floor, further reducing the available sanding area while slowing down the process even more. Pads attach to the sander base. Be sure the sander is running at full speed when you lower it to the floor. It is also important not to move the sander too quickly across the boards.

|
Ridgid Table Saw Router Table Combo Plans For Wood Projects University Ace Hardware Digital Tape Measure Essential Hand Saws For Woodworking Quest |

Kamilla_15
13.10.2020 at 13:19:29
ANILSE
13.10.2020 at 22:32:43
slide_show
13.10.2020 at 12:19:47