Tool Post For Mini Lathe,Radial Arm Saw Miter Jig 600,Wood Carpentry Shop Near Me Dream - Good Point

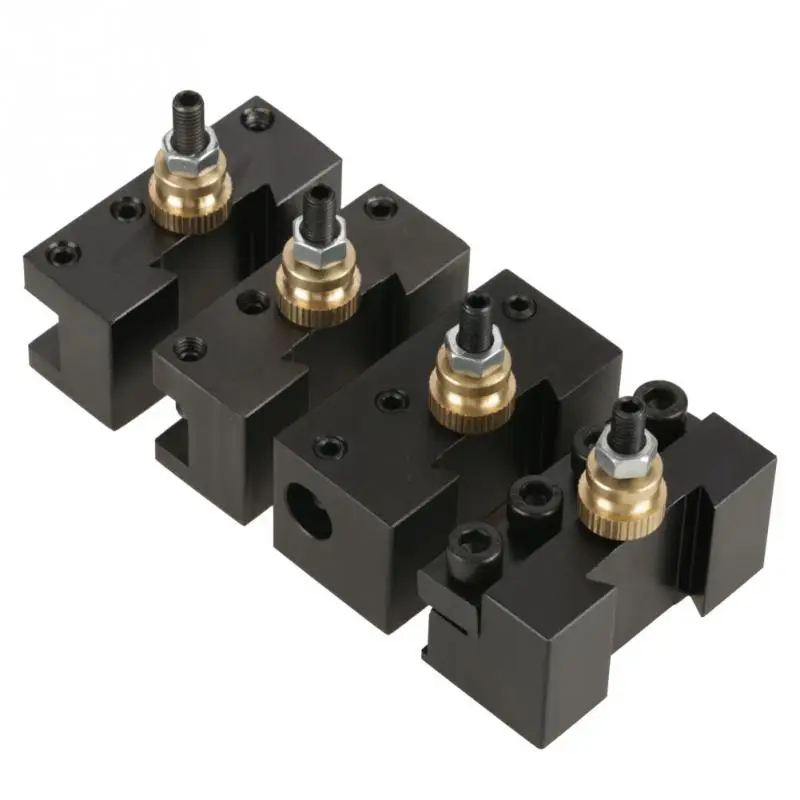
The body of the tool post is 1. We carry two standard sets in this size. PN has a cut-off tool holder that holds the cut-off blade horizontal. This allows the set to work with lathes with only 0. This quick change tool post set bolts on to 7x10, 7x12, 7x14, and 7x16 mini lathes with no additional hardware.
This set requires 0. The only difference between the PN set and PN set is the cut-off tool holder; the tool posts are identical. The PN set includes the PN cut-off tool holder. Besides the quick change tool post sets, these products include special mounting hardware. The compatibility table shows which quick change tool posts sets are available for several different lathes.
Note that all these tool posts fit many more lathes than the ones in the list. If you lathe is not listed, look at how your tool post is mounted and find something similar. The compatibility table provides details of the tool post mounting.
Even if your lathe is not listed, you can still figure out which QCTP will work on your lathe. Contact Us Your Orders Cart. Hand Tapper, Compact with Magnetic Base. For facing operations, the face of the dovetail will usually be angled slightly so that the edge closest to the operator is a little further from the chuck.
Once you have it in position, lock it down with the 8mm wrench. Only one of the dovetails is used at a time with the one to rear used only for boring operations. Mount a cutting tool in the slot of the tool holder. The tip of the tool should not protrude very far; you want the tool to be supported by the holder so that it is as rigid as possible. Ideally, the body of the cutting tool should be a little longer than the tool holder so that the tool can be clamped down along its entire length.
There are four set-screws on the tool holder to clamp the tool in place. Tool blanks in this size can be had for under a dollar apiece on sale. I prefer to stay with smaller size bits since they are cheaper therefore I can have more of them!
Next, make sure that the piston that locks the tool holder in place is withdrawn into the body of the QCTP. Use a finger to apply a little pressure to the piston while rotating the aluminum locking handle and you will feel the piston move in and out as the handle is rotated.
Rotating the aluminum handle forces the piston outward to lock the tool holder. Since the handle rotates an internal cam, you can rotate it either direction to lock the tool holder to the tool post. Since it is not spring-loaded, the piston will not withdraw unless you apply a little pressure. Once it is properly positioned, however, this step is usually not necessary during routine changing of tool holders.
Drop the toolholder in place on the dovetail and rotate the aluminum handle to lock it in place. Check that the height-adjusting set-screw is firmly tightened to the tool-holder - you don't want it to rotate when you are adjusting the height. In fact, it would be a good idea to remove the setscrew, apply a drop of Loctite, and then replace it so that it always stays firmly in place. Now make sure that the stainless steel jam-nut on the height-adjustment set screw turns freely.
Use a small wrench, if necessary, to loosen it. Rotate the nut by hand until it is near the top of the set screw. This will enable you to turn the brass height-adjusting thumb screw as needed.
We'll use this for a facing operation to set the height of the tool to dead center. Loosen the aluminum cam lever so that the toolholder can move up and down, then adjust the height of the tool by eye until the top of the cutting edge is at the center of the workpiece face.
Lock the tool holder in place by rotating the aluminum handle until it is snug. Don't use too much force, since the cam will multiply the pressure applied to the toolholder.
Prepare to make a facing cut by locking the carriage in place. Hopefully, you have added some kind of carriage lock to your lathe if not, I strongly recommend it. Lock the carriage in place using the carriage lock, or the half-nut lever if you don't have a carriage lock installed.
If using the half-nut lever, first make sure that the lead screw is in neutral not turning. Back the tool out until it is clear of the workpiece, then start the lathe and set the speed to about RPM. Take a light facing cut until the tip of the cutting tool goes just past the center of the workpiece. As the tip of the tool approaches the center, you should be able to observe if the tool is too high or too low. Retract the tool, stop the lathe, unlock the toolholder cam and adjust the brass thumbscrew as needed to raise or lower the tool.
Lock the toolholder and repeat the facing operation. After a few such passes, you should have the tool at dead center so that the face is perfectly flat with no nub at the center. With the lathe stopped, run a fingertip over the center of the face to make sure that it is flat. Once you get to that point, snug up the stainless jam-nut against the top of the brass thumbscrew to lock in the height setting. Now the tool and toolholder are properly adjusted for use.
You will not need to repeat this procedure as long as you keep the tool in the same toolholder that's why you need 5 or more toolholders and do not sharpen the tool which would lower the tip.
By the way - see that little mottling of blood under my thumbnail? It's the only visible remnant of when I cut the end of my thumb off back in March. For the closest thing you'll find on mini-lathe. No doubt you've seen import sets of 9 or 12 of these boring tools in the sale flyers from Enco, Harbor Freight and Grizzly.
They're not the most elegant tools I've seen, but they are quite effective and inexpensive. I always have 2 or 3 sets of them around the shop since they can also be used on a boring head for the mill and they sometimes succumb to a forceful meeting with a rapidly spinning chuck jaw. They consist of a steel shaft, of varying thicknesses and lengths, with a carbide cutting tip brazed onto the end.
To mount the tool in the holder, loosen the four set screws, then slide the shank of the tool into the hole in the tool holder. Align the cutting edge so that the flat top surface is parallel to the base of the tool holder, then tighten down the set screws. For the tools I had on hand, the shank is only long enough for three of the four set screws to contact it, but that should still provide plenty of holding power.
I used the extra unused set screw to replace the one on the other toolholder, that got lost in shipping. For boring operations, mount the tool holder on the dovetail facing the rear of the lathe:. Mount the tool and use the facing procedure described above to center the tool. Now you're ready to take on some real boring work. If you'd like to learn more about boring operations, including grinding your own special-purpose tools, a tutorial is available in my Premium Content section.
So boring, as it turns out, is not boring at all, but is an interesting and essential machining skill. Now, suppose you did not have a QCTP handy to hold the boring tool? What would you do?


|
Types Of Woodworking Planes Network Marking Knife Blade Woodworking Zip Grinding Lathe Tools Youtube 60 Wood Turning Tools For Sale Cheap Jam |

Biohazard15
14.10.2020 at 10:53:45
Blatnoy_Paren
14.10.2020 at 21:20:16
pearl_girl
14.10.2020 at 13:23:38
TITANIC
14.10.2020 at 16:28:27