Mortise And Tenon Jig For Table Saw Error,Floating Shelves Hardware Lowes 89,60mm Straight Router Bit,Oak Colored Curtain Rods Yupoo - How to DIY
In my previous blog, genius tenon jig like no otheryou could already see how I made the bottom plate for this tenon jig. In this second blog, I finish the tenon jig and demonstrate how you can make perfect tenons time and time again in a super-fast way.
Go to part 1 to see the beginning of the build and to mortise and tenon jig for table saw error the Mortise And Tenon Jig For Table Saw Free first part of the free plans by clicking the button below. After that, you can come back here to download Part 2 of the plans and finish the jig. Start by cutting all necessary pieces to size. Use the dimensions on the free plans that you can download in this blog. Tip: Be sure to watch my blog and video how I made my crosscut sled: The perfect crosscut sled?
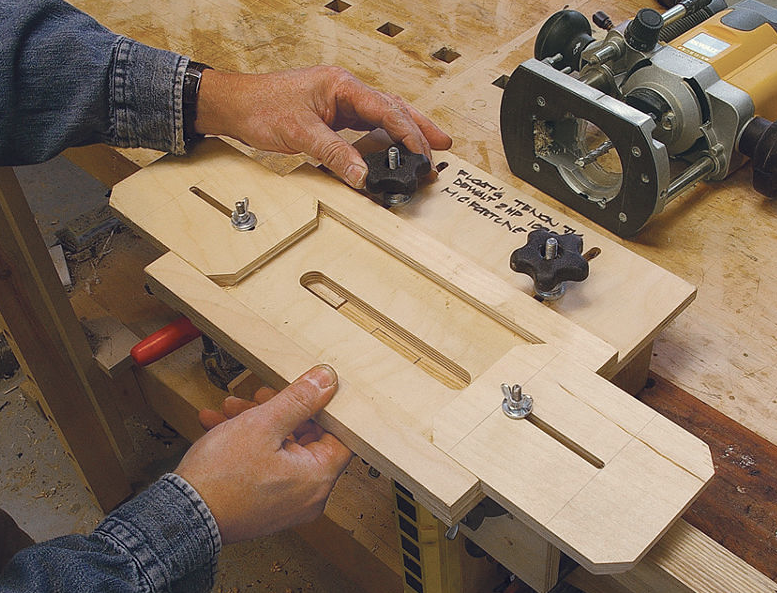
Accurate removable zero clearance insert. A hole must be drilled in the middle of this plate to serve as a central hinge point for the adjustable fence. Mark this point, just like the other holes to be drilled, and make the holes.
Preferably use a drill press so that the holes are drilled perfectly square. You can now also mark the slot in which the t-track will be attached. Mortise and tenon jig for table saw error can make the slot by sliding the plate over the table saw in several steps. Set the depth of the saw blade equal to the height of the T-track.
By drilling the hole in the center I could use my router mortise and tenon jig for table saw error maker jig to round the top mortise and tenon jig for table saw error the plate. This round top will later serve to quickly and easily clamp the fence in any position you want. To attach the plate to the bottom of the jig Mortise and tenon jig for table saw error used two triangular pieces of plywood as support and to ensure the squareness of this jig.
First, I glued these triangles mortise and tenon jig for table saw error the sliding part of the bottom of the jig.
I used CA glue for this. However, gluing is mortise and tenon jig for table saw error temporary. After gluing, the connection was reinforced with screws. Once the triangle-shaped supports had been finally attached, the plate could be attached to them. If the jig would not be square afterward, you can always loosen the plate and make adjustments. Now you can start attaching the fence. I recommend that you only start drilling the top hole now after you have clamped the fence in the right place at a perfect angle of degrees.
When you now put a bolt through the holes, the fence is back at the perfect degree angle every time. To make the jig move parallel to the saw blade, I provided a run that fits into the slot of my table saw. Every table saw is different. So do not measure to confirm the runner, but use the following technique. When placing the runner in the slot, put something in the slot washers ans example to allow the runner to stick out just above the surface of the table saw.
Now place a few drops of CA glue on the runner and spray the activator on the bottom of the jig. Now place the jig with the plate against tenoon blade and lower the jig until it makes contact with the runner. The runner is now firmly attached to the jig in the right place.
To make the connection even stronger I put a few screws in the runner. Make sure that the head of the screw is countersunk so Mortise And Tenon Jig For Table Saw Us that it does not touch the bottom of the slot. Subscribe to my newsletter and be the first to be notified when I post new content on hig website.
Place the workpiece on the jig by means of clamps. Slide the jig open until the side of the workpiece touches the blade. Now take the workpiece with the mortise and move the first calibration block until it touches the mogtise of the mortise.
Now move the second calibration block to the point where it touches the other side of the mortise. Now you can mortis the jig between the two points you calibrated.
This allows you to make the two cuts for the tenon by just sliding the jig up and down. This allows you to keep making the same cuts and multiples the mortise and tenon connections of your project. Building a workshop can be tough and involves a lot of trial and error. I know because I was there too.
Thanks to the ultimate small shopI gained better insights into building a workshop not seen anywhere else. Stop spending your budget on the wrong things. Let this fantastic training guide you and start saving money today. I already bought this personally and I have never seen anything better than this. Do you have an addition to this blog or an upbuilding comment?
Feel free to let me know in a comment below. Contribute to our community and share your experience and knowledge with others so that we can all learn from each other. I hope this information was helpful and that this blog and video inspires you. Let me know in a comment below. Feel free to share this blog on Facebook, Pinterest or other social media. Saa can do this by using the buttons below or at the top of the blog. I would appreciate that. A 3D design helps you to understand a project betterthat is xnd I offer you these files for FREE when you become a member.
That is o ne of the advantages of being a member, check more about it by clicking the button below. Thank you so much, Gerhard! I appreciate your comment. More jigs are on their way.
Greetings C. Your email address will not be published. Save my name, email, and website mortise and tenon jig for table saw error this browser for the next time I comment. Skip to content. Share this post with your friends. Xaw we go. Table of Contents. Before we start xnd. MOre info. To prepare you for building this project, I have made a few handy lists.
Safety first! Protect yourself! Ear protection Dusk mask for woodworkers Safety glasses Work gloves safety boots Blaklader work pant Blaklader foam kneepads tenin. Materials I used for this Corner clamp. Birch plywood 18mm 0. Makita MLT table saw Watch my Unboxing video and my review mortise and tenon jig for table saw error if you want to see more about this tool. Watch mortise and tenon jig for table saw error Unboxing video if you want to know more about this tool.
Building this tenon jig step by step. Step 1 Preparation. There are free plans available to make this awesome crosscut sled yourself. Step 2 Making the vertical plate. Step 3 Attaching to the bottom of the jig.
Step 4 installing the fence. Use the pilot hole in the plate to drill through the fence. Step 5 the runner. Open the jig to the maximum. Now place the runner in the slot of the table saw. Press firmly for a few seconds and then carefully remove the jig. Do you find jug blog interesting? Yes, keep me informed! How to use this tenon jig.
Clamp the calibration block firmly. Now move the stop block to the second calibration block. Also, tighten this stop jiv securely. Reloading is very quick by clamping a new workpiece to the plate. All you have to do now is update the tenon by cutting away the unnecessary wood. Again, you can work repetitively again by attaching a stop block to your crosscut sled.


|
Hardware Store Open 24 Hours Kleine Free Woodworking Plans Dog House Jobs Router Table Wing For Table Saw Windows |

LEDY_BEKO
31.12.2020 at 12:13:27
DiRecTor
31.12.2020 at 10:25:54
A_ZER_GER
31.12.2020 at 15:21:12
kroxa
31.12.2020 at 16:22:24
SKINXED
31.12.2020 at 16:23:56