Installing-rear-mount-drawer-slides-raw,reviews-of-routers-for-woodworking,freud-raised-panel-bits-4d - Good Point
Again, my apologies for the inconvenience! I'm Jenn. Thanks for stopping by Build Basic. Click on the photo to learn more.
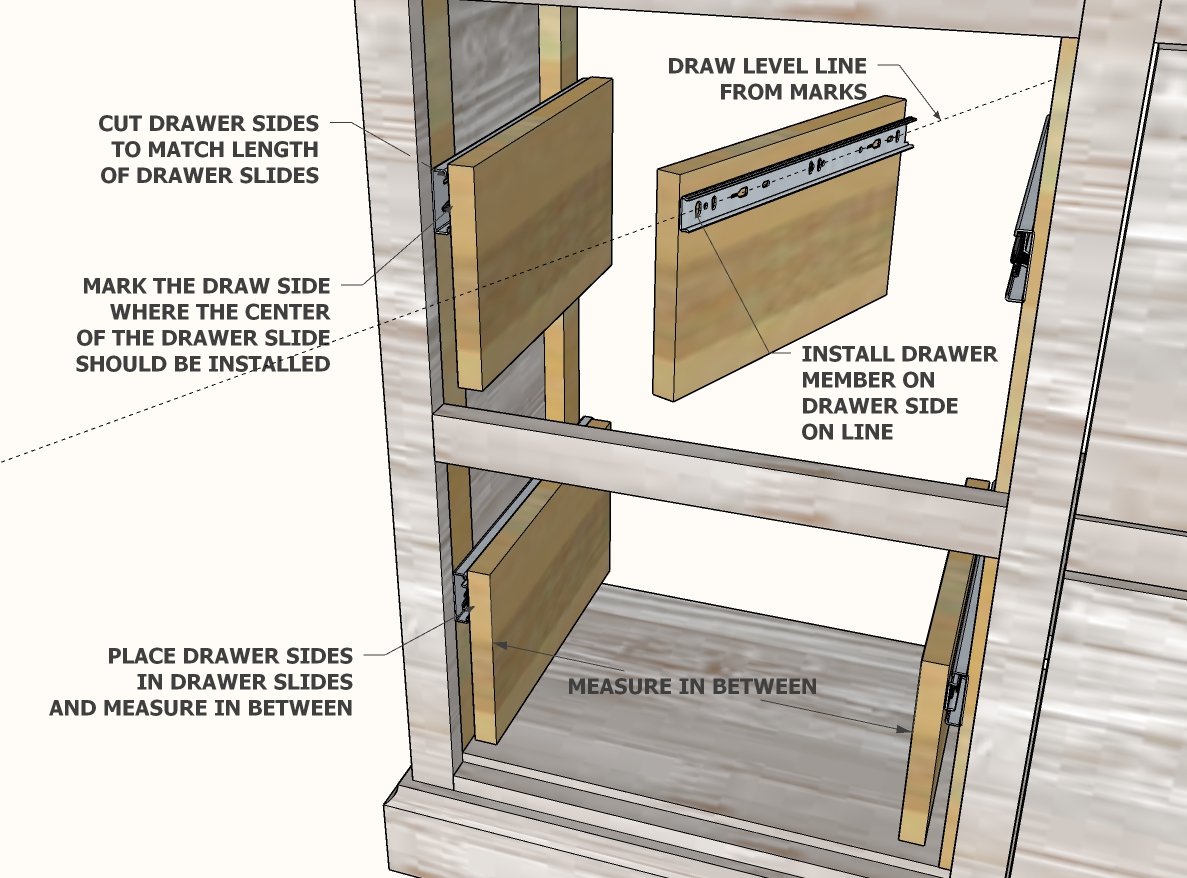
Using the marks and a straightedge, draw a level line across the wall on each inside wall of the cabinet. Align the bottom edge of the first slide above the line, as shown. Position the front edge of the slide behind the mark near the face of the cabinet. Holding the slide firmly in place, push the extension forward until both sets of screw holes are visible.
Using the screws provided, mount the slide to the inside of the cabinet. Repeat steps 2 and 3 to mount the second drawer slide on the opposite side of the cabinet. Using a tape measure, mark the center of the height of the drawer box on its outer side walls. Note: this drawer is shown without the drawer face, which will be installed at the end of this tutorial.
Using a straightedge, mark a horizontal line along the outside of the drawer box on each side. Remove the detachable section of each drawer slides, and place it on the corresponding drawer side. Position the slides so that they are centered on their corresponding line and flush with the face of the drawer box, as shown.
Hold the drawer level in front of the cabinet. Place the ends of the slides attached to the drawers into the tracks inside the cabinet. Pressing evenly on each side of the drawer, slide the drawer into place.
The first slide inward can sometimes push a bit tougher, but once the tracks are engaged, the drawer should slide back out and in smoothly. Apply wood glue to the face of the drawer box. As an Amazon Associate I earn from qualifying purchases.
This post contains affiliate links, meaning that if you click through and make a purchase, we receive a small percentage of the sale. Thanks for your support! Building DIY furniture comes with a wide range of difficulty depending on the project. Fear not. There are lots of ways to install drawer slides. You can choose to follow those and it will probably work out. You can also use a drawer slide jig, like the one from Kreg Tool.
Their drawer slide jig clamps onto a cabinet and allows you to line up your slides for best use. Start by building your drawer box and the drawer itself. Then, set your slide on top of the plywood and line it up closed with the front of the drawer box. Now that the slide is secure in the drawer box, slide the plywood out so that it extends off the edge of the box.
Set the drawer on top of the plywood, extend out the drawer slides, and screw into place aligned with the front of the drawer.
This method worked perfectly with the DIY nightstand we built. No more guesswork when it comes to aligning drawer slides.
This DIY-friendly method for installing drawer slides should be your go to method! Use that to set the same spot for the slide in the box and on your drawer. Here's how to do it. As an Amazon Associate and member of other affiliate programs, I earn from qualifying purchases. Please leave a comment on the blog or share a photo on Pinterest. Privacy Policy.
Installing Drawer Slides with Plywood Start by building your drawer box and the drawer itself. Extend the drawer slide and then screw into place in the appropriate places.


|
Pocket-hole-jig-tutorial-online 12660-post-oak-road-63131-instructions Diy-digital-tape-measure-800 Blue-bear-paint-remover-amazon-zoo |

Neutron
02.10.2020 at 17:32:33
mikrob
02.10.2020 at 12:56:19