Slip Tongue Router Bit Learning,Router Signcrafter 100,Used Woodworking Machinery For Sale In Northern Ireland King - Good Point

If the bit cuts off more stock on the second pass, it isn't centered and you will have to raise or lower the bit. I, too, found out that the tear out on the plywood cross grain was bad. I wonder if it would be a good idea to make the tongue bit cut a a small shoulder perpendicular to the plywood face on each side.
That would allow you to run the plywood directly against the fence, leaving the same small shoulder on the plywood, eliminating the need for taping a board to it. By setting up the fence very accurately, I was able to eliminate that step but it takes a long time to do it.
I also found that trying to use the straight bit to cut off the excess didn't work very well. It helps if you have a fence on the table that you can raise up the width of the exposed portion of the male piece, allowing it to go under the fence. I finally just sanded them off with a belt sander. I just bought a set of the edge banding sets.
I have pretty much used face framing and plate joinery to cover ply. Thought these might be a better way to cover it up. Boy was I wrong. I watched a tutorial to show how to set them up, which I followed, and the cuts were so far off it was ridiculous. Finally I worked out a way to get them somewhat aligned. This took over an hour and lots of scrap to achieve.
Secondly the tear out with the ply groove cutter was atrocious. I tried changing router speed, feed speed, hold downs, passes through the blades, and ply. None seemed to work. While MLCS makes some good products, this is not one of them. I bought the 60 degree set a couple of years ago - works great. The finished product is virtually seamless! I just watched the instructional video online and I learned that when cutting the groove you need to place a scrap piece of wood on top as a guide against the router fence - otherwise the piece of plywood gets smaller and the edge may not be straight.
I wish they had included instructions with set - it would have saved me a lot of headaches. Be sure to watch the short video online - it will make you a pro at this in no time. Nice demostrating on the router bits. Now I really am going to buy the bits for my cabinet making process. The other videos I have seen is great too. It looks very nice. Your tongue and groove joint is ready with the one piece of tongue and groove router bit.
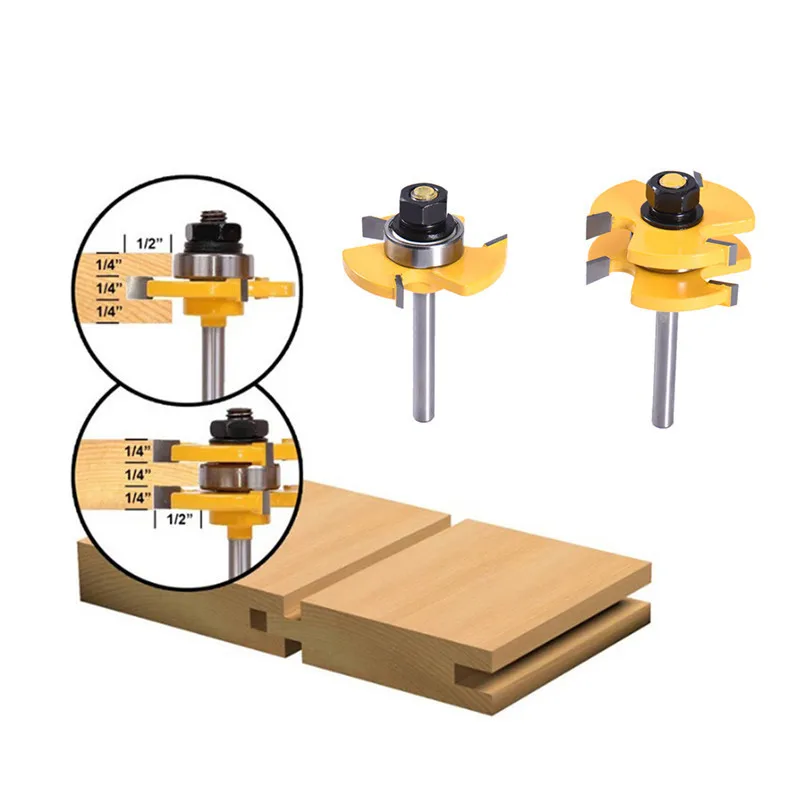
Try it yourself. If your wood pieces are not properly fixing, you can say that either it is loose or tight to fix. To avoid this problem, I suggest you use both pieces of tongue and groove router bit. But if you are a newbie then use two pieces of bits which is available on amazon. In this method, we will use both bits for tongue and groove cut.
This method is similar to the previous method, the difference is that there was only one piece of bit and here, we use two bits separately. Place one bit for tongue cut in the router table and adjust the fence and we do in the previous method and fix the fence.
Now move the piece of wood along the bit with the supporting material. You will see the tongue cut. Now change the router bit and use another but for groove cut. Make sure that the router table is unplugged during changing the router bit. Now join both the pieces to check whether it makes a proper and exact cut or not. You can see the proper joints. How to use a dovetail router bit? How to use a bullnose router bit? Your email address will not be published.
Necessary cookies are absolutely essential for the website to function properly. This category only includes cookies that ensures basic functionalities and security features of the website. These cookies do not store any personal information. Any cookies that may not be particularly necessary for the website to function and is used specifically to collect user personal data via analytics, ads, other embedded contents are termed as non-necessary cookies.
It is mandatory to procure user consent prior to running these cookies on your website. Skip to content As you know, every problem has multiple solutions. Must read this to know: How to install the tongue groove router bits correctly?
The first method is without using any tool:. In the first step, cut the tongue. I will tell you about how to cut the tongue in further detail. Here, I am just telling you the setup. Install the groove cutter bit and line the tongue board along the router bit. Make sure that the router is unplugged when you are changing the router bit. Now adjust the tongue cutter and line up with the tongue. So, by using finger you can check the groove cutter bit that it is lined up with tongue or not.
Now take another piece of wood and cut the groove on it. The first step is to cut the tongue. Place a rigid metal ruler along the tongue piece to hang the tongue. Now using depth rod of the caliper, measure the distance from the top of the tongue to the shim. With the help of lock screw, lock the reading. Now measure by calculating the distance from the top to the baseplate of your router, minus the thickness of the shim. Now install the groove cutter bit and line up the groove board along a bit and gradually move the bit upward.
Now take another piece of wood and cut the tongue. Router table Scale Two pieces of wood Tongue and groove router bits. This article covers all the aspect of the tongue and groove router bit.
You can learn many things with this. The above mentioned procedure is my experiment which I also did on my workshop and now I am sharing my experience and research with you. I hope this information will be enough for learning.
You can also share your experience with us. I am sure that you will make your tongue and groove joints by reading this. If you have any query related to this topic then you are welcoming to ask in the comment section. Good luck with your woodwork! Leave a Comment Cancel Reply Your email address will not be published.
|
Jig Tool Kit Online Stanley Hand Saw Fine Cut 500mm 11tpi Jack Makita Oscillating Tool Case |

Sahilsiz_Deniz
16.08.2020 at 12:33:39
Playgirl
16.08.2020 at 13:44:27