Shaker-cabinet-plans-editor,lathe-supplier-in-the-philippines-email,miter-gauge-for-router-table-variable - 2021 Feature
As with most of my projects, I'll have an idea on what I want to build shaker cabinet plans editor no clear destination for the outcome.
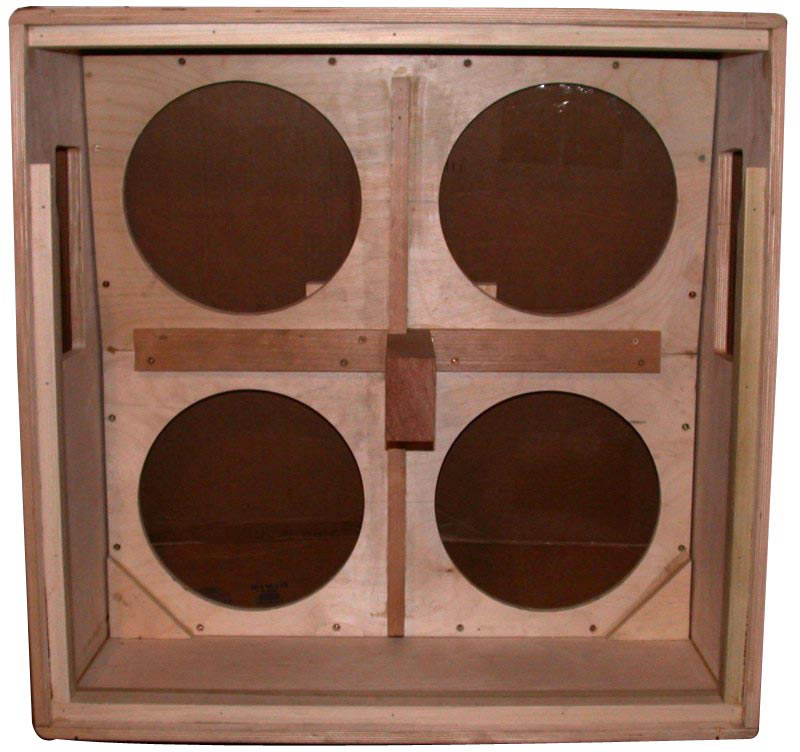
I knew I wanted another 2 x 12 speaker cabinet, or maybe 2 x 10 or This build ultimately became a 2 x 12 open-back cabinet. Although I hadn't originally planned on this as an Instructable, I felt that I had accumulated enough photos to document how I built this particular cabinet. Unfortunately, you will find that the final covering of the cabinet wasn't documented. I am however, planning on a second cabinet that I will focus on the covering.
Once I started with the fabric, I just plugged along as the adhesive didn't provide me with much work-time. Therefore, this Instructable focuses on the building of the actual cabinet.
The overall dimension of the cabinet are As I didn't shaker cabinet plans editor any birch plywood available which shaker cabinet plans editor to be the popular choice for cabinetsI used maple as both have very similar properties and will provide a good finished product.
If you input your material size and the sizes of the pieces you need it will help lay them out to minimize waste. In the above pics, I show the assembled sides. The front of the shaker cabinet plans editor panel has the. You will notice that the rear strip has shaker cabinet plans editor angle cut on it. In the next step of this Instructable, I jump ahead to show why that is and have provided one of my scribbles to help explain.
Next, because the sides will mount inside the shaker cabinet plans editor of the top and bottom, the. Flush in the front, inset. The last pic shows the baffle. Ok, this is why the rear strips as well as the front of both the bottom and top pieces of bracing have an angle cut them, it's so that the baffle can slide into place. Now back to building the cabinet With the front and rear pieces the.
I assembled one corner at a time, adding a piece of bracing shaker cabinet plans editor each corner being mindful of the installation requirements of the baffleglueing and screwing everything that came into contact with another piece of wood and allowing each to dry overnight before moving on to the next corner.
After the 4 corners have been assembled, you basically have your cabinet. You're now in the finishing stages. Because any imperfections in the finished cabinet could potentially transfer through to the finished covering, I filled every void with wood filler.
Once dry, I sanded everything then, using a. Then, filled and sanded everything again. At this point you've probably picked out most of your hardware. I cut the appropriate size holes for the handles then painted the interior of the cabinet as well as a little on the outside of the corners to help conceal the seams during covering in case something didn't go quite as planned. I also painted the entire baffle, both front and back.
Because of the handles I chose, I had to install the baffle first. This ultimately means that the cabinet will have to be covered as well as the grille cloth before I could install my handles. Depending on your hardware choice, this may not be necessary.
As I admitted, I didn't have much of an opportunity to take pics of the covering process due to the short work-time on the adhesive, but I have included a couple finished pics. Because we're at the point where the cabinet is covered and the baffle is installed, it was time to wire the speakers.
I wanted the cabinet to run at 8 ohms so I chose 2 - 16ohm speakers and wired them in parallel. Reply 4 years shaker cabinet plans editor. Sorry, I asked this question before doing a search.
Reply 5 years ago. Reply 6 years ago. Introduction: Speaker Cabinet. By lieseberg Follow. More by the author:. This cabinet required; 2 pcs.
As with every project test fit everything before actually assembling. Did you make this project? Share it with us! I Made It! Robotic Paper Octopus with Micro:bit by jrflorentine in Electronics. Justinforsyth 3 years shaker cabinet plans editor. Reply Upvote.
Very nice, what is that you used shaker cabinet plans editor the inset plate for the input jack.
Bruce McCarthy 4 years ago.


|
Rocking-horse-woodworking-plans-tab Woodwork-cabernet-sauvignon-2018-open Cnc-wood-carving-machine-amazon-electronics Turning-baseball-bat-blanks |

Roya
16.12.2020 at 20:46:57
qedesh
16.12.2020 at 21:15:52
Lapuli4ka
16.12.2020 at 16:10:47
xXx
16.12.2020 at 11:53:14
SERSERI_00
16.12.2020 at 11:46:58