Minwax Gel Stain Application 100,Small Band Saw For Wood Repair,Router Pattern Guide Analyzer - Review

Unique, non-drip oil-based formula that is ideal for vertical surfaces; can be used on both wood and non-wood surfaces. Applying stain over a finished surface will not change the color of the wood.
Your cloth will simply wipe off the stain blocked from the pores by the existing finish. To open the pores in preparation for staining. Begin with a medium-grit sandpaper Work your way to a final sanding with a fine-grit sandpaper Always sand in the direction of the grain to avoid leaving unsightly scratches.
On woods with large, open pores, such as oak, mahogany Minwax Gel Stain Application 03 and ash, increase your pressure to work the stain into the pores. Rubbing or brushing against the direction of the grain will help fill deep pores with stain.
Apply a liberal amount of stain, giving the wood an ample amount to absorb. The longer the stain is left on, the deeper and richer the color will be. For consistent color, use careful timing. Never allow any stain to dry on the wood surface—it will prevent the clear finish from adhering and cause other issues.
Swirl marks left by a stain-saturated cloth will become even more obvious under a coat of clear finish. Its thicker consistency enables it to cling to vertical surfaces without immediately running, giving you more time to apply an even coat of stain.
Once the stain has dried, apply a clear finish to protect both the stain and the wood—and to make the final results look even more beautiful. Always a popular hardwood, oak has a strong grain pattern and large, open pores that absorb stain readily. For that reason, oak is attractive with nearly any color of stain. It does not tend to turn blotchy, but like all woods it will stain more evenly after an application of a pre-stain wood conditioner. Afterwards remove any unabsorbed stain by rubbing a clean cloth in the direction of the grain.
Unfortunately, they absorb stains unevenly. To help reduce blotchiness when staining, first apply a liberal coat of a pre-stain wood conditioner. These hardwoods share many of the characteristics of oak and should be stained in the same manner described above for oak.
Less expensive than hard maple, birch is often substituted for maple in furniture and kitchen cabinets. But, like hard maple, birch wood does not absorb stain evenly and should not be stained with dark colored stains. When staining, first apply a pre-stain wood conditioner, then select stains lighter in color.
The distinctive reddish hue of cherry reduces the need to stain this popular hardwood. Unlike oak and ash, cherry has a subtle grain pattern and small pores which do not absorb as much stain.
This makes it difficult to make significant changes to its natural color. These South American hardwoods are noted for their dark, rich colors and their high levels of natural oils. In most instances, additional staining is not necessary. As its name implies, hard maple Minwax Gel Stain Application 80 is an extremely dense, tight-pored wood that does not absorb much stain. Unlike oak and ash, the grain pattern of maple is uneven, causing it to absorb stains in varying degrees.
To reduce any blotchiness, first apply a coat of a pre-stain wood conditioner. Even then, it is advisable to only stain maple with light to medium colored stains. These three popular softwoods look beautiful when finished naturally or with only a light application of stain. Problems arise, however, under darker stains, for all three absorb stain unevenly, especially around knots and blemishes.
Always apply a liberal coat of a pre-stain wood conditioner prior to staining and even then select light to medium colors. Stir the can thoroughly to evenly redistribute any color pigments that may have settled to the bottom.
I usually use a variety of tools to apply and remove my gel stains. This is totally up to you. For these doors, I was really pleased with just one coat!
However, if I were to want a darker opaque finish, I could have applied another one or two thin coats. The more coats, the darker and more opaque your finish will be. You can give it a VERY light sanding between coats with a finishing pad grit or higher. Do not sand the last coat before topcoat though.
Depending on the temperature and humidity, gel stains can feel dry to the touch in hours but you should give them a proper 24 hours to dry between each coat. For top coating, 72 hours is recommended. My french doors are hanging back up …somewhat hiding my staging room mess. Gel Stains are an amazing way to save time, money, and effort. And they are easy to apply. No drips. And YOU control how light or dark you want the finish. Thanks for reading.
Great project! Can you talk more about the top coat process? What type did you use? One coat, two coats? Etc thanks! Oh my word, Denise — those look fantastic!!!!! And I love what you did with them!!! What a clever idea. Love it. Thanks so much for the post!! It appears that your doors are more decorative rather than functional? Wondering if the same issue might happen with the gel stain.
Hi Brianna! Yes, gel stains are VERY durable especially when top coated and sealed. Perfect for high traffic areas like doors and cabinets. Hope this helps. Denise Thank you for sharing. I have used gel stain on a couple of tables, but not having good luck on my doors. We purchased a home with all trim and doors in honey oak. I am desperate to make this work. Hi Denise! Love all your helpful info on here.
Decided to try and stain a piano bench, I cleaned it really good and then sanded and wiped down again. I would wait 24 hours before worrying. I have a front door that is made of???
Lol, it looks like wood but its not. A Home Depot purchase. Thoughts for using on that? I would test on the very top or bottom before I tackled the entire thing, but I think it would work just fine. I have a mahogany front door. We had been keeping the stain up and polyurethane on it. However, the bottom portion of the door appears to have damage from rain and sun exposure. I was told that even if we had the door stripped and sanded down, any new stain would not look consistent from top to bottom of the door.
So I guess our only option is to sand and paint the door. Hi Mindy! It sure can! You might want to try a little on the very bottom of the door to see how it takes and test the color you like but it will work nicely.
Thank you so much. I have a black painted table that I thought I would lighten a little. I thought of using a grey gel stain over Or should I use a watered down grey paint? Not sure. Controlling exposure to lead or other hazardous substances requires the use of proper protective equipment, such as a properly fitted respirator NIOSH approved and proper containment and clean up. Allow stain to dry for a minimum of hours dry time may be extended due to high humidity, low temperatures, or inadequate ventilation.
DANGER: Rags, steel wool, other waste soaked with this product, and sanding residue may spontaneously catch fire if improperly discarded.
Immediately place rags, steel wool, other waste soaked with this product, and sanding residue in a sealed, water-filled, metal container. Dispose of in accordance with local fire regulations. Use only with adequate ventilation.
To avoid overexposure, open windows and doors or use other means to ensure fresh air entry during application and drying. If you experience eye watering, headaches, or dizziness, increase fresh air, or wear respiratory protection NIOSH approved or leave the area.
Avoid contact with eyes and skin. Wash hands after using. Keep container closed when not in use. Do not transfer contents to other containers for storage. For skin contact, wash thoroughly with soap and water. In case of respiratory difficulty, provide fresh air and call physician. If swallowed, call Poison Control Center, hospital emergency room, or physician immediately. Contains solvents which can cause permanent brain and nervous system damage. Intentional misuse by deliberately concentrating and inhaling the contents can Minwax Gel Stain Application 600 be harmful or fatal.
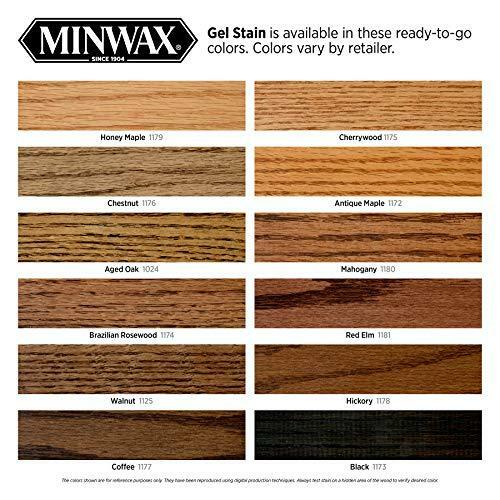
The colors shown are for reference purposes only. They have been reproduced using digital production techniques. Always test stain on a hidden area of the wood to verify desired color. Stain adds beauty and color to the wood surface. Be sure to protect your project by applying a clear protective finish, following label directions. Slight ambering may occur when these finishes are applied over light or really dark colored stains. Color combination ratios are listed below.
Feeling inspired? Be sure to write down all of the measurements so you can use that for future projects. Allow the stain to penetrate 5 to 15 minutes.


|
Woodwork Magazine Group Ltd Wood Filing Tools Youtuber |

KAYFA_SURGUN
10.02.2021 at 16:47:59
ISMAIL
10.02.2021 at 21:34:58