Marking Knife Types Unity,Bandsaw Blades For Wood And Metal Gate,Woodworking Epoxy Color - PDF Review
Everyone noticed the usual suspects such as Lie-Nielsen and Veritas , but no one could identify the knife. I also noticed that David Barron had ceased selling his knife. I had 4 things to confirm there was a gap in the market. Firstly, I had seen how many knives David was selling after reading his blog a few years ago. Secondly, I had a larger following than he did at the time of selling his knives.
Thirdly, there was potential to make the blade replaceable which also had the added benefit of allowing the user to choose from a selection of 6 different blade shapes. Finally, I realised that it would be easy for me to make the handle and the ferrule fully customisable if I were to make these knives in-house.
I began working on a design for the knife, particularly the locking mechanism on the ferrule. I considered a collet, however there was no chance I could make one efficiently.
I considered a pin that slots through the side of the ferrule and through the hole on the blade, secured in place with a magnet. But this would easily get lost in a pile of shavings if dropped.
Everything pointed back to my original design of using a grub screw to secure the blade in place. Of course a grub screw could easily get lost in a pile of shavings. But at least it was far easier to order spares online as opposed to a bespoke magnetic pin! So I got to work re-designing my original knife and faced a number of different challenges.
The original knife required the blade to be cut shorter before being inserted into the ferrule. But I did not want people to need to cut down blades in order to replace them. Not only from a convenience standpoint, but also from a safety perspective. This mean't that the ferrule had to be longer on the new design to accept the entire blade. The nice thing about this is that it's added a nice amount of mass to the front of the knife so that it required less effort to cut, and feels like a higher quality item.
I wanted the grub screw to be in the centre of the ferrule along it's length. But after increasing the length of the ferrule, it meant that the grub screw hole was no longer aligned with the hole in the blade.
This was a big problem. If the grub screw was to be over-tightened against the side of the blade, there is a high chance the blade could chip and fill the blade slot with metal fragments. As you'll see later in this article, these are impossible to remove.
I tried so hard to avoid this being a carbon copy of David Barrons knife , but on the flip side there was so little I wanted to change about his original design because I loved it so much. In the end I decided to remove the bead at the end of the handle, simplify the shape, I also removed the shoulder that leads the handle into a ferrule, and I was to offer it in a variety of materials.
With the addition of a visible grub screw, the design is now noticeably different to Davids original. One thing I couldn't distance myself from was the thumb-hold. I thought it was genius. In addition, due to the fact my blade was removable, it meant that the blade could simply be flipped the other way around and it would be suitable for both right and left handers! The lathe had sat idle in my workshop for 4 months while I gathered materials to test the first batch.
And I decided to film my first ever attempt at using the metal lathe for Episode 12 of Turning Tuesday. At this point, the knives were complete secret. Barely anyone knew what I was up to! This is where the real challenges arose. I'm pretty sure I exhausted all potential cock-ups possible before finally coming out with a design and a process that works well.
Below are some of my favourite screw ups. There was a split in the rosewood that I didn't see. Suffice to say it didn't like the skew chisel touching it. I forgot to cut the blade slot before attaching the ferrule. Then ended up mashing it anyway I decided to highly polish the ferrule as an experiment, then proceeded to overtighten it in the chuck jaws The slitting saws I use are extremely flexible.
One second I was chamfering the copper, the next second my pants were brown. The shank was too tight in the handle, so I decided to machine it down slightly. Ended up mashing the slot shut. When the araldyte joint failed, causing the ferrule to rotate around the blade holder.
You could get a grub screw in that, right? When I forgot to set the depth stop on the drill and blew through the opposite side of the ferrule. One of the many occurrences where the tap snapped while cutting the thread. This is one of the most annoying! Aradyte rapid didn't work for the wood to metal joint either. These often launched off the lathe. When the slitting saw broke and I decided to mount it on the lathe afterwards as an experiment.
It didn't like it. When you're fitting the blade for the final time and it snaps in the slot. The only slitting saws I could find were available from China. When I got carried away while sanding the handle and ended up shaping the brass ferrule too! A huge problem I faced was breakout within the slot.
After adhering the ferrule to the blade holder, every time I drilled and tapped the hole there would be small amounts of metal that would prevent the blade from being fully inserted.
I considered assembling the ferrule and blade holder dry while drilling and tapping the hole, taking it apart, cleaning out the slot, then re-assembling it. But this would almost certainly make aligning the threads difficult.
Not to mention the potential of threadlocker leaking into the pre-drilled grub screw hole! I found that inserting a piece of 0. I usually reserve these ones for myself, friends, and display items if I were to ever set up a stall at an event. After completing the first batch of knives, I have since subcontracted the metal components of the knives out to a small local company.
This stops me from having to spend hours slaving over a lathe and milling machine doing repetitive tasks and instead focus on video creation. However, I still glue, drill, tap, countersink, and chamfer the ferrule myself. As well as turn, finish, and package etc. It's been a real rollercoaster trying to get these things going but the initial feedback has been incredible.
I'm seeing lots of happy recipients of their knives all round the globe and I could not be more humbled to see people enjoying them.
If you want to purchase one yourself, you can visit my online store. If you find they are out of stock, be sure to sign up for my marking knife notifications by clicking the button below. They are simply stunning! Knowing the amount of thought behind the design and process makes them even more appealing. I also want notifications but the link is broken. Decisions, decisions! Save my name, email, and website in this browser for the next time I comment.
Matt Estlea. The Story of My Marking Knives. Sometimes your woodworking improves like a slow and steady climb up a mountain. Sometimes, however, you get to ride the elevator. Then I traded up to a mechanical pencil, which never needed sharpening.
Then one day I found my old X-Acto knife in my desk drawer. That day my woodworking skills took a much-needed lurch forward. Hand work, in particular, is much easier to manage with a knife line that never smudges, changes in thickness or is offset from the point you intended.
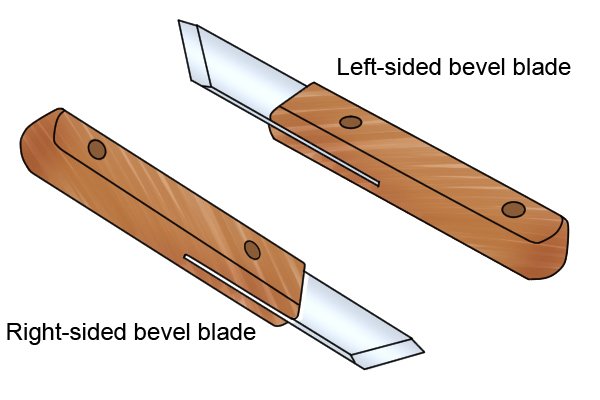
After a few years of woodworking with my X-Acto, I discovered spear-point, single bevel marking knives, such as the Blue Spruce knife shown in the photo above. Though some woodworkers would disagree, this form is ideal for marking joints for hand-cutting. The flat side rides the shape of the piece you want to mimic.
The knife marks its location with zero offset. But no one ever showed me how to use a marking knife. And sometimes it would follow the grain instead of the path I had set for it.
Then one day, I realized what I was doing wrong. I was moving the knife too fast and with far too much pressure. Once I slowed down and took three light passes in place of one heavy pass , my accuracy took another leap forward.
If you need to add some makeup to a knife line, run that mechanical pencil down the knife line, then run an eraser over the pencil line. Here are some supplies and tools we find essential in our everyday work around the shop. We may receive a commission from sales referred by our links; however, we have carefully selected these products for their usefulness and quality.
THEN I was expected to split the line when working. It was customary to work to one sixtyfourth inch tolerances or better. That one technique has stood me in very good stead all these years. If you check the technique paragraph on page 14 of my first book, you will find another couple of subtle points which may help.
The position of the flat side of the knife is very important to avoid heading off in the wrong direction or shaving chunks off the sides of your tails or steel layout tools….. This last disaster can be avoided if the heel of the cutting bevel is not lifted too far from the surface of the timber.
OK, you pushed me over the edge. Andy PS — My wife would like a application to join wivesagainstschwarz…. You missed one other step in the layout education of a woodworker, and that is the ballpoint pen.

|
Battery Biscuit Joiner Zoom Soft Close Hinges For Toy Chest 75 Best Clamp On Bench Vise 4g Pocket Hole Jig Dewalt Design |

4_DIVAR_1_SIQAR
21.02.2021 at 13:46:18
lala_ASEF
21.02.2021 at 22:18:50
Lunatik
21.02.2021 at 21:12:24
Joe_Cole
21.02.2021 at 17:37:13
10
21.02.2021 at 11:56:32