Free Wood Flag Plans Design,Best Electric Wood Carver 400,Things To Make Out Of Scrap Wood Jacket - PDF Books
It is also a fun and relatively easy project to complete using the process we share in this instructable.. It is important to get the specific red stains for the stripes.. The first step is to cut your Wood for Stripes down to length. So make 6 cuts at The top 6 remaining stripes should be cut at the full length So cut 7 at Place your 2ft x 4ft plywood backer board on a table. You will attach the strips to the plywood and later you will trim the plywood down with a circular saw to be the exact dimension of the flag.
You could cut it ahead of time but we did it after. Now here is the step that streamlines the build and makes it extra fun. Instead of nailing down all of the Stripes and then staining the red strips we use another method. Stain unlike paint tends to bleed. If we nailed all the stripes down now and stained every other one red, we would end up with red stain bleeding onto the white stripes.
Starting from the lower right corner of the 2ft x 4ft plywood backer, position the bottom stripe flush to the right side of the plywood and perfectly flush to the bottom of the plywood make sure your plywood is square. We bought ours precut at 2ft x 4ft and it was square with 90 degree corners. ALSO- if you want a more rustic look position the knots up or the rougher side up. You can also use a sander to rough it up or hit it with a chain or crowbar to make it more rustic looking.
Using your air nailer or manual hammer and nails shoot a few nails into this first bottome piece ONLY to secure it. You could optionally also apply some wood glue to the back of this first stripe to make it even more secure, but we did not.
Keep in mind the bottom and very top stripes will be red and every other strip in between in the next step. Now position the 3rd stripe which will be red eventually and nail it. Then put another stripe white but don't nail it. Be sure to still place the white stripes down to get the spacing perfect but only nail the red strips down.
Finally, pull out each stripe which is not nailed down. These will be all the white stripes. Set these aside and keep them stacked in order. You will be left with the bottom stripe attached to the plywood and every other white stripe removed.
So only soon to be red stripes are attached. Now you can get messy with the Sedona Red wood stain. Using a staining pad apply the stain to each of the stripes that are nailed down.
Also apply some stain to the bottom and right edge of the of the plywood. Don't worry about the top and left edge- because we will be trimming that off as a final step. Start with a light application of stain and allow it to dry. Depending on how rustic you want it- you may want a lighter coat of stain. Once it dries, you can always add more stain.
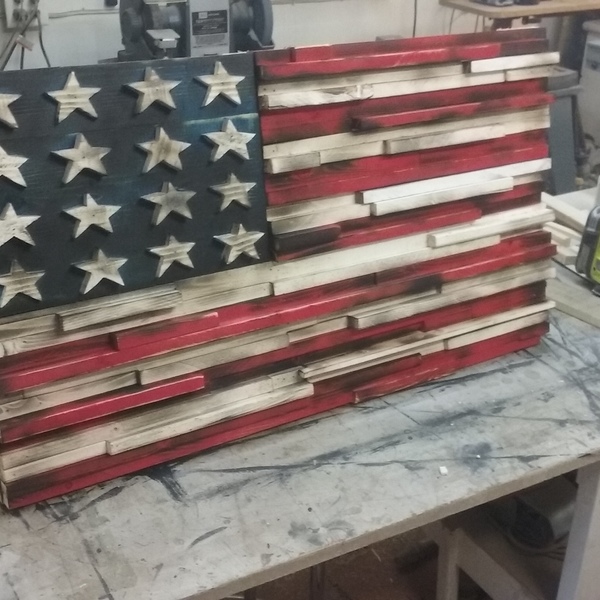
In our design pictured we did not stain the white stripes. We left them as bare wood with some knots showing to make it look rustic. You could stain these an antique white or leave them unfinished as we did. After the red stripes are thoroughly dry, put the white stripes into place and nail each one down you could optionally add some wood glue to the bottom of each but we did not.
For the Union star rectangle which you already have cut to size you will need a blue background and 50 stars. To keep with the rustic look we don't want white painted stars, rather we want wood colored stars to match the wood color stripes. We used our Cricut machine to cut 50 stars to fit within the To do this we found a flag image via Google Image search and we took a screenshot of the blue star rectangle.
Then we imported it into the Cricut design center and we resized it to be slightly smaller than We then printed it on vinyl. You can use a credit card or a roller to make sure they stick down securely. TIP: Be sure to spray paint a light stream from high above.. If you spray too much it may bleed under. We spray a light stream from high above and wait a few minutes to let it dry slightly then do another spray and another. If you rush this step the paint may bleed under and you may need to start this part over.
If you don't have a cricut machine, send us a message. We plan to sell custom sized cricut cutouts for this purpose. We then use a small picker tool or a razor knife would work to pick each star off, revealing the wood beneath each of the 50 star shapes. You could purchase a 50 star stencil sold on Amazon and elsewhere but then you would need to paint the stars through the stencil in the option above we actually stick down 50 stars using contact paper so they all stay nicely aligned and paint blue around them.
Then we peel the stars off to reveal the wood underneath. So we have wood colored stars. With a stencil you would need to first paint the Union Star area Satin Midnight Blue Rustolem allow it to dry and the use a stencil to spray paint white over for each of the 50 stars.
Once your Union rectangle star area is dry and completed. Use your nail gun or hammer and nails to secure it down in place. Next, using a circular saw and safety goggles cut the excess plywood from the top and left side of the flag.
You can use the flag as a guide, take your time and be safe. Use some painters tape to protect the edge of the flag- and stain the edge of the plywood backer board on the left side and top where you just cut. To learn more about this flag or if you want to buy one instead of build one be sure to visit our website with more pictures and details:.
We also have a new flag with waves carved into it which made for a fun project as well. Learn more at the link above. Please comment with any questions! Dimensions of the flag should be The stencil are available on Amazon. Hi, Quick question on the size of the blue area of the flag.
There are 2 different sizes mentioned. Which one is correct. Thanks in advance! Reply 7 months ago. The union should be But the main dimension of this flag are off as well. It should be 37" x Try to make this historically-based flag from an old wooden pallet. By taking the pallet apart, you already have most of your pieces you need to finish the project. The stores in the blue corner are an optional design and can be done a variety of ways, as seen on The Magic Brush Inc.
Check Project Details Here Shooting for an even smaller, unique design to set out as a table design? Instead of involving a lot of cutting wood and fitting it all together, these pieces are stacked on top of one another.
Craft paper can be used to decorate the outside. Check Project Details Here This stained flag design is similar to some of the other framed wooden flag designs that we have featured before. The biggest difference is the unique color palette that this designer has created. The instructions given by Build Something are about as detailed and straightforward as you could find. Check Project Details Here Although shutters are not as common on newly designed homes, they were of functionable importance for older homes.
Now they may be used only for exterior decoration, or left out entirely. This means that there are a lot of old shutters out there looking for repurposing. The crafter from Gotta Have Projects has turned hers into a creative and unique-looking American flag. Check Project Details Here Cute and easy is the name of the game with this design. This is something that once the blocks are cut is fun to do with your kids.
It mostly involves small pieces of wood cut into blocks, crafting paper of different colors and some ribbon. It is an easy design to put your own Free Wood Flag Plans 30 twist on. Check Project Details Here What else is more heavily associated with Fourth of July celebrations than the flag other than fireworks? Combine the two in this firecracker flag design. It makes the perfect porch decoration during the time of the year around the holiday. Towards the end of the blog from My Talking Walls , the creator has even attached a YouTube video link to guide you through her process.
If you simply want a holiday activity for you and your kids to do together, this is a great choice. The material list is mostly made up of paint sticks. From there, use some red white and blue paint and form or paint the stars. Let them get creative by sticking their own holiday message on the bottom as well. Find the step-by-step instructions at Glue Dots. Check Project Details Here Take repurposing to an all-new level with this inspired project.
The creator was lucky enough to get an old fence from one of her friends. However, keep in mind that just about any old wood works for this project. Some people may be able to find old barn wood or a piece of an old shed or palette. Read the story behind the project and get her how-to instructions at My Repurposed Life. Check Project Details Here The last project on our list is also our last wood burning project.
As you have seen throughout, there are a number of different looks that can be made through wood burning, rustic to straight-edged. Jeff Furr from The Furrminator gives you a step-by-step guide as well as a handy video. Watching the video is highly recommended in order to see his process and stay safe if you try to do it yourself.
Find out how to make a wooden American flag by wood burning here! Plain and simple, the miter stand is designed to increase the utility of your miter saw. The right product will make the process of using. Adam Harris Last updated: February 27, Check Project Details Here. Contents 1. An American Flag from Build Something Firecrackers from My Talking Walls Rustic Flag from My Repurposed Life Adam Harris.
Hi there! My name is Adam and I write for HealthyHandyman.


|
Old Craftsman Radial Arm Saw Troubleshooting Quest Cnc Engraver 3040t 61 |

SEVGI_yoxsa_DOST
09.11.2020 at 10:30:41
Esqin_delisi
09.11.2020 at 20:22:48
Romantic_oglan
09.11.2020 at 19:14:44
KINQ_BOXINQ
09.11.2020 at 18:34:38
Inda_Club
09.11.2020 at 14:23:31