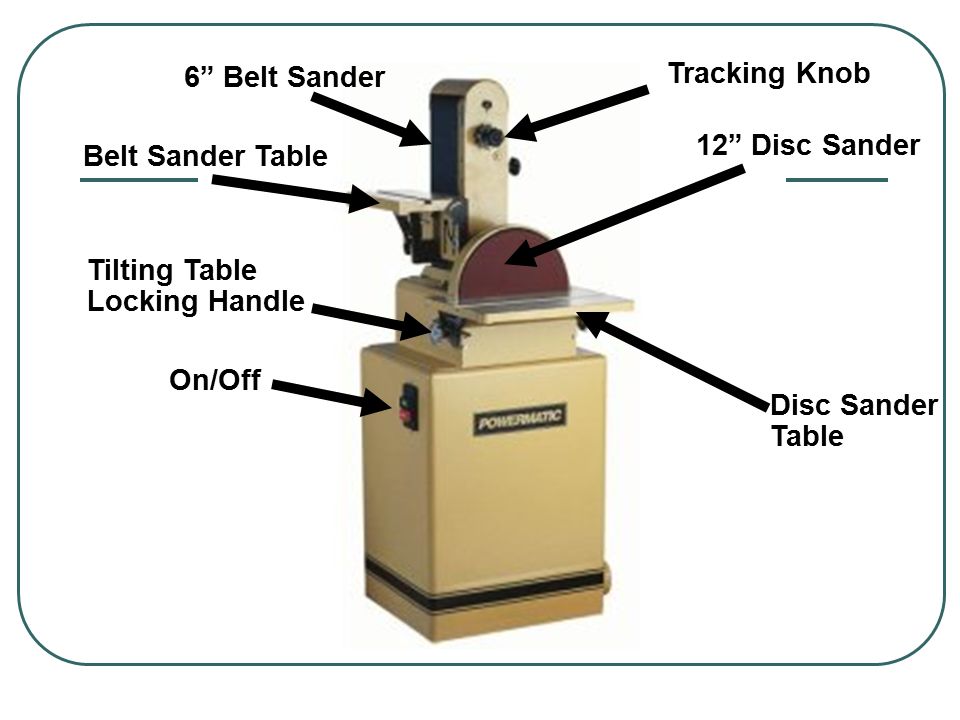
Belt And Disc Sander Safety Rules Kit,Wood Designing Machine Price Prediction,Woodworking Ideas To Make Money Mp3 - PDF 2021
Table Of Contents. Quick Links. Table of Contents. Previous Page. Next Page. Please call our customer help line: M-F CST or by email: partsandservice greatlakestec. Page 2: Table Of Contents Assembly and adjustments…………………………………………………………. Troubleshooting……………………………………………………………………… Exploded view and parts list………………………………………………………… Warranty…………………………………………………………………………… WARNING: To avoid mistakes that could cause serious injury, do not plug in the sander until the following steps have been read and understood.
Page 4 General safety rules continued Turn the power switch to OFF. Do not leave the tool until it has come to a complete stop. Serious injury could result if the tool tips or is accidentally hit. DO NOT store anything above or near the tool. This sander is designed to sand wood or wood-like products only. Sanding or grinding other materials could result in fire, injury, or damage to the workpiece.
Do not sand with the workpiece unsupported. Support the belt and disc sander safety rules kit with the backstop or table.
The only exception is curved work performed on the outer sanding drum. Always remove scrap pieces and other objects from the table, backstop, or belt before turning the sander ON. This tool is equipped with an electric cord that has an equipment grounding conductor and a grounding plug.
The plug MUST be plugged into a matching outlet that is properly installed and grounded in accordance with ALL local belt and disc sander safety rules kit and ordinances. Do not expose to rain or use in damp belt and disc sander safety rules kit. Make sure your extension cord is in good condition. When using an extension cord, be sure to use one heavy enough to carry the current your product will draw.
Always ensure the sander is unplugged prior to attempting any assembly, installation or changing of parts and accessories. Peel backing away from sanding disc. Align perimeter of disc with plate, and press disc firmly into position on plate, leaving no loose belt and disc sander safety rules kit. And use a screwdriver to fasten the provided screws and washers securely.
Page 12 Assembly and adjustments continued 3. Holding the table belt and disc sander safety rules kit this position, tighten the three bolts on the top of the table. Note: The table may have to be re-adjusted when tilted. Page 13 Assembly and adjustments continued Mounting the Sander to the Workbench CAUTION: If during operation there is any tendency for the sander to tip over, slide or walk on the supporting surface, the sander should be properly mounted to a workbench or stand.
Page 14 Assembly and kig continued Sanding belt tracking cisc 1. Plug in the power cord. Turn the switch ON and OFF to make sure the sanding belt is correctly centered and not sliding rulee the idler and drive roller drums. Page 15 Assembly and adjustments continued Install a sanding disc 1.
Remove the two screws from the sanding sanver guard and remove the guard. Remove the used sqfety disc. Wipe the sanding disc plate clean. Peel the backing from the new sanding disc, align Belt And Disc Sander Safety Rules Rate the disc with the plate and press the sanding disc firmly on to the plate.
Page 16 Assembly and adjustments continued Square the tables To ensure accurate end sanding, the work tables must be square to the sanding surfaces prior to using the tables for disc sanding. Place the key in a safe place and out of the reach of children. Page 18 Operation continued End sanding and outside curve sanding with the disc Use for sanding the ends of small and narrow workpieces and outside curved edges.
Always work on the left side of the disc downward rotation sideholding the workpiece firmly with light pressure against the sanding disc. Page 19 Operation continued Miter gauge — Disc sander A miter-gauge is supplied with your sander, and can be used on the disc table. Page Maintenance Maintenance continued Adjust the Drive belt 1.
Remove the drive belt housing cover 1. Loosen the 3 screws 2 allowing the pulley to slip and the drive belt 3 to loosen. The drive belt should be seated correctly in the motor pulley and the drive pulley. Page Troubleshooting Troubleshooting Service on these tools should only be performed by an authorized, qualified technician.
Problem Cause Solution Sanding Grains easily 1. Ensure sanding accessories are rub safsty belt or discs. Page 22 Problem Cause Dksc Motor 1. Motor overloaded. Reduce load rlues motor pressure on overheats. Extension cord too long object being sanded. Utilize an extension cord of appropriate weight. Print page 1 Print document 25 pages. Cancel Delete. Sign In OR. Don't have an account? Sign up! Restore password. Upload from disk. Upload from URL.


|
Best Raps Mp3 Makita Rt0701cx7 Compact Router Kit Ad |

YENI_ULDUZ_AZAD
26.12.2020 at 23:18:21
Henry
26.12.2020 at 10:55:15
crazy_girl
26.12.2020 at 14:37:32
AnGeL_BoY
26.12.2020 at 14:11:27