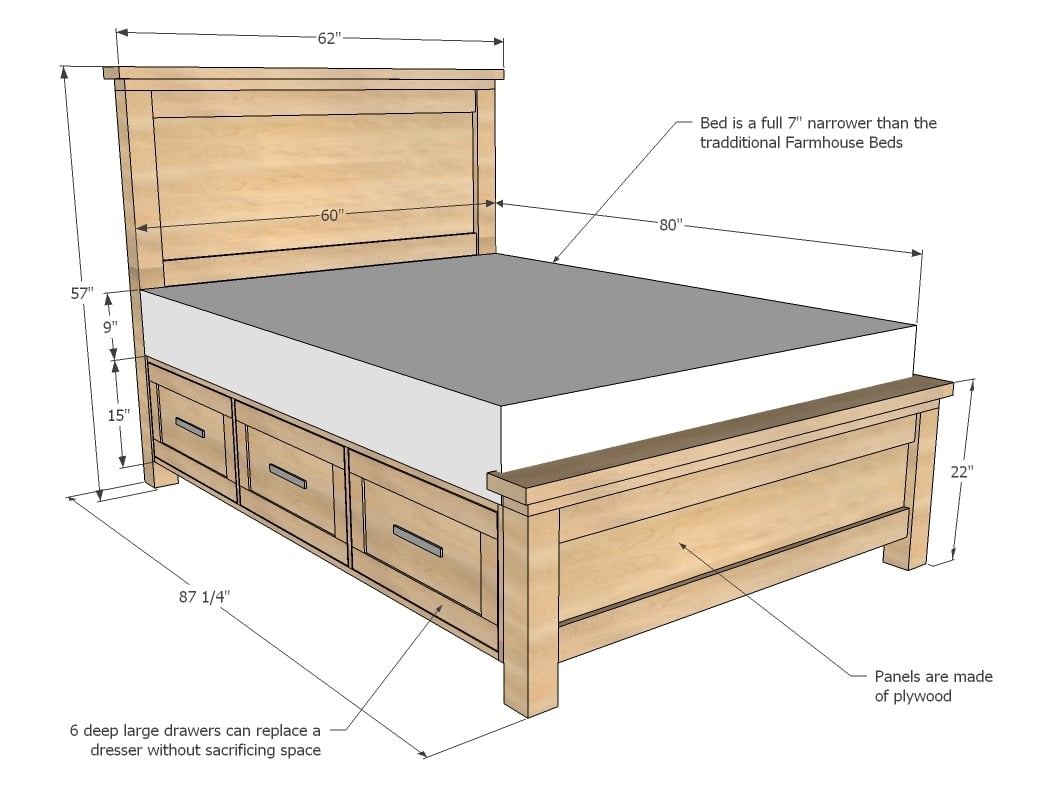
Woodworking Plans Queen Size Platform Bed Test,Home Cnc Machines 60,Soft Close Drawer Slides Home Depot Canada English,Woodworking Dust Collection Systems Zero - 2021 Feature
For the past several months my wife and I have woodworking plans queen size platform bed test trying to decide on a good bed design for our eldest son, Vinny. I happened across a site called tatamiroom. Unfortunately, searches on woodworking forums and YouTube for plans or detailed builds were fruitless, thus my journey began with the simple photo from tatamiroom. I knew there was going to be no bed hardware for this build so all the joints needed to be interlocking.
This meant all dimensions were to be taken individually to fit each part. No big deal, just a little more time investment in getting the joints just right. I needed some starting guidance so I surfed over to thewoodwhispererguild. The foot board was the genesis and then the headboard, followed by the rails. Everything else came from the dimensions of the mattress and how high off the floor I wanted the bed to be.
I laid out all my foot, headboard, and rail parts taking care to avoid all knots and defects as possible. Then I used a jig saw to rough cut the foot parts to prepare for milling. These sixteen pieces make up the bulk of the feet. Below is a view of how the feet go together. I glued up the feet in two stages. First, the grain was matched for the most pleasing view of the faces and the end grain.
Notice how the growth rings almost look like the foot is made from a woodworking plans queen size platform bed test piece of wood. This was made to lock the foot and side rails into the feet so they would not pull away when setting the bed up. I could have made the height of that key much shorter in retrospect.
This was done for each joint individually. This allows for easy test assembly but allows for finish build up to make it a nice slip fit when completed. The next order of business was woodworking plans queen size platform bed test build the headboard. My original plan was to make a solid alder panel with some square hole details similar to what is seen on tatamiroom.
I then realized I had an unused piece of bubinga that had been sitting in my shop for 2 years. I measured and it turned out to be long enough and have a good width for a nice raised panel. Next I had to decide on a profile. I purchased a raised panel bit from MLCS Woodworking only to find I was not woodworking plans queen size platform bed test with the particular outcome of the test board. I placed the bit in my bit cabinet and moved on to practicing making a raised panel on the table saw.
Then the first kerf cut was made all around the board referencing the back of the Woodworking Plans Queen Size Platform Bed Mac panel on the fence. This was done on each side several times adjusting the fence as needed to remove material. Now the headboard was glued up and ready for some detail work. After some thought, I realize Woodworking plans queen size platform bed test should have pre-finished the bubinga with the oil I used on the rest of the bed just in case contraction and expansion revealed a bare streak on the edges.
Now that the entire perimeter of the bed was made, the mattress supports could be attached. I set the rails and headboard in position, measured, and cut the mattress supports. Glue and screws attached the supports and tapered face grain plugs using this from leevalley. I was toying with the idea of adding a curve to the headboard rail and stiles but I had a thought.
If I were to cut a long subtle curve in the parts, then the whole thing may look odd because of the rectangular raised panel. The curves and straight lines would conflict. That was to use light to bend the wood. I started by marking out where the curve would have been and then using a spokeshave I cut a long tapering bevel such that the widest point was in the middle of the rail and stiles.
I was thoroughly pleased with the result. Once the foot and side rails were ready for the trim piece to be glued on I needed to add the curve on the bottom. I removed the waste at the band saw close to the line and template routed flush to the line. I then clamped the piece to the table and gave it the same treatment as the headboard rail and stiles.
Now it was time to work on the trim pieces to tie the woodworking plans queen size platform bed test into the rails. Glue and clamps attached these pieces to the rails. When the glue was dry, I scrapped it woodworking plans queen size platform bed test and planed it all flush with my Bailey foreplane. The last thing I added to the bed were two pieces woodworking plans queen size platform bed test alder that would keep the headboard from leaning back and possibly splitting either the feet or the headboard itself.
They rest against the wall and act like stops. They were attached in the same fashion as the mattress supports then sanded by hand to grit. To blend all the lines woodworking plans queen size platform bed test I chamfered all the edges that met at the feet. This was done with file and block plane. This was done at the band saw and cleaned up with a block plane. The ends of the rails were not sanded but were planed with a newly sharpened block plane.
I found this to be the easiest way to smooth out all the end grain on this project including the tops of the feet. One thing I did not capture an image of was the mattress cross supports and the cross support spacers that were glued into place on the side rails, however, they may be visible in the photos during assembly. All edges were chamfered at the router table and got one coat of spray lacquer and sanded lightly with grit. I fully intended to just do a spray lacquer finish on the bed but after doing a few test pieces I decided to first apply Cherry Danish Oil first paying close attention to the headboard panel to get into the groovesthen Tung Oil, followed by a week of curing, and finally the lacquer was sprayed on.
I used Sherwin Williams Hi-Build Semi Gloss Lacquer and the initial coat was full strength, followed by a light sanding with grit and vacuumed the dust woodworking plans queen size platform bed test. This was done twice. This last coat smoothed out the finish nicely. This was quite the build for me taking most of the summer in degree heat with an even hotter shop.
Very nice Spunjin, it will serve your family for generations. Nice design and assembly. Really nice woodworking! Thank you, Saliya. Hello Spunjin I hope ur able to assist me. I am looking for plans to make a sleigh bed. Do u perhaps know where i am able too search for these plans. Cliff cliffclegg1 gmail.
Beautiful work! I was searching for a good joint for a waterbed frame when I ran across your website. I love the Japanese inspired joinery you used. Thank you! Thanks for capturing all of this.
What made you decide to apply the cherry Danish oil instead of going straight to Tung oil? How many coats of Tung oil did you apply? Nice to hear my SketchUp Model came in handy for you. I chose to use the Cherry Danish Oil first merely for the color aspect. Hope that helps. Awesome design and construction, really came out beautifully. I am building a queen size bed frame like this and had your same issues in finding online resources for design specifics.
What a treat to find your post! I also saw you wrote that you planned down the rails after woodworking plans queen size platform bed test a tight fit to leave room for finish build up as well. I was planning to make the short spacer blocks the same width as the rails for a tight fit, im mainly basing this off of experience making dovetail joints and having little to no wiggle room. Also, would you suggest that I put a center beam for a queen bed? I sincerely appreciate any guidance you can provide for me!
Thank you so much for posting this! Its quite amazing! Thank you. I would make everything fit snug first and fine tune as needed. Start there and remove material as needed.
Definitely make a center beam with foot support for the queen size bed. The thicker you make the rails the better, in my opinion. For the bed I made I used what I had on hand.
No special trip to the lumber yard to pick up thicker stock. If you have it then use it. Send a picture of your finished work. I would love to see it. If you have any further questions during your build feel free to ask.

|
Wood Carving Gouges Uk 200 Plane Carpentry Tool Design Woodwork Quizlet Live |

melek
01.10.2020 at 16:26:54
666_SaTaNa_666
01.10.2020 at 21:55:13
Dj_Dance
01.10.2020 at 19:39:33
lakidon
01.10.2020 at 12:16:52