Rockler T Track Router Bit Js,Poi Rifle Meaning,Belt And Disc Sander Delta Time,10mm Hss Lathe Tools Install - Tips For You
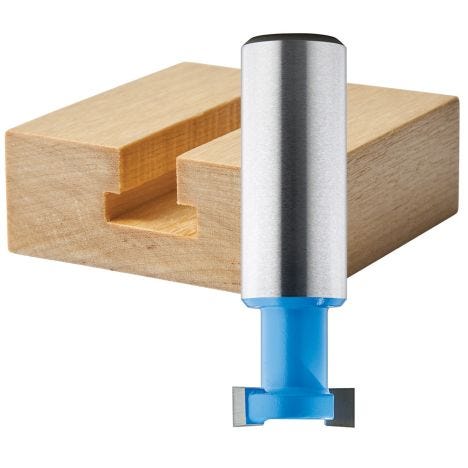
T-Slot Router Bits. Item G. Making custom fixtures or wall display units with these premium quality router bits has never been easier. Skip to the end of the images gallery. Skip to the beginning of the images gallery. Add to Cart. In stock. Offered in three popular sizes, these T-Slot router bits are handy for making slot walls for your shop that work with standard size bolts.
Add washers for extra strength and hang brackets like those found on professional wall display units. Questions and Answers. Steve made his first woodworking project at age 9 in and whittled his first wooden chain at He was also a consumer electronics repair tech and shop owner for a little over Rockler T Track Router Bit 60 20 years, until his impending obsolescence became impossible to ignore.
Since then, Steve has focused passionately on manipulating his wood Don't judge him. This site uses Akismet to reduce spam. Learn how your comment data is processed. Skip to primary navigation Skip to main content Skip to primary sidebar Skip to footer. Share this awesomeness! Facebook Pinterest Twitter. Leave a comment - we'd love to hear from you! Cancel reply. Attach two swivel casters in the middle.
Use four lag bolts per caster and add a lock washer and a washer to each lag bolt. Flip table over and attach long beam supports between leg assemblies with pocket screws. I was able to clamp a block of wood under the long support to hold it flush with the top of the leg assemblies. Here is how the supports look finished. Cut out the top corners where the end beams and middle beams are with jig saw. Below I am screwing the partition in to the bottom of the table. You will also be able to screw into the top support beam as well.
Attach the second plywood workbench top the the top of the first plywood workbench top with wood screws from underneath. Be sure the keep screws out of the path of the router channels for the T-Track. At this point the table is all built and ready to use. I am taking it Rockler T Track Router Bit 3d Model further though to add all the other goodies to it. Cut out table saw hole with circular saw and jig saw.
Measure out the size of your table saw top and cut it to fit that size. Use tape to protect the edge of the plywood.
Cut out corners to wrap around the legs. Assemble shelf and supports with screws. Cut out hole for table saw dust to fall into. That way the table saw still has something to sit on. I jacked up the shelf and clamped it in place so I could screw it in underneath. I also squared it off and screwed it in through the partition. Rout out miter gauge outfeed channel in workbench top. Rout it long enough to get the miter past the blade of the table saw. You want the channels to be deep enough to keep the top of the T-Track flush or just below the surface of the table top.
See top view of table for layout of channels. This is where the T-Track intersections will go. Cut out router lift hole with router at the depth of the lift plate. Start routing in the middle and work your way around in circles until you get to the edges. At the edges I clamped down wood as bumpers to keep my lines nice and square. Sand and polyurethane table top. I Rockler T Track Router Bit Id sanded with grit sand paper. On the outside edges I used an orbital sander to remove all the print on the boards and level the two top layers together.
After I sanded I brushed in four layers of scratch resistant polyurethane. I also sanded with grit sand paper between coats. I wanted it to be a really nice smooth surface. I started with the intersections then cut the T-Track to length with a metal blade on the jig saw.
This part was fun because it was all coming together. Level the table saw with shims. I gave myself some wiggle room to be able to shim it up to the right height of the table top. I got it nice and flush with the top. Install router lift adjustment screws. I installed four of these adjustable screws around each corner of the router lift for fine tuning the lift to the table. I had to go to the hardware store and pick these up. Once these are installed, all you need to do with this screw is reach under the table to level out the router lift flush with the top of the table.
You should only have to do this once when you first install the lift. Here is a picture of the screws and how they are installed. Drill a hole for the nut and screw it in with an Allen wrench.
Then reach under and make the fine tunes adjustments to the level of the lift. This is a longer version of the two screws that came with the lift.
I added the nut to a longer screw that matched. The nut gets hammered into the bottom of the table, so it would clamp the lift on really tight. This is how it ended up. Nice and flush. I clamped the vise in place and pre-drilled the holes to make it easier to screw in. Build a block for the the vise.

|
Rockler Wood Vise Volume Best Small Workshop Air Filter 40 |

2OO8
18.04.2021 at 12:34:42
SeRsErI
18.04.2021 at 15:10:21