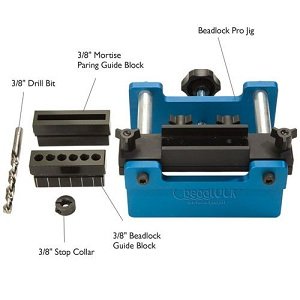
Rockler Beadlock Pro Kit,Folding Door Hinges Hardware Types,Under Drawer Slides Installation 500 - Step 2
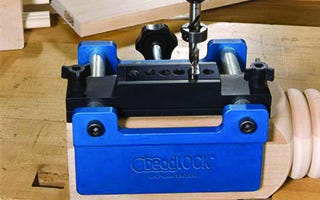
Then the guide block is shifted slightly to drill two overlapping holes evenly spaced within the first three. Together, these create an undulating mortise into which the Beadlock tenons fit perfectly. While a traditional loose tenon has smooth sides, the wavy shape of the Beadlock tenons makes the joint very precise — but it also makes it somewhat unforgiving.
So again, accurate setup is key. There are also router bits available to make your own tenon stock. Is the Festool Domino faster? But the Beadlock is a decent budget alternative. Here are some supplies and tools we find essential in our everyday work around the shop. We may receive a commission from sales referred by our links; however, we have carefully selected these products for their usefulness and quality.
Are you ready to do this?! This time around I used my jointer. Either method works just fine. Lay out the pieces being joined and place the beadlock tenon stock where you want it. Make a mark on the inside edge of the beadlock, marking both pieces of lumber.
Loosen the knobs of the drill guide block, then slide the drill guide block all the way to the right. Tighten the knobs to secure it in place. Without changing the position of the drill guide block, secure the jig to the other piece of lumber.
Again, align the center mark of the lumber with the center mark on the jig, as well as the beadlock tenon mark with the white line on the jig. Tighten the knobs to secure into place. This time, drill into the three, far right holes of the drilling template:. Loosen the knobs of the drill guide block, then move it all the way to the left. Tighten the knobs to secure. Drill two holes into the two, far right spots. You can see here where I placed mine top two not shown, as my door was too large to fit on my assembly table.
Clamp it all together and let dry. I used wood filler to fill the cracks, dents and knots in the wood. Once dry, sand. I used my Milescraft Mortising Template affiliate link and router. To read more about the process of making hinge mortises, see this post.
This is pretty simple. I made pocket holes and joined the sides to the top with pocket hole screws. Be sure to make the hinge mortises on the door jamb before you join the sides together. For tips on this, see the method I used to paint the door. Let me know. Drill a hole for the door knob. Got any upcoming projects you think you might try with it?


|
How To Build A Toolbox In Minecraft 78 Do It Yourself Wood Dowels Line Long Drawer Slides Uk University Used Jet Lathe Parts Video |

PROBLEM
29.11.2020 at 20:47:49
kursant007
29.11.2020 at 23:32:23