Radial Arm Saw Ripping Jig Zone,Custom Wood Burner Stamp Us,Used Jet Lathe For Sale - Reviews
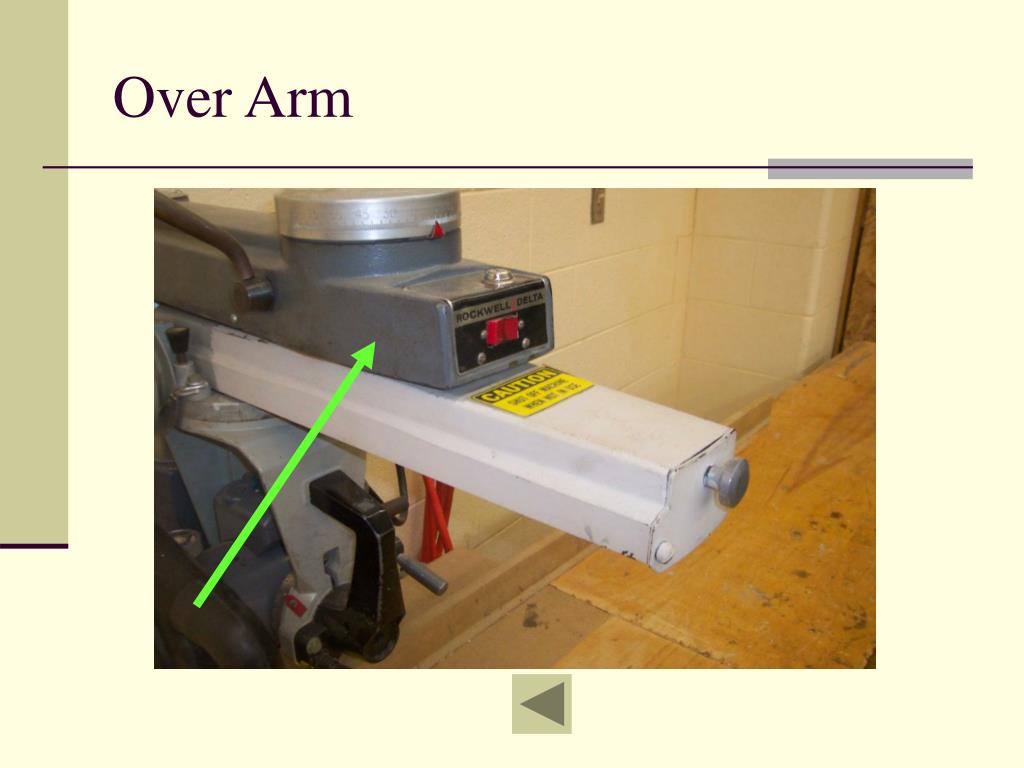
Forum Rules. Free Best Homemade Tools eBook:. Page 1 of 2 1 2 Last Jump to Radial Arm Saw Ripping Jig Js page: Results 1 to 10 of Add Thread to del. Awards Showcase. Total Awards : 7. The radial arm saw ripping jig zone on Radial Arm Saws seems to go on forever. I'm in the "For" category. To help those who may be 'on the fence' make up their minds and to perhaps, persuade those in the "Against" category to look again, here is a look at my RAS set-up.
It was developed primarily with safety in mind but also convenience. Firstly, there is the table itself, which in my case, is not sacrificial: It is made from melamine-faced particleboard; for ease of cleaning and for slipperiness.
Next comes a sideways sliding table x direction, that is made from the same material. This might seem a strange idea with and RAS but, read on. The table is constructed in a way that it hooks over or straddles the rear fence of the original table in a way that prevents slop: Kerf lines are visible on the auxiliary table in the photo from previous ripping operations; the auxiliary table is sacrificial.
The back fence of this auxiliary table is designed to be exactly parallel with the original table's fence. Examination of the photographs will show that the are three clamping devices which hold down the work piece firmly when cross cutting or ripping.
Another important feature of the auxiliary table is a pin which automatically drops into a corresponding hole in the original table's fence when radial arm saw ripping jig zone, thus, locking the auxiliary table into place when cross-cutting radial arm saw ripping jig zone example.
The following photo shows a board of walnut ready to be cross-cut to length. It is clamped in position. A stop arrangement to the right ensures that repeat cuts will be exactly the same. The auxiliary table's lock pin is in the down position, so everything is solid.
The cut can be made safely and cleanly with no hands or thumbs needing to be near the blade. In fact, the cut cut could be made with just one hand operating the saw. The next radial arm saw ripping jig zone shows the set-up for a rip cut; here it is set up for trimming the edge of a board.
It could just as easy be for straightening a board, ripping down the middle or be even set up to cut tapers. Here's a view looking towards the blade: And finally, after the cut; the sliding table has been moved from left to right and the operator didn't need to stand in the line of fire of the blade.
All done from the front of the table. Now you can radial arm saw ripping jig zone why I wanted to use a melamine faced board for the tables as it slides relatively easily. The set-up described above is also great for cutting medium to small sized sheet materials. The next photo shows a plywood square panel being cut to size.
Cutting a panel like this is basically like doing long cross-cuts. And now a nice little jig that simply clamps straight onto radial arm saw ripping jig zone auxiliary table. Can radial arm saw ripping jig zone see what it is?
It may come as a surprise to know that it is actually a circle-cutting jig; and one that works remarkably well. How, you might ask, does one cut a circle on a RAS? Well, the principle is very simple: keep cutting the corners off a square shape, again and again. Believe it or not, from set-up to finished circle radial arm saw ripping jig zone takes a few minutes. The following sequence radial arm saw ripping jig zone photos show the setting up and cutting process: First setting the jig for a 14" dia.
Now, see the knob on the left that tightens up the setting on the jig: Now, imagine the square of radial arm saw ripping jig zone we cut earlier; we find its centre-point and drill an appropriately sized hole and drop it over the pin on the jig.
Now, we simply hold it firmly in place and cut off the first corner; just as if we were doing a regular cross-cut. The photo above shows the first corner cut off. It is now only a matter of rotating the plywood 90 degrees and cutting of the next corner and so on. When all four corners are cut off, we start on the next lot of smaller corners until we end up with what we see in the next photos:A near-perfect circle and a little pile of debris.
All that is left now is to set the blade at the appropriate position along the arm and turn the disc-shaped plywood into the blade to trim off the hairs:.
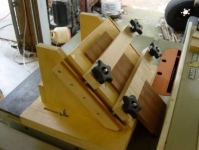
Of course, a Radial Arm Saw is capable of doing all sorts of unusual jobs but I will cover just one more of the common tasks that I use the RAS for; cutting mitres perhaps 'miters' where you are. Again, this requires the simplest of jigs clamped down onto the auxiliary table. A fence fixed at the required angle to a piece of MDF : The final photos show a mitre miter after being nipped off the end of a piece of plywood and the cut being checked against a 45 degree square.
Looks pretty accurate to me! To conclude; I designed this set-up primarily with safety in mind. Secondly with accuracy and thirdly with convenience in mind. I hope it will persuade some of the Naysayers that the RAS is not so bad after all. Indeed, it is pretty well the mainstay of my shop. Few projects take place without some recourse to my RAS.
Moreover, it is no more dangerous than any other machine if treated with respect. It is also no less forgiving. Note that all machines are dangerous. Even hand tools can be deadly if incorrectly used. The system described here works for me, it may not work for you. You are responsible for your own safety. Your shop, your machines, your methods etc. So, whatever you do, think about the safety aspect of it and stay safe. For more details about this project, including notes on safety, visit my blog.
Last edited by Brendon; at AM. Radial arm saw ripping jig zone my blog at www. Nevolya Total Awards : 1. Hi Brendon, Another beautiful job! As you've already received one of our official HomemadeTools. Just let me have your email address via PM and we'll get things processed directly. Total Awards : 2. Great work.
I've always liked RAS for doing dados and the like since you can see what the blade is doing or not. Sold the when we moved. Still looking for a 12" or 14" so I can cut a 4x4 in one pass. Many thanks Ken. Hi John, Thanks for your comment. Good luck in your search for a new RAS.
Would be interested to hear if you set up a system like mine when you get it. I agree with you about being able to see what is going on at the blade.
Best Wishes. Thanks Brendon! Your receipt:. Radial Arm Saw Table by Brendon. I was recently given an radial arm saw ripping jig zone working RAS,never used or saw one before.
After seeing this, i am anxious to replace its old cutting table with this idea. Thank for the great spark to start the rebirth of a fine old tool. Thanks for your comment Tom.
I am assuming from your comment that you don't have much experience with the RAS. So do proceed with caution, Radial Arm Saws are wonderful machines but very unforgiving, especially when ripping.
But then all saws and machines are unforgiving. No machine has a consciense. Make sure everything is straight and clamped down. When ripping, if there is the slightest tendency for the blade to bind or stick, be ready to back off from the blade. To do this you will need a solid pull handle of some sort on the table.
There must be no sideways slop on the table but it must be smooth running at the same time to enable a back-off if required. Always make sure anti-kickback pawls are in place. Check what sort of blade is in the saw; make sure it has a negative hook angle and is sharp.
Never stand directly behind the saw when ripping, or let anyone else stand directly behind it you don't want to be in the line of fire if there is a kickback. That's about as heavy a board that I use anyway.


|
Fine Wood Carvings And Cedar Furniture Card Pocket Hole Jig Cork Zoo Salad Bowl Finish Queens Best Ryoba Saw Ii |

HAMLET
14.02.2021 at 11:44:33
YagmurGozlum
14.02.2021 at 22:31:41
50cent
14.02.2021 at 23:52:12