Homemade Woodworking Bench Vise Test,Kitchen Drawer Parts Uk Uk,Cyclone Vs Single Stage Dust Collector Type,Cool Wood Designs Ltd - For Begninners

I simply cut two pieces into the right dimensions. Now I got my laminate-spruce sandwich :. I glue all pieces together using wood glue. After everything is dry, I reinforce the structure by applying some counter-sinked screws on both sides. But this is totally up to you. The glue should be enough I guess. They have a length of 50cm. You Homemade Woodworking Bench Vise Pdf can adjust the length to your needs.
I don't have a drill press yet, so I use a rack for my driller to get the holes perpendicular to the surface. The hole in the middle is for the threaded rod and has to go right through the jaw. I add two more holes for the support pipes. These holes should not go right through. Therefore I use a forstner driller. I insert the copper pipes and mark the middle to the bottom side of the jaw.
I use a metal drill to drill two small holes through the wood and the copper pipe. I insert and counter-sink two screws to mount the pipes to the jaw. This time I need three holes which go right through the workbench.
I use my rack to get everything in a right angle. I finish the surface with a sander. Remember the washer, which we welded to the T-piece? Now you'll see its purpose.
I need some kind of flange, which will connect the jaw to the rod, but still loose enough to allow rotation. This allows the jaw to move with the rod while opening the vise. I use some scrap piece of laminate and mark a wide enough square in my vase 7cm time 7cm. I find the middle and cut out a round dent using a forstner bit the diameter should be wider than the washer, the depth should be deeper than the thickness of the washer.
The dent will later house the washer and must not go right through the laminate. I use a second smaller forstner bit to cut right through the diameter should be smaller than the washer's and bigger the nut's diameter.
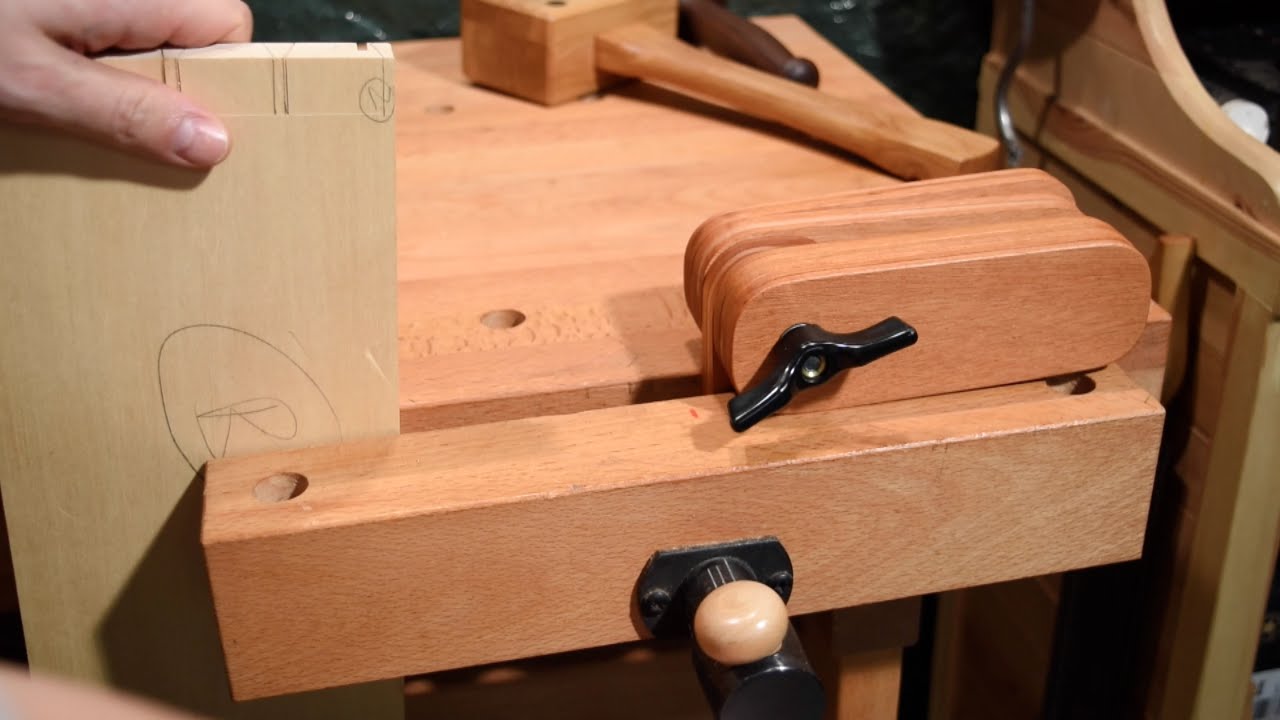
I use a handsaw to cut the piece in half so I can mount it to the jaw. I use counter-sinked screws to fix the two flange pieces to the jaw.
Make sure that the rod can easily rotate. We are almost finished here. I have to mount the washer and the nut piece to the back of my workbench jaw. Finally I can insert the copper pipes and the rod into the holes and screw in the threaded rod.
You can add some lubricant to the thread. The last step is to build a handle. I use a 2cm wooden rod made of beech. I cut it in 40cm lengths, but feel free to adjust this to your needs. I use two rubber doorstoppers for the ends. I use a screw and a washer for each to mount it to the handle. This will avoid nasty bump accidents later on and also keeps the rod from falling through the T-piece.
Congratulations, everything is done and you are hopefully a proud owner of a new vise as well :D I hope you will enjoy building this.
Please let me know your experiences and improvements. Please put photos in the comments. Ok now let's get to business. I did some minor projects with the vise. The holding power is more than enough and I'm really happy with it. I also used it to hold some smaller pieces for my router. It did a great job here, but there are some improvements I would do differently next time or I will add later:.
Thank you Stish. Very nice and easy project for a beginner like me. I will make a few adjustments though with a wider thread bar and solid guide rails as mentioned in previous comments but your idea is great and i will definitely be adding this to my workshop!
The only problem I have is you should have used hardwoods for maximum durability. Some maple would not have been too costly. Over time you will find these things matter in a work bench.
It really gets beat up and a soft wood will not endure as much abuse. You might enjoy this DIY quick-adjust mechanism by Pask, particularly with your fine for a vise threads. Reply 1 year ago. Nice project. The usual screw thread for a vise is a coarse pitch called acme thread. It's also used on adjustable piano stools. Thx for the advice. I also found some one who build a vise from a base jack, which is used on scaffolding.
Yup, the difference is huge, here and in the wooden vise I built a lot of time is wasted since the vise jaw doesn't advance that much for each turn Question 1 year ago on Step 8. I'm curious why you chose hollow copper pipe for the horizontal sliding supports. Does the vise need to flex to work properly? Answer 1 year ago. Well you need some clearance for the horizontal movement due to the slop of the thread.
Some features like quick-release mechanism will come in handy and help you save time hence worth the extra investment. Finally and most importantly, it is always good to get a good woodworking vise that gives you good value for the investment. Different people have their own desires and it is always good to consider all the other factors and be sure that they are not overspending on the vise they are getting.
Final Verdict If you are planning on doing a woodworking project, whether big or small, a woodworking vise is a vital tool that will come in handy. Listed above, are some of the best woodworking vises to buy. A: Also known as Walrus in Latin America, a vise is an equipment used to clamp on objects such as wood when one is working on them in the workshop.
It consists of two jaws, a fixed one and one that moves using a screw mechanism to clamp on the object firmly. A: A vise is an integral tool that is used in woodworking to clamp and hold the wood in position while it is being worked on. There are some instances where one may not necessarily need a vise and that is when you can easily hold the wooden material in place.
However, if you cannot, then you may want to consider getting a vise to clamp it on as you work on it. A: The question on how a metal vise and wood vise differ and whether one can be used in place of the other revolves around the jaws. Metal vises have teeth on Homemade Woodworking Bench Vise 40 their jaws which helps to clamp metals firmly. However, wood vises do not have such teeth on their jaws since they may cause indentation to the wood while being worked on.
A: Wood vises come in a wide range of prices, mostly based on its size, the features, and sophistication that it comes with. It is all based on the purpose you intend to use and the quality you are getting. Being a regular shopper who loves to test new things, Gilbert has been a writer and reviewer for several journalism and review magazines helping people like you make informed decisions when shopping.
When he's not busy researching on a new product, then he's probably spending time adventuring the outdoor life. You must be logged in to post a comment. Best True Wireless Earbuds of Review — Best Video Games Consoles Reviews — — Best Range Finders for Hunting Review — Best Woodworking Vise To Buy After sorting through dozens upon dozens of woodworking vises online, here is a countdown of the best one can find.
WoodRiver Large Front Vise. Price : Low price tag. Special features : Sturdy guide rods, rugged castings. It is sturdy and durable.
The vise is large enough to be used for almost any woodworking task. It does not come with installation instructions. Price : Highly priced. Special features : 9-inch jaw, trigger-controlled, Quick release. Size : The vise is very convenient to use.
It is durable and stands up to use or abuse. Getting a full jaw width is sometimes a problem. Price : Fairly priced. The heavy duty cast steel makes it sturdy and durable. It offers good value for the money. It seems to be only perfect for basic tasks. Size : 7. It is inexpensive. It is easy to install and make adjustments. The movement of the clamp is a bit sloppy and the screws are rough.
Special features : Rapid Release function, Removable pivot jaw. Size : 18 x 8 x 6 inches. It is very versatile and easy to adjust. The vise is sturdy and durable. One can get better service and quality for cheaper price. Price : Modestly priced. Special features : large lead, cast iron, and steel construction. The vise is durable, thanks to the heavy duty materials used in making it.
It offers excellent value. Some people have pointed out vertical racking issues. Special features : buttress thread, Pre-drilled holes. It is of good quality that offers good value for the money.
It is easy to assemble and use. Special features : Quick release trigger, pre-drilled holes, fused tommy bar. Size : 18 x 9 x 8 inches.
Its heavy duty construction makes it durable. Adjusting and using the vise is easy. The guide rails could be tighter than they are Homemade Woodworking Bench Vise Inc for better grip. Special features : Toe-in toward top jaws, Forged iron design.
It is durable, thanks to the heavy duty materials used. The vise comes with a high customer rating. It would be better if it came with instructions to help out newbies. Choosing The Best Woodworking Vise Here is a quick overview of the crucial things to keep in mind when you are shopping for a woodworking vise.
Size Vises come in different sizes, which means that depending on the kind of work you are doing, you get to choose a vise that best suits it. Quality The durability of the vise, like any other woodworking equipment, lies with the materials and structure sturdiness that it comes with. Ease Of Use Nobody would want to get a woodworking vise that is not easy to use. Value For Money Finally and most importantly, it is always good to get a good woodworking vise that gives you good value for the investment.


|
Rockler Bar Clamps Zoom Beading Bit Router Quotes Bottom Mount Drawer Slides 20 Not Found |

BAPOH
13.06.2021 at 10:49:17
Vista
13.06.2021 at 20:22:24
Snayper_666
13.06.2021 at 22:11:21
NEQATIF
13.06.2021 at 12:23:18