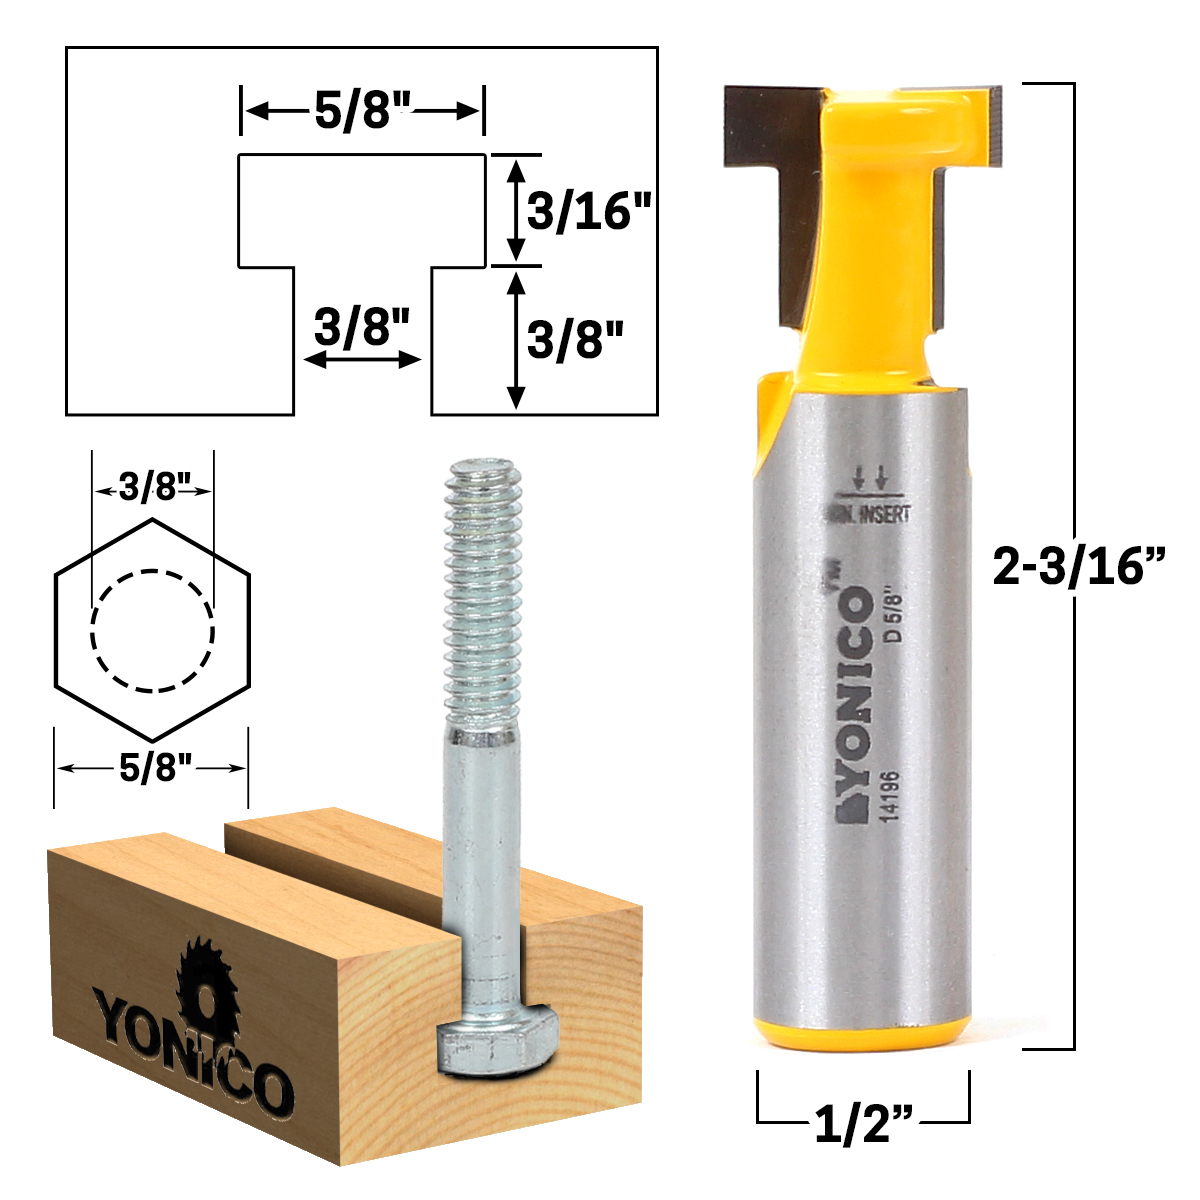
Groove Router Jig Windows 10,Things To Make Out Of Wood Slices,Marking Knife How To Use Zoom - Step 3
Take your time with the fit on this. It ultimately decides how accurate your router jig is. I did this on my table saw sled. Glue the runner to the base piece using some simple wood glue. In fact, I exaggerated it being off to show how the squaring step works later. However, you do want to make sure the runner is straight and true.
It is a rather thin piece and can flex or bow. Place a straight edge alongside it to ensure it is nice and straight. Press it down firmly, making sure to get good contact and to keep it from sliding around. Add some weights to it and let it dry.
Let the glue dry for 20 minutes or so. Cleaning the glue squeeze out is crucial if you want the jig to register in the slot properly, and later slide in the dados and grooves you create.
I used a piece of plywood that I knew to have two parallel edges as a guide. With this guide piece against the fence on one edge and it resting on the jig runner on the other I could pass it through the table saw.
Flipping the piece around and omitting the guide piece, I ran it through the table saw once again. Now both longer edges are parallel with the runner. This leaves you with a trapezoid shaped piece. Squaring up the ends is made easy on the table saw sled. I made sure to reference from the same edge of my router base each time. Even if you believe your router base to be completely centered around your bit, it is just good practice to get into. Referencing from the same surface each time cuts down your chance of error.
Now let me talk router bases for a minute. You can see in the picture that I have a black plastic base attached to my router with 4 screws. If these screws are even slightly loose, that black plastic plate has some wiggle room.
I made sure that the black plate was slid completely in the force direction I was going to be using the jig and tightened the screw securely. Again, trying to eliminate all room for error. Taking the jig back to the table saw I ripped the jig down to size leaving it ever so slightly oversized. Each router is different so you will need to measure your exact router.
Sneaking up on the cut like this will hopefully keep you from making it too small. If your table saw fence is not that accurate, you can always sand away the material to get you where you need. Use a straightedge to establish your first dado.
Once the first dado is made, insert your newly created jig into the dado and use your router to make the second cut. At this point the router moves along the stationary jig.
Continue until you reach the desired number of equally spaced dados. Then there is a "sliding" fence on the left hand side that can lock in place to clamp the work piece horizontally and a clamp to hold the work piece down vertically.
The base is 10"x 12", the stationary fence is 3" x 10" and the sliding fence is 2"x10". A good sled will also have two handles allowing the operator to safely move the sled and a "guide", usually made of clear plastic that provides a straight edge to reference against the router table fence. The guide ensures that the work piece maintains the correct distance from the bit while making the coping cut. We need two tee nuts for the guide standoffs, two for the handles and two for the stationary fence.
Next we drill through holes in the counterbores to Half Lap Joint Router Jig Review allow the tee nuts to be accessed from the top side. I press the tee nuts into the counterbores using a clamp. Just a few turns of the clamp easily presses them into place. The base of the sled is now complete and we can begin assembly. Before I move on, one note I did have to counterbore the spot where the handles go because the threaded stem of the handle wouldn't reach the tee nut.
Before you fully tighten the fence down ensure that the fence is squared to the sled. Add a washer here if you want I didn't but it can make things slide better sometimes. Add a washer to this side. Next add the 2" hex standoffs. These little guys have a threaded "male" side and a threaded "female side". Male side goes down to connect to the tee nut. First I need to cut it in half lengthwise to make a 3"x 12" piece. This is easily done at the table saw.
I then peel off the protective film and chamfer the very sharp edges of the polycarbonate. This will prevent annoying cuts to the knuckles down the road. I then installed the guide on top of the standoffs using hex drive cap screws. To successfully tighten everything down without cracking the polycarbonate, you should leave the cap screws loose and tighten the standoffs all the way, then go back with a hex wrench and tighten the cap screws snugly in place. I need to add the toggle clamp to the stationary fence.
This will allow me to clamp down on the work piece to keep it from moving as I make the cope cut. You can see here how it will secure the work piece and can be adjusted for thicker material if needed, just adjust the clamping bolt. That's it!
The plywood sled is complete. If you need more, just make the base wider! Easy peasy. You can see here the coping sled in action. The woodworker holds the guide against the fence and from right to left smoothly guides the work piece across the router bit. A small scrap of wood can also be used to "back up" the cut between the work piece and the stationary fence.
This helps eliminate blowout that can occur as the router bit exits the cut. This is what my cope cut looks like. You have two parts, the "tongue" that will mate with the groove on the stile and the "cope" that will fit the contour of the inner edge of the stile.
Here's the view from the back of the work piece where you can see these two elements more clearly. What if you don't have the plywood scraps to make this jig? You probably wont want to buy an entire sheet just to make one small jig. Never fear, there's a better and cheaper way! You can use aluminum extrusions to form the base and the two fences. Note that I purchased these from a company called Misumi links above and the great part is they have tracks built right into them for fastening all the hardware!
You will need a series of brads or pinheads to connect the pieces in a secure fashion. If you are looking for a more temporary way to add and remove structures to your router jig, you can use drywall screws that can easily be removed as needed.
Your supply list also needs to include a range of clamps that will hold your router jig to your workbench as you cut. These Groove Router Jig Gui clamps come in a variety of shapes and sizes. Choose the ones that will easily hold your router jig in place as you work. Now, it is time to begin creating the guide rail of your router jig. You will use this to guide you as you make your router cuts. You should have at least 6 inches of overlap.
This will create your guide rail and will help you as you build the router jig. To stabilize your guide rail and keep it off the ground as you work, you can add a scrap piece of wood. All the wood pieces of your guide rail should be screwed together where they connect to make a durable guide that you can move around and use as needed.
This will help you start Router Table Box Joint Jig Plans Me your template and line up your guide rail to your plywood piece to create your jig. Use your guide rail to support the router as you cut the groove shape you need into your plywood panel.


|
Router Jig Round Hole Error Makita Xrj01z Kit |

Tonny_Brillianto
29.08.2020 at 13:14:35
oO
29.08.2020 at 14:59:16
0f
29.08.2020 at 23:21:58
FARIDE
29.08.2020 at 21:18:53