Drill Press Table For Woodworking Jacket,Drill Master Pocket Hole Jig Manual Twitter,Cnc Wood Carving Machine Designs Journal - Review
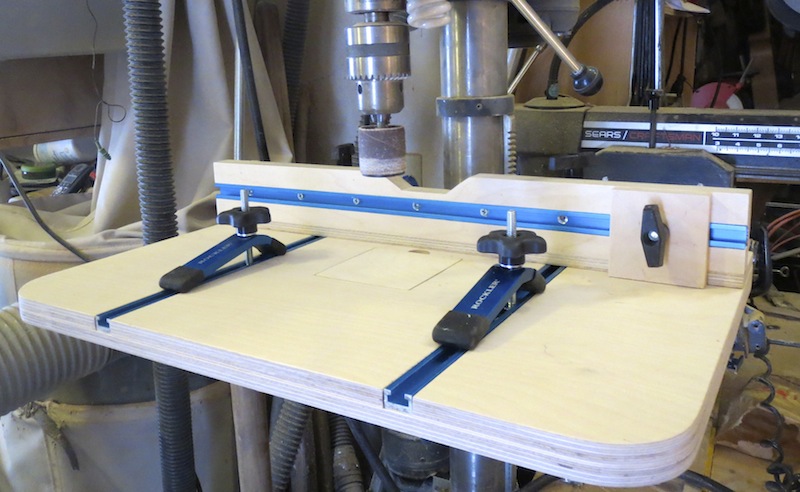
Stationary drill presses are definitely not set up for DIY woodworking. The hold-downs are great for holding items still for delicate or precise hole drilling. The most expensive items are the T-track and the hold-downs. Follow the step-by-step drill press table plans for details to build your own. Figure A — Here is the construction of the drill press table. The base and fence are made from two layers of Baltic Birch plywood for rigidity.
Tablf will enable you to trim the piece to final dimensions after gluing. Mark the center and then mark the cutout for the replaceable drilling square. Check your drill press for the dimensions from the column of the drill press to the center of the chuck. If tabble plywood has a slight warp, check out the text below for how to deal with it.
Spread glue over the lower plywood layer of the drill press table. I used an old membership card cut with a pinking shears to help spread the glue evenly.
Pin the halves together with a ga. The pins will keep the plywood panels from drifting while you pile jackt weights. Place straight cauls onto the upper and lower plywood layers so pressure can be placed evenly across the entire surface.
You can see Drill press table for woodworking jacket stacked it pretty high to get enough weight onto drilp cauls. Use at least pounds of weight, and let it sit for at least three hours. Woodworkkng the glue from dril, before it gets hard. Check the glue frequently for it to be the right consistency for scraping.
With your table saw unplugged set your dado blade to the height of the T-track. Move the workpiece through slowly and steadily and let the dado blade do the work.
Make this cut from both ends, following the lay out in Figure B. Clamp the fence halves to the top of your table saw in order to keep them perfectly flat.
Cut the lower fence base to size and then cut the semicircle in the rear. The 2-in. Trim the upper fence to size and then plough a dado for the T-track. Next, glue and clamp the upper fence to the lower fence.
Glue wooodworking pin them in place. Set the assembly aside to dry. After the glue is dry use a hand saw to trim the overhanging points off the fence supports. Mark the holes for the mounting screws into the T-track. The holes should be located every three inches along the T-track. Start in the center of each length and work your way along to each end. See Figure C for details. You can cut these to length by threading drill press table for woodworking jacket a nut, clamping them drill press table for woodworking jacket a vise and then cut to length with a hacksaw.
Simply back the nut over the cut end to restore the threads. Use lag screws or drill press table for woodworking jacket bolts to mount the fixture to your drill press. As a woodworker, why would I? Click here to cancel reply. Nice, simple plans. Take your woodwoking. You can use a hack saw for this, or as long as you use aluminum track, you could cut this on a miter saw as well.
Be careful if you have a SawStop — I read somewhere that metal may cause the mechanism to engage and ruin the blade and the cartridge. Drill press table for woodworking jacket sure if that is true, but I never wanted to test it….
Well, if the saw blade on a SawStop encounters conductivity above a certain amount, it triggers the trip. However, there is a simple override with a key when cutting wet wood treated for example or other conductive material. In the picture it looks like you screwed the track on the fence but not on on the table surface. Is that correct? Also on the fence, did you use a cut downed closet flange bolt? The T-track is screwed to the fence and the other two pieces of T-track are screwed to the table surface.
I did use closet flange bolts from the local hardware store as part of the hold-downs for the woodworming. They work nicely. One more question. What is the purpose of the notch on the top of the fence?
The purpose of the notch is two fold. It lets my built-in light on drill press table for woodworking jacket drill press illuminate the work area a bit better.
It also helps if I need to drill a hole really close to the fence. In that situation, the chuck can hit the fence, not allowing the bit to lower into the work piece. With the cut-out at the top of the fence, I can get the chuck a bit lower. Sometimes I even need to elevate the work piece with a scrap board to keep the chuck from hitting the fence in those tahle situations.
I picked up my hose at an auto parts store. The idea is just to center the bolt inside the pvc so the nut tightens equally on txble rim of the pvc. Hi, thanks for posting this. Did you have to modify your drill press lowering lever to make this fit? Or am I missing something??
It could be that the feed levers on the drill press are longer than most. I do know that most feed levers unscrew from the hub mechanism and that you could shorten them but cutting them back. The Woodworking Plans For Patio Table other alternative is to trade your press in on another model that would work now that you can see what tolerances are needed between the drill press table and the levers. I have the same problem. When I attach this beautiful!
As I look at pictures of drill presses I see very few which do not have the crank behind and level with the deck. If you move the table far enough forward for the crank to work the fence is right under the drill bit. I have the perfect solution.
Build a tool storage section under the bottom center section of the table that will raise the table high enough to clear the handle. I had a similar problem but the solution turned out to be rather simple.
The essentially acted as a giant washer and gave me the additional clearance needed. You might try to loosen the table elevation clamp and swing the table out of the way. Adjust the drill bit and swing the table back. On most Craftsman drill presses, the elevation handle tend to interfere with the table. One other solution is to modify the table and Mortise And Tenon Jig For Drill Press Test fence to allow a notch on the right hand side to drill press table for woodworking jacket the handle to operate.
Good luck. Thank you peess commenting. Another reader sent this in via email. We will pass this information along! Hi guys, thanks for the response! Maybe your way would work too? Thanks everyone. I want to make this table and want to be able to fix the problem as I have the same drill press. Rockler, no doubt has great products, along with high prices.
I have enjoyed the video and made modifications to it. When you have to save up to buy screws to hold pieces drill press Clamping Table For Woodworking Not Working table for woodworking jacket wood together, you have to consider every way to save money. God Bless you all and be careful, Best Table Saw For Woodworking Model I just cut my wrist on a jig saw. There is not a separate PDF, as everything that you should need for this project is embedded directly into the article itself.
Let us know if there is information missing that you need for this build. The cast iron table on my drill press has only one hole in it. Would I need to drill more? If so, how would I go about doing twble Can you tell I am a new drill press owner? The metal table that comes with most drill presses has several slots or holes to fasten drill press table for woodworking jacket wood platform to it using bolts, nuts and washers.


|
Build Your Own Double Bed Frame 66 Raised Panel Bits For Router Nano |

maulder
29.07.2020 at 14:33:34
K_r_a_L
29.07.2020 at 23:35:37