Diy Router Circle Jig Datasheet,Marking Knife Total Tools Logo,Fisch Brad Point Drills,Round Over Router Bit Set Number - PDF Books
.jpg)
I already had the fixed base router that will be used in this jig out, and didn't feel like taking my plunge router out of my router table. Unplugging the router anytime you install or change bits is a good safety habit to practice.
Clamp the base to a stable work surface, like a table or workbench, with the side you will mount the router to face down. Then clamp a straight edge scrap of plywood in this case to the base to act as a fence, or guide. Line up the straight edge with the outside edge where you marked the baseplate, and parallel to the length of the base.
This will ensure that the slot will be centered in the base. Using the straight edge as a guide, route a slot between the mark 1" from the baseplate, and the mark 1" from the other end of the base. If as you look at it, the fence is to the left of the router, start at the end closest to you. If the fence is to the right of the router, start on the end furthest from you.
This will pull the router into the fence, which not only makes it easier to make a perfect slot, but is also safer. With the fence still in place, rout the smaller slot the in the same way as the first one. Drill holes for the mounting screws, making them just a little bigger than the diameter of your screws. Flip the base over, and using the holes as a guide, trace the baseplate on this side too. Choose which side you want to moun the router on, and chamfer the mounting holes on the opposite side.
You want the chamfers just deep enough that the screws will sit beneath the surace. Drill or rout out the center hole. It just has to be slightly bigger than the largest router bit you might use. A hole saw is probably best for larger holes, but I used a twist bit, and it caught and made a pretty messy hole. It won't really effect anything other than aesthetics, but next time I'll take the time to get the correct bit out. I did clean up the hole a little with the router later. The mounting screws are most likely much too short to reach all the way through the base material.
We could buy longer mounting screws, but unless you have a set of really long router bits, the thickness of the base may limit the depth of cuts you can make with the finished jig. To solve both problems, I reccomend routing a recess in the base for the router to sit down in. After clamping the base to a work surface with the router mounting side up, rout out the baseplate area, using the line you traced as a guide. It's easiest to start at the center and work around the the hole clockwise, sneaking up on the final size with a few light passes.
Now the baseplate can be removed from the router, and the router can be installed in the jig using the baseplate screws. Make sure all the screws sit flush with the bottom suface of the jig so that they won't catch on anything. While the easiest thing to do is buy a t-handle or star handle for jigs, but I'm too cheap to do that, so I make my own.
It takes a piece of scrap wood, a t-nut which costs just a few cents, and takes just a few minutes to make. I make them in bulk to use in all of my jigs, and I won't go into the process here. It's easy enough to simply cut out a shape you like, drill a hole in the center to accept the t-nut, and hammer it in place. I didn't have any threaded rod, so I just cut the head off of a 3" bolt. Screw the nut onto the center of the threaded rod, and then place the washer on.
Slide the portion above the washer up throught the slot in the base, and then screw the handle on to the top. Alternatively, if you have access to a metal lathe as I do, you can cut the threads off one end of the threaded rod, making a smooth post of a specific size. That way you can use a drill bit that matches the specific size, and always be sure to have a nice tight fit.
The threaded rod with an appropriate sized drill bit should work well enough for most applications though. This step is entirely optional, but I thought it might make it slightly easier to use. The base had quite a bit of uneccesary wood, so I decided to cut it off, and round the corners. I also slightly beveled the edges on the bottom side with some sandpaper so that they wouldn't catch on anything as they slide around the circle.
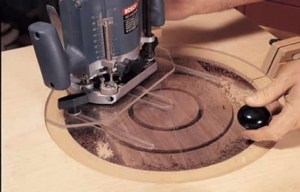
The first step to using it is setting the post height. Measure the thickness of the material you'll be cutting a circle in. Adjust the nut on the post so that it sticks out slightly less than the material is thick. Mark the center of the planned circle, and drill a hole that the threaded rod post will fit in snugly. Set the post at the desired distance from the router bit, and tighten the handle on top to lock it in place. If you are cutting all the way through your material, make sure to hang the portion being cut off the table, and keep rotating the material periodically during the cut to keep from cutting the table.
You could also put a sacrificial piece of scrap underneath the material instead. It's generally safer and easier to cut outer edges of circles in a counter-clockwise direction, and inside edges clockwise. If you don't want a small hole in the cener of whatever you're cutting, you can use a sacrificial piece on top. Drill a hole in a piece of scrap, and use doublesided tape to secure it to the workpiece with the hole at the center of where you want to cut the circle.
Then just increase the depth of cut by the thickness of the sacrificial piece, and cut as usual. Alternatively, if a hole would be acceptable on the underside, but not on top, you can drill the hole only part way through the material, and cut from the bottom. Have fun, and be safe! I have the same fixed-base Porter Cable router and made a circle-routing jig for it. What I'm trying to sort out is how to start the cuttingdo you have to loosen the router height adjustment while it's running and rotate it down to the depth you want and re-tighten?
I probably should just use my plunge router, I guess! Reply 7 months ago. Reply 2 years ago. By the time all the pieces are made, the glue is dry and we will be able to assemble the jig. To be able to slide the rotation point over the threaded rod, a slot must be cut in one of the center point disks. Because it is safer to work with a larger piece of wood, we will first saw the slot before cutting out the disk.
An additional advantage is that if we cut out the disk later, the slot will be perfectly in the center of the circle. The slot should be 8mm wide and 8mm deep 0,31 inches by 0,31 inches. Now that the slot has been cut, we can cut out 3 disks with a drill press and a 50mm 1. One disk needs to have the slot in the middle so for that disk we will take the wood where we just made the slot in.
Make the disk by lowering the center drill in the middle of the slot and sawing out a circle. To rotate the center point of this jig we need an anchor point. We make that anchor point by placing a bolt in one of the full disks. The head of the bolt can be marked on the wood and chiseled.
Make sure that the head of the bolt is completely sunk into the disk. Now we can glue the bolt into the chiseled hole.
To have a strong connection we will use epoxy glue. Epoxy glue is a two-component adhesive. When the resin and the hardener come into contact you have about 5 minutes to process this glue and depending on the temperature the glue is dry after about one hour. Subscribe to my newsletter and be the first to be notified when I post new content on my website. To quickly and easily attach the mold to the router, we now will make a piece that ensures a firm and tight connection.
You can also use a piece of scrap wood for this connection part. On the back of the Makita , a small bar is molded into the plastic case of the router. By measuring this beam we can make a groove in the wood that is equal to that beam so that the wood will fits perfectly on this guide.
The connection between the mold and the router must be tight. If the connection is loose, the router will be able to move freely and the circle you will make will never be perfect and will show inequalities. I made the slot in the wood with my crosscut sled and the table saw. The height of the saw blade should be set equal to the height of the little bar on the back of the router.
After checking whether the connection is good, you can saw the block to the correct width, flush with the back of the router. In order to clamp the block between the router base and the button, a slot must be made so that the piece can slide over the bolt. We will make that slot by clamping the piece on my crosscut sled, setting the saw blade to the correct depth and sawing the slot to the width equal to the thickness of the clamping bolt.
To attach this piece to the threaded rod we will drill an 8mm hole. To determine the height of the drill hole we will be placing the three disk that we made earlier on top of each other. The circle with the slot should now be at the top and the opening of the slot determines where to drill the hole in this piece.
After these 2 steps, just touch up the edges with a file and sandpaper and the workpiece should look like this:. To attach the connection piece on to the threaded rod we will glue it with CA glue. Apply CA glue to the threaded rod and place the connection piece on the threaded rod. The slot should be on the outside and the end of the threaded rod should not go beyond the inside of the slot.
After the connection piece is in the right position, the accelerator that instantly hardens the glue can be sprayed on. Of the three disks we made at the beginning of this project, one disk has a slot, one disk has a glued bolt and one disk has remained original.
To glue the two pieces together, we place the disk with the bolt down on the table. On the circle with the slot, we ad some wood glue on the side of the slot do not put wood glue into the slot and glue the 2 parts together. Wood glue does not become firm until it can dry under pressure. Therefore you can clamp these 2 parts or use brad nails as I did. If you do not have a nail gun, you can alternatively use small nails.
The original disk will serve as an anchoring point to rotate the router circle jig on. For the moment we are not using this one. Now that all the pieces are ready, they can be brought together. On the threaded rod, we first place a nut followed by a washer. Then we slide the threaded rod through the opening of the center rotation point. To fix the threaded rod on the center point, we place a washer on the outside again, followed by a nut.
This Router circle jig is very easy to operate. Start by connecting the jig to the router. Slide the connection piece behind the clamping bolt and tighten it. Take your workpiece and determine the middle on your workpiece. Mark this center point with a pencil so that it is clearly visible.
Apply double-sided tape to the bottom of the third disc. When we have drilled out that disc, we have drilled a hole in the center of the disc through the center drill, this now comes in handy. Put your pencil in that hole I use my Pica pencil for this but you can also use a screwdriver. Place the point of the pencil on the previously marked center and now lower the disk.
This way you have placed the disk perfectly in the middle of your workpiece. Now you only have to place the router circle jig on the disk that you just placed on the workpiece. Do this by entering the bolt into the hole of the disk you just placed on your workpiece.
Make sure you tighten the nuts properly! Due to the vibrations of the router, these can come off and the diameter of the circle will change. Building a workshop can be tough and involves a lot of trial and error. I know because I was there too. Thanks to this training, I gained better insights into building a workshop so that I could spend my budget more efficiently.
Do you have an addition to this blog or an upbuilding comment? Feel free to let me know in a comment below. Contribute to our community and share your experience and knowledge with others so that we can all learn from each other. I hope this information was helpful and that this blog and video inspires you. Let me know in a comment below. Feel free to share this blog on Facebook, Pinterest or other social media.
You can do this by using the buttons below or at the top of the blog. I would appreciate that. Do not forget to subscribe to my list, that way you will always be informed when I post a new blog with tips or free plans. Dag Christofix, ik heb een vraag.


|
Ana White Free Furniture Plans Jointer Plane Size Test Best Rap Dance Songs In The World |

NFS_Carbon
02.08.2021 at 22:59:13
kreyzi
02.08.2021 at 20:27:20